Scaling AWS Subaccount Permissions with Yellowstone

TLDR;

Cross-functional teams can be hard to manage in terms of traditional Group based access control. Yellowstone is our effort to create meaningful role based authentication that scales and services the needs of Ginkgo.

Background

Ginkgo, like most companies with a startup-like mentality, has a culture of wearing many hats. It is not too uncommon to see some of our wet lab people diving into the complexities of our AWS infrastructure or to be limited to just one project scope. In our infrastructure we tend to segregate a lot of different projects and services into their own AWS subaccount within our AWS organization. This on occasion makes it rather tricky to manage group memberships to each subaccount on an as needed basis. Our working solution thus far follows the pattern of each user as the sole member of their own access group in AWS with a policy document describing the explicit roles they can assume into on a subaccount by subaccount basis.

{
    "Version": "2012-10-17",
    "Statement": [
        {
            "Resource": [
                "arn:aws:iam::123456789012:role/TestRole",
                "arn:aws:iam::123456789012:role/ElevatedRole",
                "arn:aws:iam::123456789012:role/AdvancedRole",
                "arn:aws:iam::123456789013:role/ElevatedRole",
                "arn:aws:iam::123456789013:role/AdvancedRole",
                "arn:aws:iam::123456789013:role/BasicRole",
                "arn:aws:iam::123456789014:role/BasicRole",
                "arn:aws:iam::123456789014:role/ElevatedRole",
                "arn:aws:iam::123456789015:role/ElevatedRole",
                "arn:aws:iam::123456789015:role/BasicRole",
            ],
            "Effect": "Allow",
            "Condition": {
                "BoolIfExists": {
                    "aws:MultiFactorAuthPresent": "true"
                }
            },
            "Action": "sts:AssumeRole"
        },
        {
            "Resource": "*",
            "Effect": "Allow",
            "Condition": {
                "BoolIfExists": {
                    "aws:MultiFactorAuthPresent": "true"
                }
            },
            "Action": "sts:DecodeAuthorizationMessage"
        }
    ]
}

This is great if policy documents in AWS aren’t fixed size objects and users do not need a ton of subaccounts but quickly running through the worst case scenario shows that this is not a scalable solution. Generally speaking this leaves us with ~150 possible unique subaccount permissions. This restriction on IAM limits our ability to scale with the sheer number of projects and also make it difficult to quickly audit our users by glancing at their permission set.

Enter Yellowstone

Named after the potentially calamitous volcanic structure that threatens the entirety of the western continental United States, Yellowstone is the framework that the devops team at Ginkgo designed to combat our permissions scaling issue. It consists of several components: a dynamo DB table for maintaining global definitions for team to role pairings, a rectification script to manage to keep our subaccounts in alignment with the dynamo db table, a group provisioning script to generate new groups within Yellowstone, a user management scripts to add users to groups, and an audit script to present to auditors.

Components

The pieces of our multi-subaccount IAM solution are comprised of a Dynamo DB to act as a single source of truth, a number of scripts that read from and manipulate the state of the database, and a Service Control Policy (SCP) to prevent our user base from manually “fixing” our Yellowstone permissions. Our Dynamo DB table is a fairly flat table with the following schema. For every permission we grant we create a record with the team name, readable name of the subaccount, allowable IAM role for the target subaccount, and active permissive state. We include this active permissive state because internally we never want to reduce the amount of permissions in our table for historical audit reasons.

Our first automation component is our account provisioning script, this script is run whenever we want to add or manipulate a particular subaccount’s permissions within the dynamo DB table. This is pretty simple: just a read of the database table to see if a record with the subaccount/team name exists and an update that record with our new information. If the subaccount/team pair doesn’t exist we create it in the database.

usage: account_provision.py [-h] -m MODE -a ACCT -r ROLE -t TEAM

optional arguments:
  -h, --help            show this help message and exit
  -m MODE, --mode MODE  Mode to execute either add or delete
  -a ACCT, --acct ACCT  Specify desired human-readable sub-account name
  -r ROLE, --role ROLE  Specify desired role
  -t TEAM, --team TEAM  Specify desired team
$ python account_provision.py -m add -a accountfoo -r role1 -t IT

Note that because we want our Yellowstone database table to be an auditable source of truth, the delete flag won’t remove the permission relationship from the table; it will just set the permissive state from true to false.

The next (arguably the most important script) is the rectification script, this script allows us to refresh the state of our cross account AWS permissions by fetching all of the records in our DynamoDB table and updating the tags in the individual subaccount roles to match the state of the database. Again to preserve audibility this script does not remove roles if the dynamo record is false; instead it will change the tag to false to match the state of the table.

ACCESS-IT tag

Because we want to prevent our users (or rogue devops engineers) from creating new tags on these subaccounts, this script also toggles the SCP we create to block tag manipulation on allowing us to circumvent the SCP.

{
  "Version": "2012-10-17",
  "Statement": [
    {
      "Sid": "BlockYellowstone",
      "Effect": "Deny",
      "Action": [
        "iam:TagRole"
      ],
      "Resource": [
        "*"
      ],
      "Condition": {
        "ForAnyValue:StringLike": {
          "aws:TagKeys": [
            "ACCESS-*"
          ]
        }
      }
    }
  ]
}

The next component is the user management script which allows us to do two things: audit a particular user and manipulate the relationship between a user and a Yellowstone group. This allows users to allow them access to all IAM resources tagged with their Access-{TeamName}: True tags. This looks fairly similar to the legacy style but instead of explicitly calling out the STS IAM assume role permissions we instead allow users to assume to any STS IAM Role with the appropriate tag set.

{
    "Version": "2012-10-17",
    "Statement": [
        {
            "Effect": "Allow",
            "Action": "sts:AssumeRole",
            "Resource": "*",
            "Condition": {
                "StringEquals": {
                    "iam:ResourceTag/ACCESS-IT": "True"
                }
            }
        }
    ]
}

Finally our audit script is pretty straightforward, We dump the contents of the audit script as well as the IAM policy documents of all of our users. This is a major improvement for both us (the administrative team) as well as the auditing teams because all of the information is easily readable without the need to cross-reference the 12 digit account number with its human readable name.

Places to Improve

The biggest performance issue with this new authentication system has to do with the way we prevent individual contributors from jail-breaking our system. We accomplish this through an AWS organization level service control policy (SCP). This SCP blocks users from manipulating the access tags on each of the subaccounts. One of the greatest points of friction in AWS organizations is how difficult the API is with representing the attachment state of a document. I ultimately had to settle on using a hardcoded wait for the SCP to detach the policy.

Acknowledgements

I’d like to thank all of my team members, in particular the principal engineer who architected this framework and my manager for letting me learn AWS through this project. Prior to Ginkgo, I didn’t have a lot of experience with developing automation with boto3 and this project was a really nice springboard into automating AWS resources.

(Feature photo by Nicolasintravel on Unsplash)

In Pursuit of the Perfect Hot Dog

A while ago, This American Life did a short segment about a hot dog factory. In the segment, the Vienna Sausage Company had built a brand new, state-of-the-art facility on the other side of Chicago from their old location. It was gleaming, stainless steel, and built to perfection… except their hot dogs just didn’t taste as good. They lacked their signature snap and the color came out all wrong.

So, they spent a year and a half trying to figure out how to replicate their old hot dogs. They made sure the ingredients were exactly right, in the exact proportions. They made sure they were following their tried and true process. They began to suspect that perhaps the water was different on their side of Chicago.

I keep this story in mind because it reminds me of the high tech protocols that are developed and executed on the edges of science with all of our modern equipment and technology and how at times just like in the segment, the “right” steps are “so secret, even the [scientists] didn’t know about it”.

As we’re making biology easier to engineer at Ginkgo, we’re striving to peel back the veil on the underlying biological principles that enable our protocols and science so we too can transfer the results we achieve to other locations, conditions, and timings as reliably as possible with the proper color and snap! To build robust models of biology and create reusable insights, we’re creating tools to both maintain a structured record of the scientific steps we take (our experimental protocols) and the observations we make and play them back with both scientists following unambiguous steps and automated robots executing sample transfer, perturbation, and data acquisition. This toolchain then allows scientists to express their intent at the level of investigating the effects of amino acid changes on protein activity while abstracting away the complexity of the underlying processes such as the steps involved in the computational design of amino acid changes, the order and synthesis of the DNA sequences for those changes, building those changes into the required biological strains, growing those strains and express our proteins of interest, and testing protein activity. This in turn creates tight linkages among the intent of the experiment, the work done and the data collected.

We think about this in three phases. First, how do we create appropriate abstractions for the science we execute and how do we associate data and meta-data together in a meaningful composite? Second, what insights can we gain by analyzing natural experimental variation and the outcomes of those experiments, what new experimental variations does this suggest, and what can those associations tell us about the underlying biological contexts? And finally, how can we use this information to understand science and meaningful variation better, engineer organisms more prescriptively, and create protocols and biological alterations that are not only reproducible but also robust?

In the case of the hot dogs, it ended up being all down to an employee named Irving, who hadn’t moved with the company to the new location. To get the hot dogs from where they’re stuffed to where they’re smoked, Irving would take a circuitous thirty-minute trip through the factory. In the new factory, the stuffing room and the smoking room were more directly connected so the hot dogs didn’t have a chance to warm up and “age”. Once they figured it out, they built a whole room that simulates the journey that Irving took those hot dogs on before.

As we explore organism engineering and build out more scaled and robust platforms for routinely engineering biology, we’re looking to design systems that help us to observe, measure, and highlight these hidden factors so that we understand the underlying science and have better predictability in scale-up and transfer. In addition, we want to understand experimental reproducibility and create protocols that are robust to more variation. Overall, this is fundamental to pushing the bounds of science and making meaningful models of our engineered perturbations. If you’re interested in more deeply understanding biology and creating the systems necessary to unambiguously describe and execute scientific protocols, please reach out and get in touch.

(Feature photo of Bioworks 5 by Kris Cheng)

Infrastructure as Code with Morphogen2

Morphogen2, from its outset, was a project designed to make complex infrastructure developer friendly and accessible. Morphogen2, a continuation of Vidya’s summer internship project, is a Python library that runs in the CI/CD pipelines for projects. The idea is that you simply check in code that describes the infrastructure for your target environment(s) and these environment(s) will be automatically created/updated/managed for you.

It plays well and integrates with the existing Ginkgo ecosystem of tools in all sorts of ways as well. Morphogen2 code can describe one or many microservices, one or many Lambdas, etc. etc.. It can build discrete chunks of infrastructure but it can also build larger, more complex entities. It can also build complicated ecosystems that consist of complex architectures integrated with various discrete chunks of infrastructure like RDS instances, S3 buckets, and ECR repos. The project has a dedicated team on DevOps that I tech lead but anyone in the company is welcome to contribute to it. Sure you can make infrastructure in vanilla Terraform or CloudFormation, but we’ll get into some code examples and I’ll start to show some of the reasons why you would waste a lot of time trying to replicate the stuff you can easily cookie cutter out with Morphogen2.

An example of a more complex architecture you can pretty quickly stand up in Morphogen2 would be this architecture for what’s called “serverless_https_endpoint”:

A Morphogen2 Architecture

Another example would be the microservices architectures Morphogen2 creates which generally look something like this:

Another Morphogen2 Architecture

The library also provides a bunch of tools that can do complex actions with Lambdas like really rapidly creating Lambda layers with specific packages or automatically deploying new code when it’s checked into a project with git. You can also do things like write code that scans a bunch of different environments for specific infrastructure and if that infrastructure doesn’t exist it creates it or if it does exist it updates it. And these examples are only just beginning to scratch the surface of the vast collection of tools we’ve accumulated within Morphogen2 from all its different contributors across a whole host of different teams.

A lot of the code to do particularly complex things in AWS with Morphogen2 is very concise compared to other offerings. It incorporates best practices in the infrastructure it builds and provides a whole bunch of tools to auto discover and build on top of existing infrastructure. Want to build an HTTPS endpoint that serves requests and is backended by a Lambda? Here are fewer than 50 lines of Python code that will do that for you:

from morphogen2 import Stack, Garden, Utilities, Probe
import os

if __name__ == "__main__":
  # initializing a garden object
  a_morphogen2_garden_object = Garden.garden()

  # fetching template
  a_garden_template_object = a_morphogen2_garden_object.fetch('serverless_https_endpoint')

  # building the template (this could easily be json.loads() from a json if you'd prefer it to be!)
  Parameters = {"ServiceName": "<name_you_want_your_service_to_have>"}
  a_garden_template_object.build(Parameters)

  # getting a utilities object
  a_utilities_object = Utilities.utilities()
  a_utilities_object.create_assume_role_config('<role_to_assume_to_target_account>', '<account_number_you_want_to_deploy_to>', '<region_to_deploy_to>')

  # getting a stack object
  a_morphogen2_stack_object = Stack.stack()
  a_morphogen2_stack_object.create_assume_role_config('<role_to_assume_to_target_account>','<account_number_you_want_to_deploy_to>','<region_to_deploy_to>')

  #if the stack doesn't exist already create it, otherwise do an update.
  a_morphogen2_stack_object.universal_deploy_update_from_template(a_garden_template_object, '<name_you_want_your_resource_stack_to_have>')

  # getting a probe object
  a_probe_object = Probe.probe()
  a_probe_object.create_assume_role_config('<role_to_assume_to_target_account>', '<account_number_you_want_to_deploy_to>', '<region_to_deploy_to>')

  # Wait 5 minutes for stack to build. If the stack doesn't build successfully in that time then error out.
  boolean_value = a_probe_object.determine_if_cloudformation_is_done_building('<name_you_want_your_resource_stack_to_have>',300)
  if boolean_value:
      print('Stack built successfully!')
  else:
      raise ValueError('Stack did not build successfully within 300 seconds!')

  # query completed stack for output values
  outputs_dictionary = a_probe_object.fetch_outputs_from_cloudformation_stack('<name_you_want_your_resource_stack_to_have>')

  # deploy lambda code
  a_utilities_object.update_code_and_attach_layer_to_python_lambda_function(outputs_dictionary['LambdaFunctionARN'],
                          os.path.join(os.path.dirname(os.path.realpath(__file__)),'code'),
                          'main.lambda_handler',
                          os.path.join(os.path.dirname(os.path.realpath(__file__)),'requirements','requirements.txt'))

That’s a sanitized version of a real-life deploy script I built for an app at Ginkgo. I set it up as a Gitlab CI/CD job and every time I check in new Lambda code it goes out and deploys my code for me. It also takes a path to a requirements.txt file and turns that into a Lambda layer and attaches it to my function so that it has all the dependencies it needs to run. I built a whole app around that script in an afternoon and it’s been running reliably to this day months later.

Would you like to set up an autoscaling microservice in ECS on Fargate? Great! Here are fewer than 20 lines of code that do it for you:

from morphogen2 import Stack, Garden, Probe

if __name__ == "__main__":
   # initializing objects
   a_morphogen2_garden_object = Garden.garden()
   a_morphogen2_stack_object = Stack.stack()
   a_probe_object = Probe.probe()

   #updating template
   Parameters = {'LogGroupName':'<whatever_name_you_want_your_logs_to_have>',
                 'Images':['<account_number_you_want_to_deploy_to>.dkr.ecr.<region_to_deploy_to>.amazonaws.com/ecrreponame:latest'],
                 'ContainerPorts':[80],
                 'Certificate':'<arn_of_certificate_you_want_to_use>',
                 'WantsEFS':'True',
                 'WantsRDSCluster':'True',
                 'WantsS3Bucket':'True'}
   a_garden_template_object_for_serverless_autoscaling_microservice = a_morphogen2_garden_object.fetch('serverless_autoscaling_microservice')
   a_probe_object.create_assume_role_config('<role_to_assume_to_target_account>', '<account_number_you_want_to_deploy_to>', '<region_to_deploy_to>')
   a_garden_template_object_for_serverless_autoscaling_microservice.build(Parameters,probe_object=a_probe_object)

   # deploying template
   a_morphogen2_stack_object.create_assume_role_config('<role_to_assume_to_target_account>','<account_number_you_want_to_deploy_to>','<region_to_deploy_to>')

  # if the stack doesn't exist already create it, otherwise do an update.   
  a_morphogen2_stack_object.universal_deploy_update_from_template(a_garden_template_object_for_serverless_autoscaling_microservice,'<name_you_want_your_stack_to_have>',region_name='<region_to_deploy_to>')

And because you set WantsEFS to True you’ll get an EFS made for you and mounted to all your containers at /mnt/efs. Because you set WantsS3Bucket to True you’ll get an S3 bucket all your containers will have access to. And, because you set WantsRD to True you’ll also get an auto scaling Aurora RDS cluster with rotating credentials in Secrets Manager made accessible to your containers as well. I’ve also encoded a whole bunch of environment variables for you to help you find infrastructure and generalize your code across your different microservices. And even though you didn’t specify anything for it when your cluster hits an average CPU utilization of 50% it’ll autoscale for you to meet demand. There’s a whole host of other parameters you can set to customize the behavior of your microservice but for the sake of brevity I’m not going to include them all. Also, while it’s not in the code example above it’s a single call to our “Utilities” library in Morphogen2 to build a container from a source directory and deploy it to ECR and another single call to the same library to trigger a new deployment from ECR to ECS. Many deploy scripts automatically push out new containers to ECR ahead of updating their microservice stacks and it’s a good way to keep all your container code up to date and deployed without really having to think about any of the infrastructure that accomplishes that.

Also, this script is idempotent and if I ran it multiple times all it would do is scan for any changes and make updates as necessary, but if there were no changes to be made, then none of the stacks created the first time would be altered. The universal_deploy_update_from_template function I’m calling scans to see whether or not a stack of that name in the target account exists already and if it doesn’t it will make it but if it does it will check to see if there are any updates to be made and if there aren’t nothing will happen. Behavior like that makes people a lot more comfortable having deploy scripts set to run automatically when new code is checked in to git.

You might have also noticed that I didn’t have to specify VPCs or subnets in the above example even though I’m for sure going to need to know where those things are in the account to make the infrastructure I described. Well, because I provided a_probe_object it auto-discovered the optimal networking infrastructure I should be using for me and set parameters within my stack appropriately. Probe pairs well with a number of different templates to auto-discover the optimal configuration for certain things for users without them needing to bother to figure out the best way to network a database or choose subnets to deploy containers into or a whole host of other tasks that distract them from writing code.

The library can also ingest YAML templates called MIST (Morphogen2 Infrastructure Simple Templates) and you can describe many AWS accounts worth of infrastructure in a single directory of YAML files.

Here’s an example of a MIST file:

account: <account_to_deploy_to>

ecrstack:
 resource_type: stack
 template: ecr
 parameters:
   EcrRepos: ['containerrepo']

deploy_code_to_ecr:
 resource_type: utilities_call
 call: build_and_push_image_to_ecr
 parameters:
   path_to_docker_folder: '/path/to/container/code'
   ecr_repo_to_push_to: 'containerrepo'

microservicestack:
 resource_type: stack
 template: serverless_autoscaling_microservice
 parameters:
   LogGroupName: 'acoolestservice'
   Images: ['<account_to_deploy_to>.dkr.ecr.us-east-2.amazonaws.com/containerrepo:latest']
   ContainerPorts: [80]
   Certificate: '<certificate ARN>'
   WantsRDSCluster: 'False'

kinesisstack:
 resource_type: stack
 template: kinesis
 parameters:
   stream_parameters: [{"Name": "myStream", "ShardCount": 1},{"Name": "myOtherStream", "ShardCount": 10}]

KinesisStreamARN:
 resource_type: probe_call
 call: fetch_outputs_from_cloudformation_stack
 parameters:
   stack_name: 'kinesisstack'
   value_to_return: 'KinesisStream1'
   type_to_cast_return_value_as: 'str'

TriggerNewDeployment:
 resource_type: utilities_call
 call: trigger_new_deployment
 parameters:
   cloudformation_name: "microservicestack"

dynamostack:
 resource_type: stack
 template: dynamo_db
 parameters:
   table_parameters: [{"TablePrimaryKey": "BestIndexEver"},{"TablePrimaryKey": "BestIndexEver",'WantsKinesisStreamSpecification':'True',
        'KinesisStreamARN': "#!#KinesisStreamARN#!#",'WantsTTLSpecification':"True","TTLKey":"MyTTLKey"}]

So what the above MIST file would do when run would make an ECR repo, build and push my container to said ECR repo, build an autoscaling microservice using that container in the ECR repo, build 2 Kinesis streams, trigger a deployment from ECR to my ECS stack of whatever the latest container code is in my ECR repo, and then build a DynamoDB with a kinesis stream specification that uses one of the streams I built earlier in the template. The template is idempotent and if I ran it again it would scan for any changes and make updates as necessary, but if there were no changes to be made, then none of the stacks it created the first time would be altered. To run the template I can run the following code chunk that relies on our Architect class:

from morphogen2 import Architect

if __name__ == "__main__":
    Architect.architect().set_state()

That code, without any parameters set, will scan the directory it’s being run in for a folder named “config” and then will iterate through any MIST files contained therein. It will also auto discover optimal parameters for things without needing to have a probe object supplied and it will handle figuring out the best way to assume a role and deploy into a target account for you.

It’s a really easy and readable way to manipulate and maintain a large amount of infrastructure across a large number of accounts and the syntax has so far been pretty well received. The hope is that over time people will start to drift towards common configurations for git repos that leverage MIST and Morphogen2 and this will result in a shared knowledge base that will accelerate overall development at Ginkgo.

Morphogen2 has been creating a positive feedback loop. As we solve problems in AWS we gain more experience which allows us to improve the library which in turn allows us to solve problems faster and gain more experience that in turn allows us to improve the library faster. Most importantly to me it’s aligned the goals of the Software and DevOps teams. We both have a vested interest in improving and contributing to Morphogen2. Primarily the library is used by people in the Digital Tech Team but there’s ongoing efforts to try to target future work at teams in the foundry and beyond. My hope is that in the not too distant future there’s a version of Morphogen2 with an easy to use UI that allows scientists and other people who aren’t necessarily Software or DevOps engineers to rapidly build their own apps and digital infrastructure to accelerate science happening at Ginkgo.

(Feature photo by Jack Dylag on Unsplash)

2021 Digital Tech Summer Internships: Part 3

In our last blog post, Liam and Aileen told us about their summer. Lets hear what Kevin and Vidya have been up to!

Kevin Lin, Software Engineering

My name is Kevin and I’m currently pursuing my Bachelor’s and Master’s in Computer Science at Stanford University. This summer I interned with the Decepticons, a team that works on software-automation interfaces like our Laboratory Information Management System (LIMS), a system housing data foundational to our foundry operations and codebase growth.

I first became interested in synthetic biology a little over a year ago. I took a class called “Inventing the Future” at Stanford d.school, during which Drew Endy gave a phenomenal overview of synthetic biology, its potential to solve our most pressing problems, and associated challenges like biosecurity (I highly recommend this podcast if you’re looking for a similar overview). While browsing the web to try and satiate my newfound interest, I came across this blog and was ecstatic to learn about all the ways in which software can contribute to synthetic biology. I hope this post will give yet another example of how software can make biology easier to engineer, and how someone who is relatively new to the world of biology can make an impact!

Before I begin, I want to give a huge shout out to my mentor, David Zhou, and our team’s product manager, Daniel Yang, for conducting the technical and customer research, respectively, that made this project possible.

Main Project: Improving Protein Tracking

My main project was standardizing and automating the storage of proteins in our LIMS. For context, Ginkgo uses the Design-Build-Test-Learn (DBTL) cycle to engineer biological systems to produce desired outputs. Examples of desired outputs include capping enzymes for mRNA vaccines, microbes that destroy environmental contaminants, and even the fragrance of a plant that hasn’t been seen since 1881. I worked closely with the Protein Characterization (PC) team, which is involved in the Test step of the DBTL cycle. They plan and execute experiments that provide us with insights into the proteins we engineer.

In order to successfully plan their experiments, the PC team needs to understand the work done in prior steps by gathering all the relevant data in a usable format. Part of the data gathering process involves translating designed DNA sequences into their corresponding amino acid sequences, and storing them, along with associated metadata, in our LIMS. Currently, this process is done manually, which can be time-consuming, error-prone, and inconsistent. The feature I implemented addresses these challenges by introducing a UI that automates and standardizes how we translate DNA sequences and store them in our LIMS.

Biologists can now go to our DNA sequence viewer, select an open reading frame (ORF), and export the corresponding amino acid sequence as a protein to our LIMS. Important metadata such as the DNA molecule that encodes the protein is also stored in the database.

Protein Tracking Screenshot
For demo purposes only: this is our sequence viewer displaying the full LentiCRISPR v2 sequence from Addgene (lentiCRISPR v2 was a gift from Feng Zhang (Addgene plasmid # 52961 ; http://n2t.net/addgene:52961 ; RRID:Addgene_52961)). The ORF selected encodes the Cas9 protein. A biologist can now name and export this protein, along with associated metadata, to our LIMS by clicking the button on the upper right-hand corner.

A sequence diagram for this feature is shown below. Note that Strand is a Ginkgo-specific application for bioinformatics operations hosted on AWS.

Sequence Diagram

Now that this feature has been implemented, we have a framework to further standardize and automate the tracking of proteins. Potential next steps include automating the naming of proteins, organism-specific translations, and recording other important properties like relevant affinity tags and post-translational modification sites.

My Experience

I greatly enjoyed Ginkgo’s culture of growth, collaboration, and whimsy. For my project, I worked closely with Bilobans from a wide array of backgrounds – fellow software engineers, PMs, biologists, and UX designers. Each gave invaluable insights into how to make the feature better, and helped me understand a range of new topics, from what affinity tags are and why they’re important, to the design choices one can make when incorporating GraphQL into a system. Outside of my project, I reveled in learning from other teams’ office hours, weekly technical talks, monthly town halls with the founders, AMAs with senior software engineers, and textbooks I obtained with Bonusly points (best trade deal in the history of trade deals). If there’s one thing I learned from all the interdisciplinary work, it’s that anyone can help make biology easier to engineer, just like anyone can cook!

I’m going to miss the Ginkgo community and all the brilliant Bilobans that make this company what it is. This summer has been an absolute delight and I can’t wait to see what comes next!

Vidya Raghvendra, Software Engineering

Hi there! My name is Vidya, and I’m a returning software engineering intern at Ginkgo. This summer, I interned on a software team called the Impressionists, and last summer, I worked with the Decepticons (as you can tell from the team names, whimsy is a core tenet of Ginkgo’s culture!). My work last summer was focused on the back-end of the software stack, and this summer I’ve done full-stack work with a front-end focus. To learn about my perspectives and projects from last summer, check out this post and this one.

Project 1: Service Subscriber Notifications

My first project focused on Servicely, one of Ginkgo’s core platforms which organizes and orchestrates the work being performed in our Foundry. On Servicely, Organism Engineers (who design and grow genetically modified organisms in Ginkgo’s labs) make requests for our services to run (e.g., for sequencing to be performed on a sample). Our Foundry operators use Servicely to execute these requests. For this project I revamped a piece of Servicely called the Operator Dashboard to enable users to add or remove subscribers to particular services– these changes would then update in the UI, and subscribers would be notified via Slack each time a new set of service requests drops into the queue. I was really eager to work with technologies I hadn’t used before, and worked with React (for the front-end) and Django (for the back-end). It was very exciting to work on a feature that would touch several users–as a result of these changes, Servicely operators no longer need to refresh queues looking for samples that they may have accidentally missed, and can avoid the potential miscommunication that comes with messaging teammates about service sample submissions.

Subscription Screenshot
A view of the Operator Dashboard UI.
Slack Screenshot
Examples of Slack notifications automatically sent to subscribers.

Project 2: Simple Services

My second project also involves Servicely, as well as OrganiCK (Ginkgo’s system for notating laboratory operations). When this project is complete, Foundry operators will be able to onboard new laboratory processes (which we call “services”) using the existing user interface already available in OrganiCK. I am working on the back-end code for this project, but the rest of my scrum team will pick up the front-end after my internship ends

In addition to general streamlining and better user experience, the impact of this project includes efficiency gains from the ease of quickly onboarding laboratory processes onto a common platform, the capability for operators to more easily organize their work, and faster submission request processing.

My Ginkgo Experience (thoughts after two internships!)

Working on projects with stakeholders across the company taught me more about building for users, and it was really exciting to work with not only the engineers on my team, but also designers and product managers.

Also, although this internship was mainly remote due to COVID-19, I did have the opportunity to go into the offices in Boston in person for a week. There, I was able to meet my team and fellow interns, have lunch and an AMA with Ginkgo’s founders, and tour the Bioworks (where the magic happens!).

I think the fact that I returned to Ginkgo for a second internship attests to how much I’ve enjoyed working and learning here. Now, as Ginkgo grows and prepares to go public, I’m really glad that the culture of growth, community, and dedication to making biology easier to engineer has stayed the same and it’s still an awesome place to intern!

Conclusion

As this summer wraps up, we want to thank our Digital Tech Team interns for their contributions. What they accomplished has been impressive. Thank you, and we wish you great success in what you all will be doing next!

(Feature photo by frank mckenna on Unsplash)

2021 Digital Tech Summer Internships: Part 2

In our last blog post, Vichka and Etowah told us about the cool things that they did this summer. This week, Liam and Aileen tell us about their internships on the Software Team!

Liam Bai, Software Engineering

Hi! My name is Liam, and I study Applied Math and Computer Science at Brown University. This summer, I interned with the Base Chasers team (each of the scrum teams at Ginkgo has given itself a fun name), and worked on expanding Ginkgo’s next generation sequencing (NGS) data pipelines. Specifically, I built a pipeline orchestrating sequence data from Oxford Nanopore long-read sequencers.

Although Nanopore sequencers are not new at Ginkgo, software support for the instruments was minimal. An internal command-line tool handled most of the data processing, and any downstream quality control and analyses were done manually by bioinformaticians in Jupyter notebooks. The goal of my project is to replace the current processes with a pipeline that is more automated, scalable, observable, and robust, with additional features including metadata capture, notifications, and support of custom analyses. In short, after starting a sequencing run, a sequencer operator can sit back and relax, knowing that data––along with metadata such as QC statistics––will show up in the right places in the right format.

The Nanopore pipeline runs on Airflow, an open-source workflow orchestration system. The pipeline integrates with Datastore and Campaign––internal data/metadata storage services at Ginkgo––along with the NGS Analysis Provisioning Service (NAPS), an internal queuing service for analyses. To improve efficiency and scalability, I used AWS Batch to process large, raw files, compute metadata, and run analyses.

Nanopore data pipeline diagram

Zooming out, as part of the testing pipeline that allows scientists to gain detailed insight into the strains they work with, NGS plays a critical role in Ginkgo’s mission to make biology easier to engineer. Newer long-read (Nanopore) sequencers complement short-read (Illumina) workflows and enhance our confidence in the sequence data. It was immensely satisfying to see my project contribute to Ginkgo’s efforts in evangelizing standardization and building out infrastructure that can support engineering biology at this unprecedented scale.

I loved being a part of the Base Chasers this summer, and learned a ton from their mentorship. Perhaps more importantly than learning the ins and outs of Airflow, I picked up on many design patterns that make a system robust and scalable, and learned the importance of communication in building software.

I am extremely lucky in being able to come into the office for the latter half of my internship. I bonded with my teammates and fellow interns, and loved the culture of whimsy at Ginkgo. Every day, I am inspired by the Bilobans’ passion for making biology easier to engineer, while constantly reminded that there is so much fun to be had along the way.

Aileen Ma, Software Engineering

Hi! My name is Aileen. I’m a rising senior at MIT majoring in 6-3 (computer science) and a full stack software intern on the Terminators team for the summer of 2021. The Terminators team primarily works on Loom, an internal platform for designing and ordering DNA constructs. I was remote for the first half of my 11-week internship, but returned to Boston for the remainder of the time.

While working at a synthetic biology company in the midst of a global pandemic is already a one-in-a-million experience, going public also adds a unique dimension to my time here. I have really enjoyed not only learning about producing scalable technology, but also in watching the steps a startup takes as it rockets into the public eye.

My Projects

My two projects focused on improving the user experience with Loom. There were two main aspects of Loom that I worked on: the search feature and the bulk editing feature. As a full stack intern, my two projects were chosen to give me experience with both the frontend and backend. Improving search was a project largely concentrated on the backend, while bulk editing was a combination of both, although a little heavier on the frontend.

Making Search in Loom Delightful

The Loom search feature is used to look through design units and taxa. Design units are the building blocks used to create DNA designs. Taxa refers to the organism species that produces a sequence. The previous implementation used matching by trigram similarity, a text searching algorithm supported by Django which ranks results based on matches with the search query by checking every three characters (a trigram) and filtering only those that meet a certain threshold of similarity. In practice, there were many common search queries that would not meet the similarity threshold even though the user intended them to. For example, if the user searched “large table”, the search result “large brown table” may not meet the similarity threshold. Additionally, this method is very slow because it would be necessary to loop through every trigram and compare with the existing entries, and users would often rather select a pre-loaded default than wait 20 seconds or so to search for the proper taxon (if it would even appear at all).

search screenshot

Because the taxon database is fairly constant while the design units and design databases are frequently being updated, it is best to use two separate methods of searching through them. For the design/design units databases, it turns out that a more accurate method involves regex matching for every word in the search query (a Postgres LIKE query) against each entry within the desired fields. This seems a little brute force, but proved to be twice as fast as trigram search and better supported user intentions.

The taxon database is much larger than the design unit database, but it updates less frequently. Instead of using a brute force method similar to the one used for designs/design units, it was much more efficient to implement a search vector with GIN (generalized inverted index) for speedy lookups. GIN has a higher build cost than the previous method (GIST), but faster lookup times. For a database that doesn’t change very much (and doesn’t need to be built frequently), GIN is the way to go. Results were between 2x to 6x faster than before, along with better accuracy. Results were also limited to the top 100 matches, which helped speed up the display dramatically.

search performance graph

Editing Feature

Once a design unit is created, it can be difficult to change the metadata associated with it. A user who may have hastily selected the default E. Coli as the source taxon may realize they want to change it later on (especially now that they can quickly find the appropriate taxon!). Providing an editing feature is therefore very desirable to enhance the user experience. The editing feature came in two parts: adding more features to single unit editing, and adding a bulk editing feature.

Previously, design units could be modified by name, description, or status. I worked on expanding upon these features so that design units could also be modified by source taxon, target taxon, project, or part types (which are used for characterizing and grouping design units) for a single design unit. This involved adding an appropriate addition to the back end that would allow for these new mutations and writing unit test cases. Throughout the process, I became familiar with GraphiQL for making queries – this allowed me to figure out if mistakes were happening on the back end or front end. On the front end, I worked on integrating editable features with existing components such as dropdown menus. React is a great framework that allows for components to be reused from various parts of the platform, allowing for very scalable software.

modifying a design unit screenshot

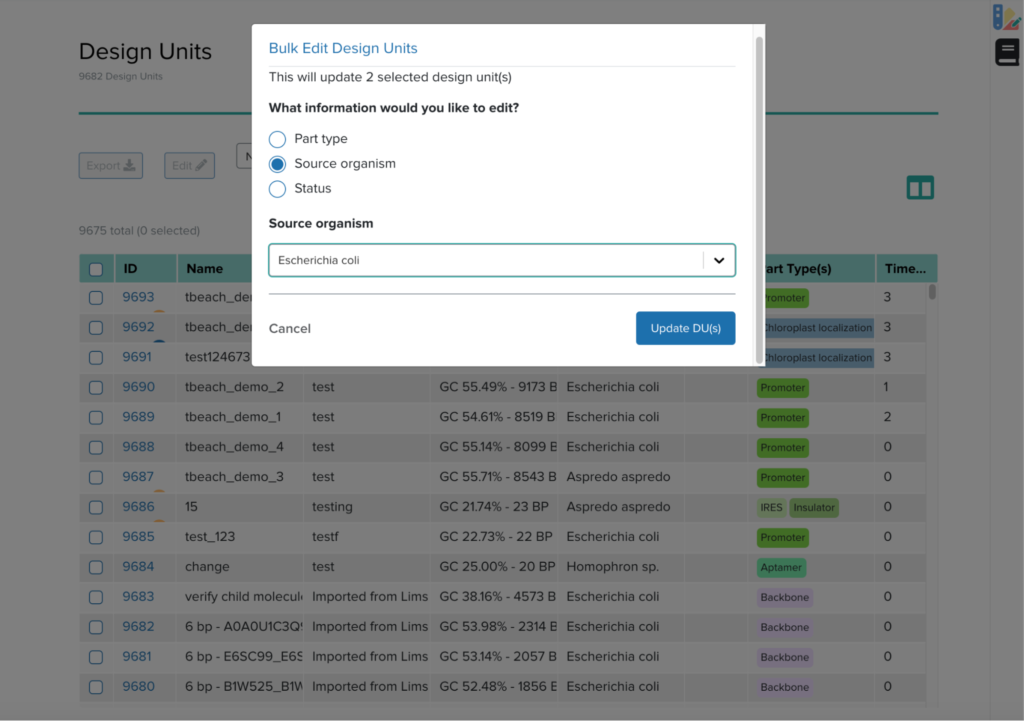
Finally, I also worked on the bulk editing feature, which will override a single field with a user input. As Ginkgo grows larger, the internal database of design units grows increasingly large. With a bulk upload feature integrated with the existing software, it becomes important to easily fix small errors in many different entries. Bulk editing seeks to implement this feature. I worked with my mentor and the Lead UX Designer to figure out how the user should interact with bulk editing. Similar to my experience with implementing a single edit feature, I started with adding relevant features in the back end and moving towards the front end. The end result was a lovely modal as shown.

bulk edit screenshot

Social Experience

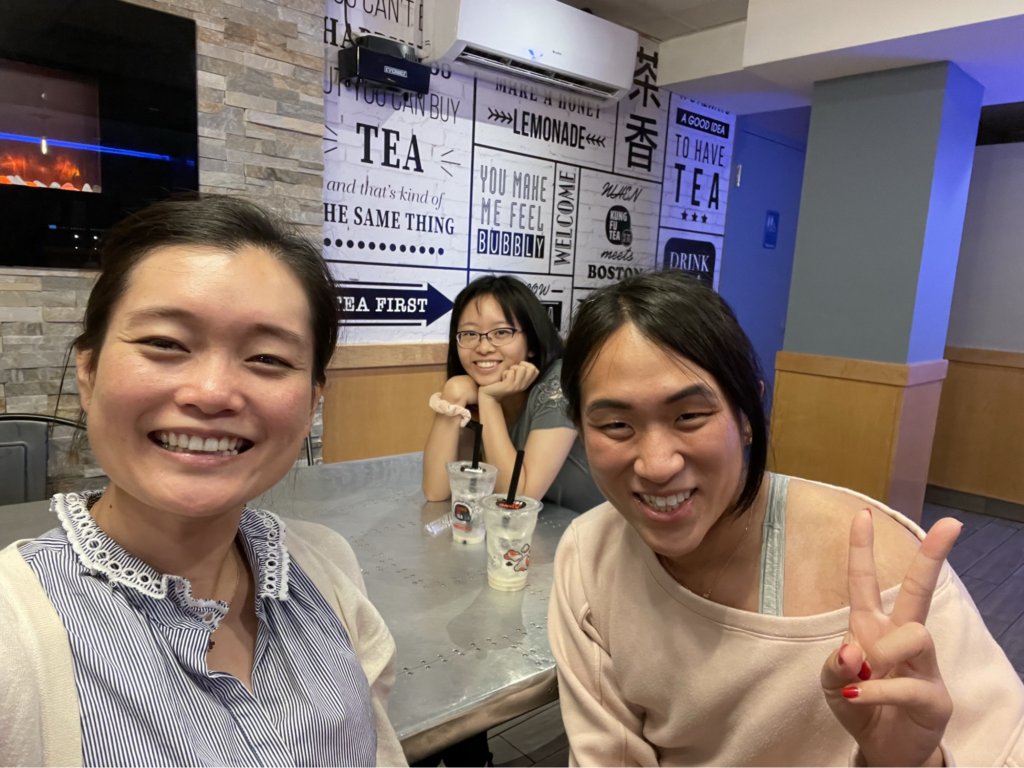
Ginkgo hosted 11 interns this summer: 6 software interns, 1 product manager intern, and 4 business and development interns. One of the benefits of having a smaller intern class is forming a very tight-knit community. The onsite software interns were particularly close, given that we were all around the same year (rising college seniors/freshly graduated). We spent a lot of time together, both in and out of the office. One time, four of us even stayed in the office until midnight discussing a combinatorics question proposed in the #help-science slack channel. Sometimes when we leave early, we’ve eaten out at various restaurants in the area, hopping from taiyaki ice cream to pizza to fried chicken.

group photo

Ginkgo has also hosted a few intern events, the most prominent of which was the catered lunch with our founders. They answered every question we threw at them with complete transparency. In fact, the whole company is pretty rooted in transparency – documents are easily accessible to employees, including meeting notes, project documentation, and OKRs. The company also hosted an intern/mentor dinner at Committee, where we completely stuffed ourselves with Mediterranean food and got the chance to speak with other interns/full time employees we didn’t typically interact with.

group selfie

After the intern/mentor dinner, I also got acquainted with some of the business interns and learned more about their projects. They are all in the midst of pursuing their MBA degrees and have been great about reaching out to the software interns. They have such vastly different experiences from us, having already accumulated some experience in the workforce, and it’s fascinating to hear about the path that brought them to Ginkgo.

On Friday nights, there would often be happy hour or other social events happening in the kitchen after a long week of work. Chess and other board games are popular pastimes, and I met many other people at the company through these. Bughouse (2v2 chess) is a popular variation here and draws a bit of a crowd.

Interacting with the Company

I met daily with my mentor, usually on-site, since I tend to ask questions that are more easily answered in person. Most of my team was remote, although some of them worked in the area and would come into the office occasionally. Every two weeks, we would have sprint planning sessions that allowed me to interact more with the team; otherwise, I usually spent most of my time with my mentor. I worked very closely with my mentor, and as someone who was much more familiar with the codebase and tools for working with software, he guided me through many patches of my internship where I needed help. I learned so much from seeing the way he thought about problems and digging to the root of the issue that by the end of my internship I could solve problems about 5x faster than I was at the beginning of my internship.

One of the best parts of being an intern is being able to reach out and ask questions without feeling awkward about it. We had weekly AMAs with a different Digital Tech Team member every week, and it was extremely insightful to chat with them about their experiences and backgrounds. We heard from solution engineers, software architects, and software engineers on different teams. Many of these people previously came from other companies working in healthcare or biotech, and knew each other prior to joining Ginkgo. One of the questions that seemed to garner a mixed variety of answers from people was the path of either developing a broad set of skills or a very deep understanding of one particular field. As a biology company that seeks to sell a service, I originally imagined that having a solid foundation in both biology and computer science would be helpful. While the software engineers all have an interest in biology, biology background is not critical. This question of pursuing a broad versus deep set of skills is answered individually andI look forward to exploring further myself.

Aside from AMAs for the interns, many of the groups here hold office hours to explain the projects they’re working on. For software engineers, office hours are a fantastic way to learn more about the biology side (and vice versa!)

While we technically have a hierarchy, the organization feels very flat. As an intern group, we’ve spoken with every level of the organization up to the founders, and even cornered Tom Knight himself to ask questions about the founding days. Our head of software is very involved with the internship program, and sometimes joins us for lunch or happy hour chats. The happy hour events have also been very fun and attended by a variety of people across the company, and provides another avenue to learn more from others.

Concluding Thoughts

These past 11 weeks have flown by, especially being in person. I had a wonderful time learning new technology, speaking with fascinating people, and working on a product that will make a difference for others. As Ginkgo scales up, there will be more and more people relying on our internal software and it’s been important for me to remember that good software practices now will make life exponentially easier for future maintainers. There is a strong company culture here that incentivizes growth, with the atmosphere of a startup but enough resources to make the Batcave seem paltry in comparison. People here are truly passionate about shaping a future with synthetic biology that feels like it’s just around the corner, and working here has been an optimistic reminder of the achievements we might have in the years ahead as we continue down this path.

We’ll hear from Kevin and Vidya next, so check back soon for that!

(Feature photo by frank mckenna on Unsplash)

2021 Digital Tech Summer Internships: Part 1

The Digital Technology Team welcomed six interns this summer. This is the first of a three-part series where our interns tell you about their summer in their own words. We will begin with Vichka and Etowah!

Vichka Fonarev, Software Engineering

Hello! My name is Vichka Fonarev and I am a rising senior studying Computer Science at Tufts University. I have always been fascinated by the intersection of software engineering and the physical world so I was thrilled to join Ginkgo Bioworks’ Infragon, a team that works at the intersection of biology, software, and automation.

Project

My project this summer was to implement a new architecture for the Batch Scheduler, a system that converts and ‘schedules’ Autoprotocol to a series of instructions that our workcells can understand and execute. In Ginkgo’s Foundry, we use a constraint solver from Strateos called SCLE to do this. However, many of Ginkgo’s Autoprotocol workflows are very complex and difficult to schedule. To combat this, a member of the NGS team wrote a tool called the Batch Scheduler. This tool allowed users to input many different constraints — such as batch sizes and overall scheduling time limitations — and would then generate all possible permutations of these constraints. This ‘batch’ of jobs could then be individually scheduled to increase the chance of getting a fast run, or at least a successful one.

While this worked, it was prone to failure and had load limitations due to a reliance on the manual setup of Celery workers. The re-architecture aimed to resolve both of these issues. The primary change in the re-architected system was moving the computationally intensive constraint solving from celery workers to Batch-as-a-Service (BaaS). BaaS is an internal tool that provides an abstraction on top of AWS Batch that makes setting up the infrastructure and submitting jobs significantly easier. The move to BaaS posed an interesting challenge since it is a closed asynchronous system where no results are directly returned and there is no completion notification. I had to implement an asynchronous lambda function that would poll BaaS jobs and write results to our database as they become available. Another big benefit of this new architecture is that we are now able to access the results of individual scheduling runs as they finish rather than waiting for the entire batch to finish. This allows scientists to run a workable schedule as soon as one becomes available rather than waiting for marginally more efficient schedules to be computed. Since we now rely on Batch job definitions rather than hosted celery servers, we are able to automatically deploy them from our CI/CD pipeline with no downtime for users. Additionally, we can now support multiple SCLE code versions so Foundry users who required different features can work concurrently on the same system.

architecture diagram

My Time at Ginkgo

Over the summer Ginkgo helped us integrate into the company culture and helped us meet as many people as possible. One of my favorite activities was a weekly Ask Me Anything (AMA) session with senior software developers set up by David Hofer, another software engineer. These AMAs were a great way to get some face-time with engineers from all sorts of backgrounds and from the diverse set of teams at Ginkgo. We got a ton of fantastic career advice and got to learn about many of the projects happening on the software team.

I also gained valuable experience working on a system with many moving parts. I learned not only a suite of software tools, but also how to tie together different services into a complex system in a way that’s efficient, scalable, and easy to understand.

Etowah Adams, Software Engineering

Hi I’m Etowah! I’m a junior at Yale University where I study biology and computer science. This summer I worked as a software intern at Ginkgo Bioworks. It was a great experience and I learned a tremendous amount about building software and the challenges of doing biology at the scale that Ginkgo is doing it. I also made some close friends along the way.

One of the most prominent questions on my mind this summer was “how will Ginkgo standardize processes in biological engineering?”

I wondered about this particularly because I was coming to Ginkgo after spending the semester doing wet lab research in my molecular biology professor’s lab. The work I did there was extremely interesting, and different in nature to the work done at Ginkgo. Whereas the research at my professor’s lab does not require a great deal of automation and process standardization, Ginkgo aims to have many more projects in flight than individuals working directly on them, and with significant divisions of labor.

Standardization is one of the keys that allows Ginkgo to scale the number of its projects. Standardizing operations and information enables efficient processes and handoffs between teams. But how could something as complex as engineering in biology be standardized?

Through my internship, it has become clear to me that at Ginkgo, software will play a central role in creating and fostering these standardizations. In my time here, I worked on helping promote two types of standardizations: the first software-oriented, and the second more biology-oriented.

Projects

Ginkgo has many different user-facing web interfaces, many of which are written in React, a Javascript frontend web framework. These interfaces, such as for the inventory or workflow builder, were largely developed independently of each other so each element of each interface is unique. Such being the case, it is harder to transfer knowledge of one interface to another.

In my first project, I created a React component library and published it to Ginkgo’s internal node package manager to allow these interfaces to use the same components. Using standard components across interfaces reduces development time and decreases the amount of time it takes scientists to learn to use them, allowing them to focus on the biology.

component library screenshot

My second project was born in response to a new centralized strain banking service. Rather than being stored in miscellaneous freezers, important microbial strains would be stored in a centralized location. Banked strains are easier to find and can be reused more readily across projects.

Standardized information about each banked strain, such as strain origin and usage, must also be recorded in Ginkgo’s laboratory inventory management system (LIMS). To do this, scientists upload a CSV file containing metadata for many strains to LIMS.

If the CSV file is incorrectly formatted or is missing fields, though, they must edit the CSV and upload it again. I sought to allow scientists to seamlessly upload and correct these errors without having to return to the CSV file itself. I did this by creating a React component that detects and fixes these issues. This makes the process of creating strains with standardized metadata less time consuming. I then deployed a React application with this component (to an autoscaling serverless stack I stood up on AWS).

bulk importer component screenshot

As Ginkgo continues to grow, enabling standardization of biological engineering practices through software is a must. The projects I worked on this summer contribute to this. In all, I had a fantastic summer and am excited to have contributed to Ginkgo’s mission of making biology easier to engineer.

Stay tuned! In our next blog post, we will be hearing about the cool things that Liam and Aileen have been doing this summer!

(Feature photo by frank mckenna on Unsplash)

How To Convert a JavaScript Project With Flow Types to TypeScript

Are you interested in migrating from Flow to TypeScript? Want to update your code incrementally without having to do a total rewrite? We recently underwent this transition so let’s walk through what we did to ease the process here.

At Ginkgo, we write a lot of frontend code and we strive to use modern tooling that helps our developers work more effectively. Most of our frontend apps are written in React with Flow types, which was established as our canonical frontend pattern in late 2016. At the time, I was porting one of our major frontend apps to React from a deprecated framework, and I wanted to introduce static typing to ease the transition. Flow and TypeScript both looked like good options then but we had a hard requirement on using Babel for our compilation, and TypeScript didn’t support Babel at the time, so we decided to go with Flow types.

Flow types have served us well, but we’ve decided to migrate to TypeScript for new code because of the wide community adoption of TypeScript and the correspondingly large amount of third party type definitions. These type definitions really supercharge the development experience with an IDE like VS Code, so we want to take advantage of them for future development. In the rest of this post I’ll describe the way that we are making this transition without doing a total rewrite of our code, which allows for incremental adoption of TypeScript as our new frontend language of choice.

To start with, let’s briefly discuss our usage of Babel. We use Babel to transpile our Flow typed JavaScript code with the preset-flow preset, which removes the type annotations and leaves vanilla JavaScript that the browser can run. We separately use “flow-bin” to do type checking.

With TypeScript, we’ll also be using Babel to strip its types and will use tsc separately for type checking. Roughly, our old Babel pipeline looks like this:

Each file with a // @flow comment at the top is processed with the preset-flow babel integration, producing a plain JS file. Let’s take a look at what our builds now look like with both Flow types and TypeScript:

We still produce plain JavaScript, but now files with the TypeScript extension .ts will be handled by Babel’s preset-typescript. In order to achieve this intermediate solution, we’re using the “overrides” feature of Babel, which allows for configuration to be overridden with a pattern match applied to the files going into Babel. Our Babel override section includes a test for all .ts files, which it then processes using preset-typescript rather than preset-flow. This is what our .babelrc file looks like:

{
  "presets": [
    "@babel/preset-env",
    "@babel/preset-flow"
  ],
  "plugins": [
    "@babel/plugin-proposal-class-properties",
    "@babel/plugin-proposal-object-rest-spread"
  ],
  "overrides": [
    {
  	"test": ["./src/**/*.tsx?"],
  	"presets": [
    	  "@babel/preset-env",
    	  "@babel/preset-typescript"
  	]
    }
  ]
}

That takes care of Babel parsing our project files and stripping types to produce plain JS, but it doesn’t actually achieve the type checking we want yet. For that, we installed the typescript package using yarn add --dev typescript @babel/preset-typescript and created a .tsconfig file according to the tsconfig handbook here. Finally, we must make Flow and TypeScript play nicely together, and not produce errors when encountering a file of the other type. To make Flow play nicely with TypeScript files, we add a // $FlowFixMe comment above any TS import, like:

// $FlowFixMe
import helloTypescript from './hello_typescript';

Similarly, we have to make TypeScript play nicely with Flow files by setting “allowJs” to false and “noImplicitAny” to false in our tsconfig.json. With these Flow comments and TypeScript settings, we’ve essentially told each of the type checking systems to ignore files of the other type, and treat them as “any” types. This means we lose type checking across file boundaries as we convert files to TypeScript, but it does allow us to incrementally move files over instead of trying to rewrite them all at once.

There are a couple of other tools that we use that need updating to understand TypeScript as well. First off, we update package.json to tell babel to look for .ts files and to include some tsc type checking commands:

{
  "scripts": {
    "build": "babel src -d dist --copy-files --extensions '.js,.ts,.tsx'",
    "tsc": "tsc --noEmit",
    "tsc:watch": "tsc --noEmit --watch"
  }
}

Next our .eslintrc file which includes configuration for eslint is also updated to include overrides for TypeScript files:

{
  "extends": ["airbnb-base", "plugin:flowtype/recommended", "prettier"],
  "parser": "babel-eslint",
  "plugins": ["flowtype"],
  "env": { "jest": true },
  "rules": {
    "no-process-env": "error",
    "no-else-return": 0,
    "import/no-cycle": 0,
    "import/no-unresolved": 0,
    "import/extensions": [
      "error",
      "ignorePackages",
      {
        "js": "never",
        "jsx": "never",
        "ts": "never",
        "tsx": "never"
      }
    ]
  },
  "settings": {
    "import/resolver": {
    "node": {
    	"extensions": [".js", ".jsx", ".ts", ".tsx"]
  	}
    }
  },
  "overrides": [
    {
      "files": ["*.ts"],
  	"extends": [
        "airbnb-typescript/base",
        "plugin:@typescript-eslint/recommended",
        "prettier"
  	],
  	"plugins": ["@typescript-eslint"],
  	"parser": "@typescript-eslint/parser",
  	"parserOptions": {
    	  "project": "./tsconfig.json"
      }
    }
  ]
}

These new ESLint dependencies are installed by running yarn add --dev @typescript-eslint/parser @typescript-eslint/eslint-plugin eslint-config-airbnb-typescript. For Jest support, all that’s needed is to install TypeScript types with yarn add --dev @types/jest.

I also discovered that apps created with the create-react-app tool work with both Flow and TypeScript out of the box as of version 2.1.0. All that’s needed is to install the appropriate TypeScript dependencies like yarn add --dev typescript @types/node @types/react @types/react-dom @types/jest and set some overrides in the scripts section of the package.json file:

"tsc": "tsc --noEmit --allowJs false --noImplicitAny false",
"tsc:watch": "tsc --noEmit --allowJs false --noImplicitAny false --watch"

These overrides are necessary because create-react-app overwrites any changes to tsconfig.json, so we use command line flags to override the allowJs and noImplicitAny settings.

At this point, Flow and TypeScript talk nicely with each other and all that’s left to do is install our TypeScript types with installs like yarn add --dev @types/node @types/react and then start converting our own files to TypeScript. We’ve been using the flow-to-ts package to convert files to TypeScript as we work on the codebase, which has been working nicely.

This overall strategy of incremental adoption is working well for us, allowing us to use TypeScript for new code without having to overhaul all the old code. Once most of our files are converted, we’ll likely do a final push to get the rest moved over to TypeScript to reach our final goal of having a fully TypeScript codebase:

In this post we’ve seen how to transition a codebase from Flow types to TypeScript, without having to do a total rewrite. In the future we’re looking forward to having fully type safe TypeScript codebases, and we’re working hard to convert files to TypeScript using the methods in this post. Hopefully these techniques will help you too if you have a Flow typed codebase and would like to adopt TypeScript!

(Feature photo by Ravi Pinisetti on Unsplash)

Building Delightful Command-Line Interfaces with Click

In software engineering, we talk a lot about creating intuitive and delightful user interfaces, which is to say, graphical user interfaces. But what about the command-line? At Ginkgo, our users are scientists and biological engineers, so some of the software that we write are best presented as command-line tools rather than web apps. Click is a powerful and easy-to-use Python library that you can use to create rich command-line interfaces, and I’ll be going over some of its basic features.

The Basics

Getting Started

One of the nice things about Click is that it’s easy to get started, and you can realize a lot of power without much boiler plate at all.

#!/usr/bin/env python3

# hello_world.py
import click

@click.command()
def hello_world():
  click.echo('Hello, world!')

if __name__ == '__main__':
    hello_world()

The @click.command() decorator is not terrifically useful on its own — it’s a starting point from which we will add more features to our command-line UI. click.echo is very much like print, but the result is more consistent across different terminal environments.

Arguments

We enrich the behavior of our command-line user interface by adding decorators to our main function. For example, we can use the @click.argument() decorator to specify that our “Hello, World!” tool takes an argument name, which will form a part of the greeting:

#!/usr/bin/env python3
import click

@click.argument('name')
@click.command()
def hello_world(name):
  click.echo(f'Hello, {name}!')

if __name__ == '__main__':
    hello_world()

Now, we can run the tool with the argument:

> ./hello_world.py Ray
Hello, Ray!

The decorator @click.argument('name') specifies that the command-line interface takes a single argument, which is passed to the main function as the named argument name.

Options

Specify command-line options also with a decorator:

#!/usr/bin/env python3
import click

@click.option('--punctuation', default='!')
@click.option('--greeting', default='Hello')
@click.argument('name')
@click.command()
def hello_world(name, greeting, punctuation):
  click.echo(f'{greeting}, {name}{punctuation}')

if __name__ == '__main__':
    hello_world()

Here, we have added two command-line options: --greeting and --punctuation. These options are passed into the command function as keyword arguments greeting and punctuation respectively (where Click generated the keyword argument names by parsing names of the options). We have set default values for both options, in case either option is left out when the command is invoked:

> ./hello_world.py Ray --greeting Bonjour
Bonjour, Ray!

We can also set an option as required:

#!/usr/bin/env python3
import click

@click.option('--punctuation', default='!')
@click.option('--greeting', required=True)
@click.argument('name')
@click.command()
def hello_world(name, greeting, punctuation):
  click.echo(f'{greeting}, {name}{punctuation}')

if __name__ == '__main__':
    hello_world()

So, this time, if we were to leave out the --greeting option:

> ./hello_world.py Ray
Usage: hello_world.py [OPTIONS] NAME
Try 'hello_world.py --help' for help.

Error: Missing option '--greeting'.

As you can see, the command function will not run, and the script quits with an error message and suggestion to invoke the --help option, which brings us to the next feature of Click that we will discuss.

Help Documentation

Click makes it easy to create rich and informative help documentation. Click automatically adds a --help option to all commands (which can be disabled by passing add_help_option=False to @click.command()).

Docstring Integration

Click integrates with Python docstrings to generate descriptions of commands for the help screen:

#!/usr/bin/env python3
import click

@click.option('--punctuation', default='!')
@click.option('--greeting', default='Hello')
@click.argument('name')
@click.command()
def hello_world(name, greeting, punctuation):
    """
    Prints a polite, customized  greeting to the console.
    """
    click.echo(f'{greeting}, {name}{punctuation}')

if __name__ == '__main__':
    hello_world()
> ./hello_world.py --help
Usage: hello_world.py [OPTIONS] NAME

  Prints a polite, customized  greeting to the console.

Options:
  --greeting TEXT
  --punctuation TEXT
  --help              Show this message and exit.

Here, by adding a docstring to the command function, we are simultaneously helping developers by documenting our source code, as well as our end-users by providing a useful help screen message.

Documenting Options and Arguments

Document your options by using the help argument:

#!/usr/bin/env python3
import click

@click.option('--punctuation', default='!', help="Punctuation to use to end our greeting.")
@click.option('--greeting', default='Hello', help="Word or phrase to use to greet our friend.")
@click.argument('name')
@click.command()
def hello_world(name, greeting, punctuation):
    """
    Prints a polite, customized  greeting to the console.
    """
    click.echo(f'{greeting}, {name}{punctuation}')

if __name__ == '__main__':
    hello_world()
> ./hello_world.py --help
Usage: hello_world.py [OPTIONS] NAME

  Prints a polite, customized  greeting to the console.

Options:
  --greeting TEXT     Word or phrase to use to greet our friend.
  --punctuation TEXT  Punctuation to use to end our greeting.
  --help              Show this message and exit.

Note that you cannot specify help text for arguments — only options. You can, however, provide a more descriptive help screen by tweaking the metavars:

#!/usr/bin/env python3
import click


@click.option('--punctuation',
              default='!',
              metavar='PUNCTUATION_MARK',
              help="Punctuation to use to end our greeting.")
@click.option('--greeting',
              default='Hello',
              help="Word or phrase to use to greet our friend.")
@click.argument('name', metavar='NAME_OF_OUR_FRIEND')
@click.command()
def hello_world(name, greeting, punctuation):
    """
    Prints a polite, customized  greeting to the console.
    """
    click.echo(f'{greeting}, {name}{punctuation}')


if __name__ == '__main__':
    hello_world()
> ./hello_world.py --help
Usage: hello_world.py [OPTIONS] NAME_OF_OUR_FRIEND

  Prints a polite, customized  greeting to the console.

Options:
  --greeting TEXT                 Word or phrase to use to greet our friend.
  --punctuation PUNCTUATION_MARK  Punctuation to use to end our greeting.
  --help                          Show this message and exit.

Types

Click gives us some validation right out of the box with types. For example, you can specify that an argument or option must be an integer:

#!/usr/bin/env python3
import click


@click.option('--punctuation',
              default='!',
              metavar='PUNCTUATION_MARK',
              help="Punctuation to use to end our greeting.")
@click.option('--greeting',
              default='Hello',
              help="Word or phrase to use to greet our friend.")
@click.option('--number',
              default=1,
              type=click.INT,
              help="The number of times to greet our friend.")
@click.argument('name', metavar='NAME_OF_OUR_FRIEND')
@click.command()
def hello_world(name, greeting, punctuation, number):
    """
    Prints a polite, customized  greeting to the console.
    """
    for _ in range(0, number):
        click.echo(f'{greeting}, {name}{punctuation}')


if __name__ == '__main__'
    hello_world()
> ./hello_world.py --help
Usage: hello_world.py [OPTIONS] NAME_OF_OUR_FRIEND

  Prints a polite, customized  greeting to the console.

Options:
  --number INTEGER                The number of times to greet our friend.
  --greeting TEXT                 Word or phrase to use to greet our friend.
  --punctuation PUNCTUATION_MARK  Punctuation to use to end our greeting.
  --help                          Show this message and exit.
> ./hello_world.py --number five Ray
Usage: hello_world.py [OPTIONS] NAME_OF_OUR_FRIEND
Try 'hello_world.py --help' for help.

Error: Invalid value for '--number': 'five' is not a valid integer.
> ./hello_world.py --number 5 Ray
Hello, Ray!
Hello, Ray!
Hello, Ray!
Hello, Ray!
Hello, Ray!

Click gives types that are beyond the primitives like integer, string, etc. You can specify that an argument or option must be a file:

#!/usr/bin/env python3
import click


@click.option('--punctuation',
              default='!',
              metavar='PUNCTUATION_MARK',
              help="Punctuation to use to end our greeting.")
@click.option('--greeting',
              default='Hello',
              help="Word or phrase to use to greet our friend.")
@click.argument('fh', metavar='FILE_WITH_LIST_OF_NAMES', type=click.File())
@click.command()
def hello_world(greeting, punctuation, fh):
    """
    Prints a polite, customized  greeting to the console.
    """
    for name in fh.readlines():
        click.echo(f'{greeting}, {name.strip()}{punctuation}')


if __name__ == '__main__':
    hello_world()

The user enters a path to a file for FILE_WITH_LIST_OF_NAMES argument, and click will automatically open the file and pass the handle into the command function. (By default, the file will be open for read, but you can pass other arguments to click.File() to open the file in other ways.) Click fails gracefully if it cannot open the file at the specified path.

> ./hello_world.py ./wrong_file.txt
Usage: hello_world.py [OPTIONS] FILE_WITH_LIST_OF_NAMES
Try 'hello_world.py --help' for help.

Error: Invalid value for 'FILE_WITH_LIST_OF_NAMES': './wrong_file.txt': No such file or directory
> ./hello_world.py ./names.txt
Hello, Ray!
Hello, Ben!
Hello, Julia!
Hello, Patrick!
Hello, Taylor!
Hello, David!

Click provides many useful types, and you can even implement your own custom types by subclassing click.ParamType.

Multiple and Nested Commands

Command Groups

The examples so far have included just a single command in our command-line tool, but you can implement several commands to create a more robust tool and richer command-line experience. We can use the click.group() decorator create a “command group”, and then assign several Click “commands” to that group. The main script invokes the command group rather than the command:

#!/usr/bin/env python3
import click


@click.group()
def hello_world():
    """
    Engage in a polite conversation with our friend.
    """
    pass


@click.option('--punctuation',
              default='!',
              metavar='PUNCTUATION_MARK',
              help="Punctuation to use to end our greeting.")
@click.option('--greeting',
              default='Hello',
              help="Word or phrase to use to greet our friend.")
@click.argument('name', metavar='NAME_OF_OUR_FRIEND')
@hello_world.command()
def hello(name, greeting, punctuation):
    """
    Prints a polite, customized  greeting to the console.
    """
    click.echo(f'{greeting}, {name}{punctuation}')


@hello_world.command()
def goodbye():
    """
    Prints well-wishes for our departing friend.
    """
    click.echo('Goodbye, and safe travels!')


if __name__ == '__main__':
    hello_world()

In this example, we have moved the functionality of our greeting functionality to a command hello and implemented a new command goodbye. hello_world is now a command group containing these two commands. Click implements a help option for our command group much in the way that it implements them for commands:

> ./hello_world.py --help
Usage: hello_world.py [OPTIONS] COMMAND [ARGS]...

  Engage in a polite conversation with our friend.

Options:
  --help  Show this message and exit.

Commands:
  goodbye  Prints well-wishes for our departing friend.
  hello    Prints a polite, customized greeting to the console.

The hello command preserves the options, arguments, and documentation that it had when it was the root command.

> ./hello_world.py hello --help
Usage: hello_world.py hello [OPTIONS] NAME_OF_OUR_FRIEND

  Prints a polite, customized  greeting to the console.

Options:
  --greeting TEXT                 Word or phrase to use to greet our friend.
  --punctuation PUNCTUATION_MARK  Punctuation to use to end our greeting.
  --help                          Show this message and exit.
> ./hello_world.py hello --punctuation . Ray
Hello, Ray.

Nesting

We can arbitrarily nest command groups and commands by putting command groups inside of other command groups:

#!/usr/bin/env python3
import click


@click.group()
def hello_world():
    """
    Engage in a polite conversation with our friend.
    """
    pass


@click.option('--punctuation',
              default='!',
              metavar='PUNCTUATION_MARK',
              help="Punctuation to use to end our greeting.")
@click.option('--greeting',
              default='Hello',
              help="Word or phrase to use to greet our friend.")
@click.argument('name', metavar='NAME_OF_OUR_FRIEND')
@hello_world.command()
def hello(name, greeting, punctuation):
    """
    Prints a polite, customized  greeting to the console.
    """
    click.echo(f'{greeting}, {name}{punctuation}')


@hello_world.group(name='other-phrases')
def other():
    """
    Further conversation with our friend.
    """
    pass


@other.command()
def goodbye():
    """
    Prints well-wishes for our departing friend.
    """
    click.echo('Goodbye, and safe travels!')


@other.command(name='how-are-you')
def how():
    """
    Prints a polite inquiry into the well-being of our friend.
    """
    click.echo('How are you?')


if __name__ == '__main__':
    hello_world()
> ./hello_world.py --help
Usage: hello_world.py [OPTIONS] COMMAND [ARGS]...

  Engage in a polite conversation with our friend.

Options:
  --help  Show this message and exit.

Commands:
  hello          Prints a polite, customized greeting to the console.
  other-phrases  Further conversation with our friend.
> ./hello_world.py other-phrases --help
Usage: hello_world.py other-phrases [OPTIONS] COMMAND [ARGS]...

  Further conversation with our friend.

Options:
  --help  Show this message and exit.

Commands:
  goodbye      Prints well-wishes for our departing friend.
  how-are-you  Prints a polite inquiry into the well-being of our friend.
> ./hello_world.py other-phrases how-are-you
How are you?

Notice also that we can give our command groups and commands custom names, if we wish to name our commands and command groups something different from the Python functions that implement them.

Context

You can define options for command groups just as you can for commands. You can then use the Click context object to apply a command group’s options to its commands:

#!/usr/bin/env python3
import click


@click.option('--punctuation',
              default='!',
              metavar='PUNCTUATION_MARK',
              help="Punctuation to use to end our sentences.")
@click.group()
@click.pass_context
def hello_world(ctx, punctuation):
    """
    Engage in a polite conversation with our friend.
    """
    ctx.ensure_object(dict)
    ctx.obj['punctuation'] = punctuation
    pass


@click.option('--greeting',
              default='Hello',
              help="Word or phrase to use to greet our friend.")
@click.argument('name', metavar='NAME_OF_OUR_FRIEND')
@hello_world.command()
@click.pass_context
def hello(ctx, name, greeting):
    Prints a polite, customized  greeting to the console.
    """
    click.echo(f'{greeting}, {name}{ctx.obj["punctuation"]}')


@hello_world.group(name='other-phrases')
def other():
    """
    Further conversation with our friend.
    """
    pass


@other.command()
@click.pass_context
def goodbye(ctx):
    """
    Prints well-wishes for our departing friend.
    """
    click.echo(f'Goodbye, and safe travels{ctx.obj["punctuation"]}')


@other.command(name='how-are-you')
@click.pass_context
def how(ctx):
    """
    Prints a polite inquiry into the well-being of our friend.
    """
    click.echo(f'How are you{ctx.obj["punctuation"]}')


if __name__ == '__main__':
    hello_world()

Here, we initialize our context object to a dict, which we can then use to store and retrieve context values (such as the value for the punctuation option of the root command group).

./hello_world.py --help
Usage: hello_world.py [OPTIONS] COMMAND [ARGS]...

  Engage in a polite conversation with our friend.

Options:
  --punctuation PUNCTUATION_MARK  Punctuation to use to end our sentences.
  --help                          Show this message and exit.

Commands:
  hello          Prints a polite, customized greeting to the console.
  other-phrases  Further conversation with our friend
> ./hello_world.py --punctuation . hello Ray
Hello, Ray.
> ./hello_world.py --punctuation ?! other-phrases how-are-you
How are you?!

Conclusion

We are really only scratching the surface of what Click can do. For more, check out the Click documentation! I hope this helps you get started in building robust command-line interfaces.

(Feature photo by Sai Kiran Anagani on Unsplash)

Catching Unmocked Requests in Unittest

At Ginkgo we use the Python standard library module unittest for automating the testing of our Python code which is a powerful class-based approach to catching bugs and regressions. Philosophically, a test should only target a small piece of code and every HTTP request should be mocked so it can be relied on to always provide the same result. In practice, making sure tests don’t make unintended network requests make the tests more resilient so they don’t fail if an API is down or the environment in which the test is running has connection issues. A test that includes an inadvertent request could accidentally cause unintentional mutation of data, for example, by calling an API endpoint that updates a database with a payload of test data. The database could be updated every time the test suite is run and could could conceivably fill the database with unexpected junk data and cause problems for the rest of the testing environment.

Code often has to call HTTP APIs, so when testing, to mock any external requests we utilize VCR.py to record the requests and responses which increases the deterministic nature of the tests and removes the time it takes for a live request to be completed. The first time a test with a HTTP request is run within a VCR.py context manager VCR.py will record the HTTP traffic and create a flat file, called a “cassette”, that serializes the interaction. When the test is run again VCR.py will recognize the request and return the cassette file instead, preventing any live HTTP traffic. Writing tests can be complicated and sometimes a test will use code that can unknowingly include an external request to an API which is why it would be beneficial for the tests to warn contributors about unmocked external requests so they can be wrapped in a VCR.py context manager and have a cassette generated.

To implement this behavior we will extend TestCase from django.test and utilize the setUpClass to preform that patching during initialization. (As an aside don’t forget super, the absence of which can lead to some nasty bugs.) When tackling this, my first approach involved monkey patching urllib3 which is called on every external request. VCR.py already monkey patches HTTPConnection from urllib3 so it can return cassettes instead of live requests. If we want to avoid incorrectly flagging VCR cassettes as outgoing requests, we have to go lower and monkey patch urllib3.util.connection.create_connection instead.

class RequireMockingForHttpRequestsTestCase(TestCase):

    @classmethod
    def setUpClass(cls):
        super(RequireMockingForHttpRequestsTestCase, cls).setUpClass()

        def mock_create_conn(address, timeout, *args, **kw):
            raise Exception(f'Unmocked request for URL {address}')

        # monkey patching urllib3 to throw an exception on unmocked requests
        # must be commented out to generate cassettes for vcrpy
        urllib3_patch = mock.patch(
            target="urllib3.util.connection.create_connection", new=mock_create_conn
        )
        urllib3_patch.start()

While this approach is successful in catching requests it has one glaring issue when combined with VCR.py, that VCR.py actually needs external requests to complete when it is first run in order to generate the cassette that is then used as the mock response for any further calls. With a simple patching of urllib3 this would block VCR.py from being able to generate the cassette and require the developer to comment out this line when first creating a new test — unideal.

Here is an approach that patches urllib3 more intelligently. Based on parsing the stack trace this will allow requests originating from VCR cassette creation to make a network request as expected but everything else will raise an exception. We decided not to go with this approach, deeming it too hacky because of its reliance on string manipulation and the install location of the Python package.

class RequireMockingForHttpRequestsTestCase(TestCase):

    @classmethod
    def setUpClass(cls):
        super(RequireMockingForHttpRequestsTestCase, cls).setUpClass()

        def mock_create_conn(adapter, request, **kw):
            if any('dist-packages/vcr' in line.filename for line in traceback.extract_stack()):
                return real_create_conn(adapter, request, **kw)
            else:
                raise Exception(f'Unmocked request for URL {adapter[0]}')

        urllib3_patch = mock.patch(
            target="urllib3.util.connection.create_connection", new=mock_create_conn
        )
        urllib3_patch.start()

Our solution was to allow external requests based on an environment variable which would preserve the ability to locally generate VCR cassettes but fail any outgoing connections when the tests are run in our GitLab pipelines.

class RequireMockingForHttpRequestsTestCase(TestCase):

    @classmethod
    def setUpClass(cls):
        super(RequireMockingForHttpRequestsTestCase, cls).setUpClass()

        def mock_create_conn(adapter, request, **kw):
            raise Exception(f'Unmocked request for URL {adapter[0]}')

        if os.environ.get("GITLAB_CI"):
            urllib3_patch = mock.patch(
                target="urllib3.util.connection.create_connection", new=mock_create_conn
            )
            urllib3_patch.start()

This comes with a tradeoff as now an unmocked request will pass all tests within a local environment but fail in the Gitlab pipeline but we decided that was the most robust failure mode because it prevents bad test from entering into production code.

Even thought this change is very recent it has already caught unmocked requests for our developers making our Python tests stronger. We hope you find this helpful as well!

(Feature photo by Daniel Schludi on Unsplash)

How to Make Emoji Your Coworkers Will Cherish

One thing I enjoy about Ginkgo culture is our excessively creative use of emoji. Ginkgo emoji have taught me to express myself in ways I never would have thought possible. At the time of this writing, the Ginkgo Slack workspace has over 9000 custom emoji. Each one was crafted with love by a fellow coworker. What a time to be alive!

As a UX Designer here at Ginkgo, I have some authority to say what makes a good emoji (and what doesn’t.) I spend a lot of my professional time creating visuals to communicate ideas to a wider audience (check out my previous blog on abstraction and UX to learn more.) I’m writing this blog to help you make the freshest little Slack emoji you possibly can. It’s a great way to add some fun to your workday. If you haven’t tried it before I recommend giving it a go!

Uploading Custom Emoji to Slack

Here’s a nice guide for uploading custom Slack emoji if you don’t already know how.

What Makes a Good Emoji?

Not all emoji are created equal. Although Slack allows you to upload any image, not all images translate well to the emoji format. The following tips will help you select images that translate into easy-to-read emoji.

Must Read Well Small

This is the most important advice I can give. Slack renders emoji at extremely small sizes, around a quarter inch wide on the screen. If you upload a photograph that is too detailed, it will just end up looking like random noise at this scale.

Types of images that read well small:

  • Faces – humans are really good at recognizing faces. It’s a deep-seeded evolutionary skill. If you upload a picture of a face, chances are it will probably be recognizable even at a small size.
  • Memes – memes are everywhere. We see them so much that we can recognize them even if the image size is small.
  • Cartoons – This simplified drawing style with dark outlines around shapes makes for images that read well at small sizes.
  • Single words – A lot of times people like to upload words as emoji. The best ones are always shorter in length. Also, try to upload images with bold fonts. Make sure there’s plenty of contrast between the color of the text and the color of the background.
Word Emoji
Notice how you don’t need to squint so much to read the text on the left

Square Format

A good rule of thumb is that every emoji you create should be a square image. Slack renders all emoji in a square format. Before uploading an image as an emoji, make sure to crop it into a square format. If you don’t do this, Slack will add (ugly) little black bars to either side of the image. You don’t want that!

Square Emoji vs Rectangular Emoji
The bars don’t look as nice!

Don’t know how to crop images into a square? I recommend Adobe Photoshop Express. It’s an easy-to-use, free tool that works in the browser.


Transparent Background

If possible, it’s nice to upload emoji that have transparent backgrounds. Usually these are saved in the .png file format. Emoji with transparent backgrounds render better for dark mode users. You don’t see the white box when the emoji is set on a dark background. This isn’t a critical step, but it’s a nice touch!

Transparent Background vs Opaque Background
Erasing the background makes the Ginkgo logo look more professional.

There are a number of free online tools that can remove backgrounds from photographs. I’ve gotten mixed results from trying out a few. Your best bet is to use Photoshop, but that’s a lot more complicated. The internet is full of great Photoshop tutorials if you want to dive in.

Short and Sweet Names

  • Shoot for names that are no more than 2-3 words
  • When the name is too long Slack will sometimes cut off the end, this is bad if the punchline was at the end
  • It’s helpful to put the most important word in the name first
  • Make sure to separate words with either underscores or dashes. Slack doesn’t let you upload names with spaces
  • If you mash all the words together the name is hard to read (e.g. thisishardtoread)

Animated Emoji

Everybody loves animations! I qualify animated emoji as an “advanced technique.” They aren’t really that hard to upload, but it can be kind of a pain. You need to use the .gif file format and the file size needs to be incredibly small. If you find a cool gif file online, chances are it won’t work until after you resize it. You can also make cool custom GIF files with recording tools such as GIPHY Capture. Good luck playing around with animations, it can be challenging but I’m sure you’ll figure it out. I could write a whole tutorial on this topic, maybe another time…

Conclusion

That’s it, you’re ready to go off and WOW your coworkers on Slack with fresh new emoji. Any tips that I might have missed? Hit us up on the @ginkgobits Twitter account and I can update this post. Good luck!

Spinning Party Ginkgo

(Feature photo by Domingo Alvarez E on Unsplash)