A main challenge in science is effectively analyzing and displaying data to accurately and concisely convey information. Graphs can be generated in a spreadsheet service like Excel or Google Sheets, but this limits the adaptability of the graphs. There are many helpful packages in Python and other languages to visualize data. This post will give you a brief introduction to using Matplotlib for your data visualization needs.
Begin by installing Matplotlib and working in the python environment of your choice, either in a terminal, a python file, or an interactive Python notebook. You can install matplotlib using the instructions here. To follow along through the examples here, you will also need to install numpy.
For this demonstration, we’ll just go ahead and generate some random data using numpy.
import numpy as np
x = np.random.randn(100)
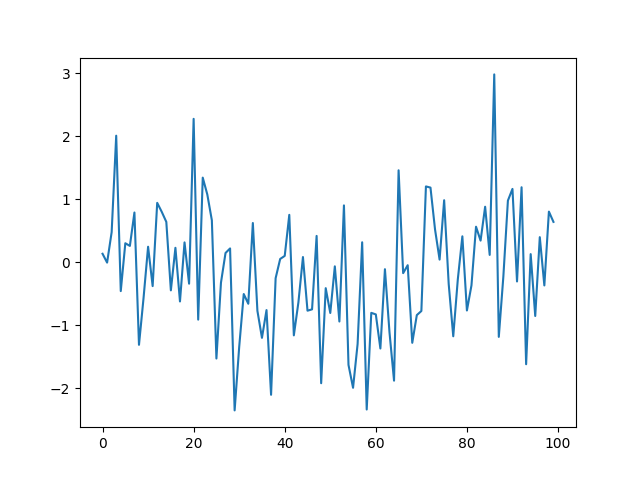
For any dataset, you can use the built in plotting function of matplotlib to generate a line graph. With only one variable, the variable will appear on the y-axis with the index on the x-axis. Using the default plot configurations:
import matplotlib.pyplot as plt
plt.plot(x)
We get something like this:
(If you are running this from the terminal you can run plt.show() to show the graph.)
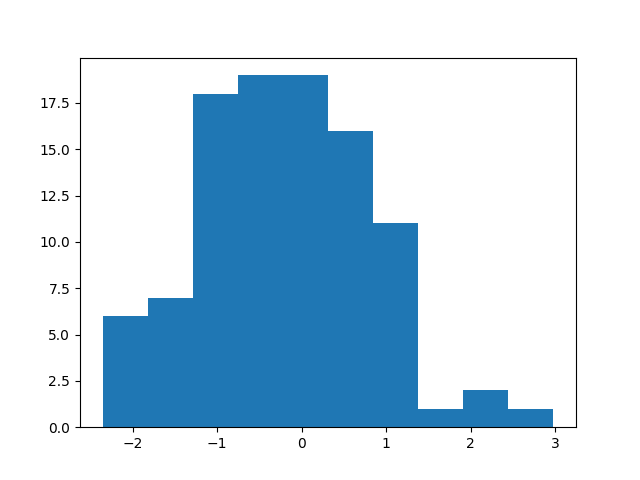
For a single variable graph, this is often not ideal, so we can plot a histogram instead and save the figure automatically with a convenient command. Again, we begin by using the default plotting option before adding customizations to it:
plt.hist(x)
You can save the histogram as a png file:
plt.savefig('hist.png')
Now, we can customize the graph by adding a title and axis labels:
plt.xlabel('x value')
plt.ylabel('frequency')
plt.title('Histogram of x')
plt.savefig('hist_updated.png')
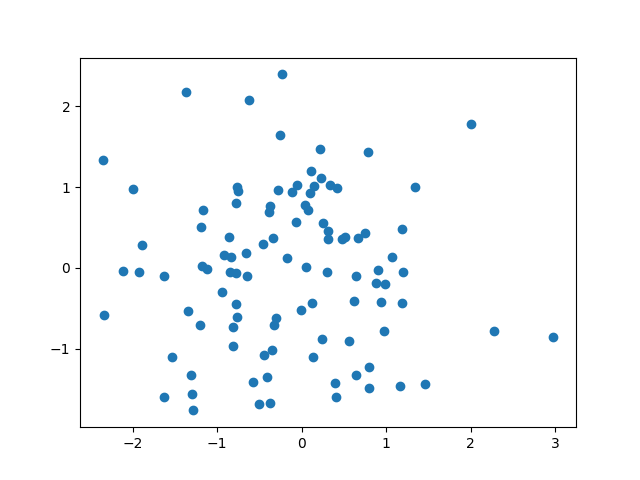
For another common type of graph, we’ll introduce a second variable.
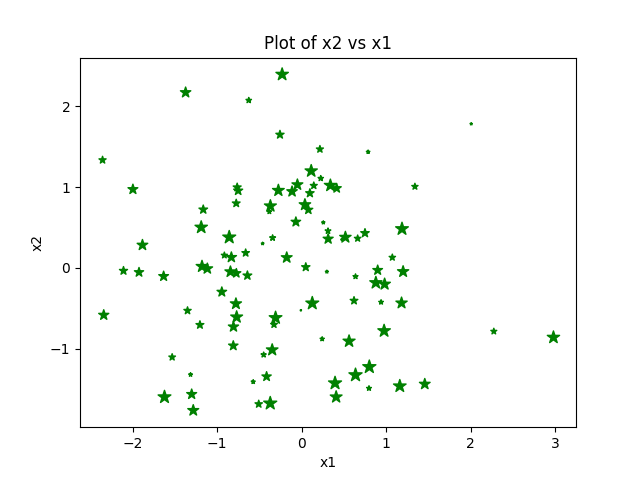
For a scatter plot, we can use keyword arguments to change the colors, size, and type of marker as well as adding axis labels and a title. When adding the size, we’ll generate another variable set of numbers with the same length as the dataset arrays.
plt.scatter(x, x2)
s = np.arange(100)
plt.scatter(x, x2, s=s, c='green', marker="*")
plt.xlabel('x1')
plt.ylabel('x2')
plt.title('Plot of x2 vs x1')
plt.savefig('scatter_final.png')
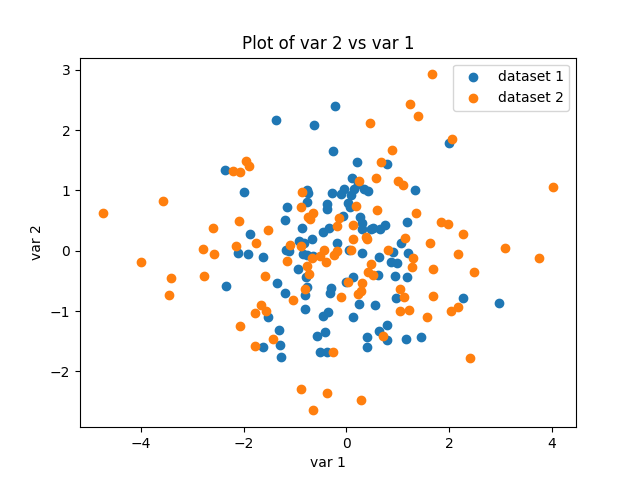
Finally, we’ll include multiple datasets on one graph and include a legend using the label keyword argument. The legend object in matplotlib can be placed differently in the plot depending on the data. In order to create a bigger distinction between the two datasets, we will generate x3 and double the values so that the placement will vary.
x3 = np.random.randn(100) * 2
x4 = np.random.randn(100)
plt.scatter(x, x2, label='dataset 1')
plt.scatter(x3, x4, label='dataset 2')
plt.xlabel('var 1')
plt.ylabel('var 2')
plt.title('Plot of var 2 vs var 1')
plt.legend()
plt.savefig('scatter_w_legend.png')
Here are some other helpful hints. Between graphs, you can use plt.clf() to clear the graphs, as using plt repeatedly uses the same figure object. Alternatively, if you are working in an interactive notebook, you can use %matplotlib inline so that graphs will appear as you go.
I want to share with you a process that my scrum team at Ginkgo Bioworks has recently gone through (and continues to go through) to organize and rationalize our backlog of tech debt tickets.
What even is tech debt? To paraphrase our Software Architect Sam, tech debt is some suboptimal part of software that adds risk or cost. You incur tech debt for some short term gain in exchange for some later cost. (Software) engineering is the primary stakeholder, and tech debt does not violate user-facing requirements. The effort to resolve an item of tech debt has a clear deliverable, usually the elimination of said risk or cost.
Because tech debt is, by definition, not user-facing, we have found that it has been important to organize our tech debt tickets around impact and business value. A well organized backlog of tech debt has enabled us to advocate for, and make, well-informed decisions about allocating resources to paying down tech debt. We have also been able to focus our attention towards particular parts of our tech debt backlog with greater precision and confidence.
Our Process
We follow this process to organize our tech debt tickets:
Assign a category to every tech debt ticket in our backlog.
Assess the approximate impact that completing each tech debt ticket would have.
Estimate the level of effort it would take to complete each ticket.
Sort and group the tech debt tickets by these dimensions.
Categories of Tech Debt
Assigning categories to tickets is an important first step to organizing the tech debt backlog because it surfaces the value of each ticket to the business. This is how we justify allocating resources to tech debt rather than implementing features, bug fixes, or other tasks where impact to users and other stakeholders is more immediately apparent. The categories should be chosen to make business value very clear. These are the categories that we use on my team.
Bug Factory
A “bug factory” is an area of code that is often the source of (user-facing) bugs. It is convoluted enough (and perhaps without sufficient test coverage) that any attempts to make even small changes to it has a high likelihood of creating a bug. It is perhaps even fragile enough that making (obviously related or not) changes somewhere else would likely cause bugs. Code that is WET (short for “write everything twice” — code that has repeated parts to it) may fall into this category.
Scalability/Performance
The Scalability/Performance category of tech debt covers code that is non-optimal in terms of performance (either on the compute or space dimensions, or both), but sufficient for the scale at the time the code was written. The negative business impact eventually could be application slowness perceived by the user, job completion times that become untenable, or application instability, as scale continues to grow. Scale may be measured in terms of number of users (simultaneous or not), size of dataset, etc.
This category of tech debt can be differentiated from “Bug Factory” in that “touching” such code is not necessary for negative business impact to manifest — it simply manifests as scale grows, perhaps unnoticeably until it is too late.
Developer Productivity
This category of tech debt includes code that is convoluted enough such that tasks which necessitate working with such code (where “working with” is actually altering such code or even just understanding it) takes an unexpectedly and/or unreasonably long time to complete. Business impact is material delay in time to delivery of future features.
This is different from “Bug Factory” in that working with such code does not usually result in bugs (at least no more than usual) — perhaps the code is convoluted but test coverage is good.
Ugly
Merely “ugly” code is where its ugliness is largely aesthetic — it does not fall under the category of “Bug Factory” or “Developer Productivity”. Examples include incorrectly formatted code, incorrectly cased identifiers, deviation from coding standards where the only material impact is aesthetic consistency of code, etc. In some cases, this category may be hard to differentiate from “Developer Productivity”. (At what point does aesthetic inconsistency of code have a material impact on developer productivity?) Ugly code should not be categorized as a “Bug Factory” unless it can be empirically shown to be (or at least empirically shown to have the potential to be) a “Bug Factory”.
This is an important category to have because it keeps the software engineers honest when assessing the business value of a tech debt ticket.
Impact and Level of Effort
The next step in the process is assessing impact and level of effort. Level of effort is relatively straightforward. On my team, we used one of several online planning poker apps to estimate each ticket. We happened to use developer-weeks as our unit of effort, but we could just as well have used developer-days, story points, or any other unit.
Impact can be hard to quantify, but the category assigned to a tech debt ticket makes its impact tangible. For instance, the impact of a Bug Factory ticket could be related to the likelihood of causing a bug any time that area of code is modified, the frequency with which that area of code is modified, the severity of the bugs that are likely to result, or a combination of all of these. We didn’t overthink quantifying impact — we simply assigned each ticket a value of “high”, “medium”, or “low” impact.
Prioritization
The tech debt backlog is now described along several dimensions. In order to find the tickets with the most value with the least level of effort, we sorted the list of tickets by impact and level of effort (in descending and ascending order, respectively). Grouping the tickets by category has allowed us at a glance to pick tickets to work on based on circumstance and context. For example, if we anticipated the need to scale up in the near-to-medium term future, then we would have favored Scalability tickets. If the team was really feeling the productivity drain of having to work with an area of difficult code, then we would have worked on tickets in the Developer Productivity category. If our plans had been to build features in a Bug Factory section of the code, then we would have favored paying down Bug Factory debt.
Because our tech debt tickets are organized around business impact, they can be integrated into the team’s overall backlog as “first class citizens”. The value of each tech debt ticket should be nearly as plain as the value of a feature, bugfix, or any other ticket. The decision to allocate resources towards or away from tech debt will therefore be well-informed, and it becomes easier to build the case to spend time on tech debt.
Conclusion
To conclude, I’d like to observe that “tech debt” is an apt term. It accrues interest and becomes harder to pay off over time. By organizing and rationalizing our tech debt backlog, we have been able to pay it down effectively and efficiently.
In our last blog post, Ariel, Yasmine and Evan told us about their summer. Lets hear what Delight and Judah have been up to!
Delight N., Product Management
Hi! My name is Delight and I’m currently studying bioengineering at MIT. This summer, I interned on the Product Management team at Ginkgo, working on the development of a catalog for Ginkgo’s Foundry offerings. The Foundry refers to Ginkgo’s lab space and teams that each specialize in a different area, such as DNA design or high throughput screening. “Offering” is a term used to describe the protocols or work that Foundry teams do for other teams. Ginkgo’s Foundry currently supports over 100 offerings with a variety of uses and complexities. As Ginkgo continues to grow rapidly, understanding what the Foundry can offer is key to leveraging Ginkgo’s resources most effectively. This is especially important as the company continues to scale because if people are not aware of what offerings exist, they cannot take advantage of them.
To achieve this end, we proposed an offering catalog that organizes key service information. The guiding belief was that by improving presentation, accessibility, and information about Foundry offerings, users could more easily identify and request Foundry offerings. The goal was to provide a single source of truth for Foundry offerings that allows for browsability by scientific application and discovery of new offerings.
Understanding the needs of the core users was an important first step to working towards a solution. This included understanding information they needed access to, what functionality helped them navigate with ease, and what styles of presentation were intuitive and easily comprehensible to them. The target users of this catalog are Ginkgo’s organism engineers and project leads who can leverage Foundry’s tools and processes to fulfill the needs of Ginkgo’s customers.
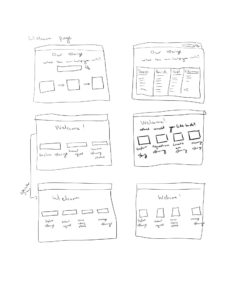
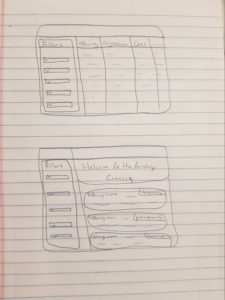
After better understanding the value users needed to extract from the catalog, I worked with Darek Bittner, a seasoned product designer to design the general layout of a catalog. To inform our brainstorming session, I researched presentation styles of product libraries from a variety of industries, paying special attention to elements that helped these libraries convey key pieces of information to readers. Based on the information gathered I produced thumbnail sketches, some of which are shown below.
After aligning on key elements for the catalog, the next step was to develop a prototype. We decided to use Tableau, which is an interactive data visualization software, because it would allow us to quickly iterate on the prototype without software engineering support. Darek and I created three different versions prior to the first round of user testing. We then conducted user research using the prototype where we assessed how intuitive, easy to use and flexible our design was. Three of our most important findings were:
Users were able to find offerings based on their name, description and intended purpose
Descriptive names helped users navigate through the catalog and understand the nature of Foundry offerings
Using tableau as a platform resulted in usability issues that could pose significant challenges to implementing it as a long term solution. We also found that users chose to find offerings by searching through Foundry teams, rather than via scientific categorization, which was unexpected.
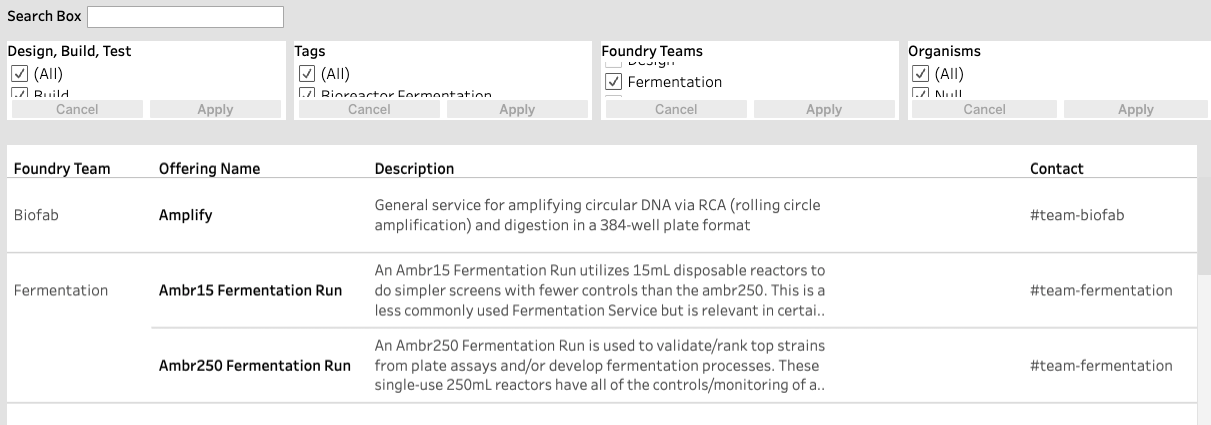
We used these findings to inform the updated design of our prototype in Tableau, thus resulting in the current version of the platform, a screenshot of which is shown below.
In order to improve search and filtering for our users, we decided that we needed to provide additional guidance to the Foundry representatives who directly contribute to the catalog on how information should be presented. Based on this, a guideline was created requesting that representatives select all valid organisms for each offering.
To address the usability issues caused by Tableau, I looked into alternative platforms that could be used for prototyping and possibly support the minimal viable product for the system. In the interim, we will release the prototype we created because, with its basic functionality, it will provide tremendous value to users. In the future, we would like a more stable version of the catalog to contain information that is easy to understand and navigate by, be updated automatically based on the information entered into Smartsheets, and work in sync with the offering creation tool in Servicely, which is another Ginkgo software product.
Working on this project this summer has been an interesting introduction to software-oriented design and has given me a great opportunity to practice design thinking. I learned the importance of paying attention to details and evaluating how they affect the outcome of different solutions, while keeping in mind the big picture. Keeping an open mind was central to moving forward after discovering ways that the design was interfering with our users’ ability to use our prototype. Our solution went through several versions, most quite different from the last, but by combining and altering the presentation and function of different elements, we discovered new ways to design our solution and gained valuable information on how best to support our users.
Judah Wyllie, Software Engineering
Introduction
Hi! My name is Judah Wyllie, and I’m a recent graduate from the University of Washington with a Bachelor’s degree in Computer Science. I had the amazing opportunity to be an intern on the Infragon team at Ginkgo this summer. The Infragon team is a hybrid software/automation team that works at the intersection of biology, software, and automation.
Main Project: SCLE Schedule Cache
Background
At Ginkgo, scientists use Autoprotocol to define biological protocols that are executed on integrated sets of lab automation devices called workcells. At a high level, a protocol consists of a set of containers and a sequence of instructions to perform on them (e.g. spin, seal, incubate). Before a protocol can be executed, it must be “scheduled” using a tool called SCLE, which outputs low-level instructions for the workcells to execute.
Problem Statement
Once a protocol is validated (i.e. it performs the scientific intent correctly/reliably when executed), it is often operationalized as a Foundry Service and is run repeatedly for weeks, months, or even years.
This can be challenging however due to a number of intrinsic limitations of the SCLE scheduler. First, scheduling large protocols can be extremely time consuming – several hours in the worst cases. Second, scheduling is non-deterministic, meaning that scheduling the same protocol multiple times can yield different results each time.
The goal of my project was to address these limitations by designing and implementing a caching service that allows for the reuse of previously computed schedules for a given protocol, thereby reducing scheduling times from hours to seconds, and increasing the reliability and reproducibility of the scheduler.
At a Glance
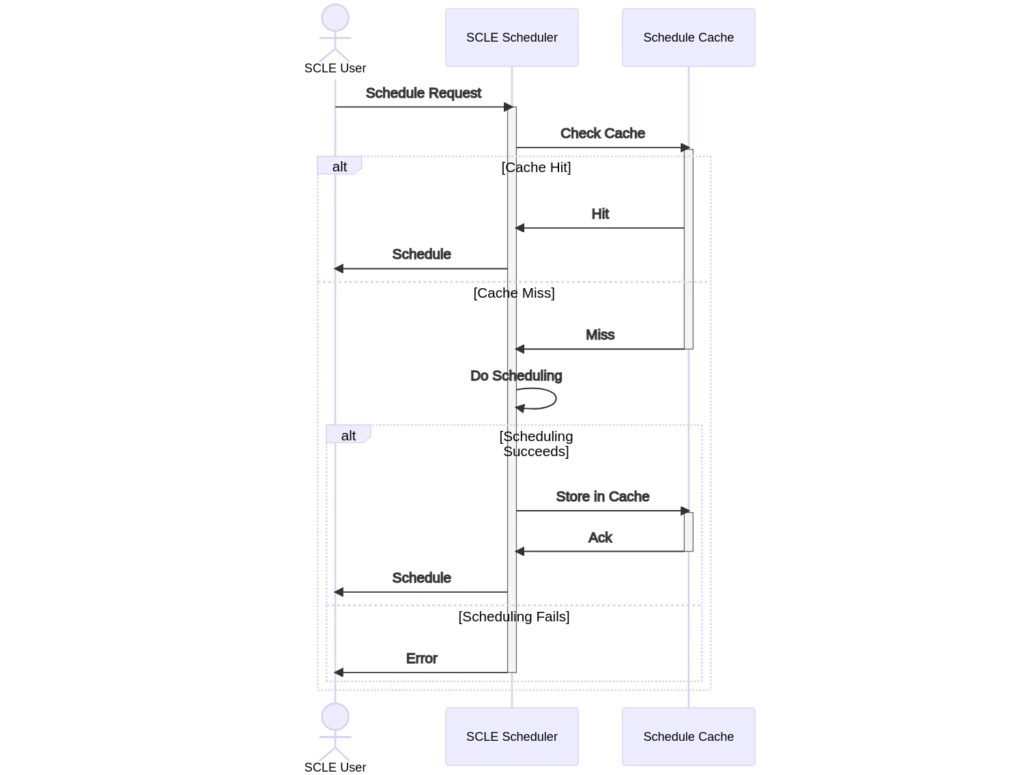
At a high level, the cache service works by storing scheduling outputs and reusing them when given the same inputs, thus bypassing scheduling altogether. We can tell if our schedule is stored in the cache by use of a cache key: a list of inputs that identifies unique results. The cache key is composed of a MD5 hash of the provided workflow as well as other unique identifiers. The logic behind the service’s decision making is simple and can be followed from the diagram below.
The SCLE User requests the scheduling service for a given protocol, plus other scheduling inputs. The cache service then checks the cache to see if there is a match. If there is a hit, it can simply return the cache object that stores a compatible schedule. In the event of a miss, the scheduling service continues as usual. If the scheduling job is successful, it will then store the result in the cache for future usage.
Solution Implementation
Now we have the core functionality of our service in place, but the bulk of my work during my internship actually revolved around building a robust and reliable service with all the features you’d expect from a modern API. Here are some of the main decisions we made:
Our API is built on FastAPI, a Python framework with built-in type validation and Swagger documentation generation.
Our service is containerized within Docker, which allows us to easily test it locally in a contained environment.
An AWS Lambda hosts our service (through a Docker container). This “serverless” platform allows us to scale easily. Our service is easily deployed to our Lambda via a CI/CD pipeline.
Cache objects are stored in a PostgreSQL database hosted by Amazon RDS.
Unit tests and integration tests are integral to a service like this, where errors could have real-world consequences. Our test suite automatically builds a new database to run its tests on that matches the production environment. Real-world schedules and workflows are used in the test suite.
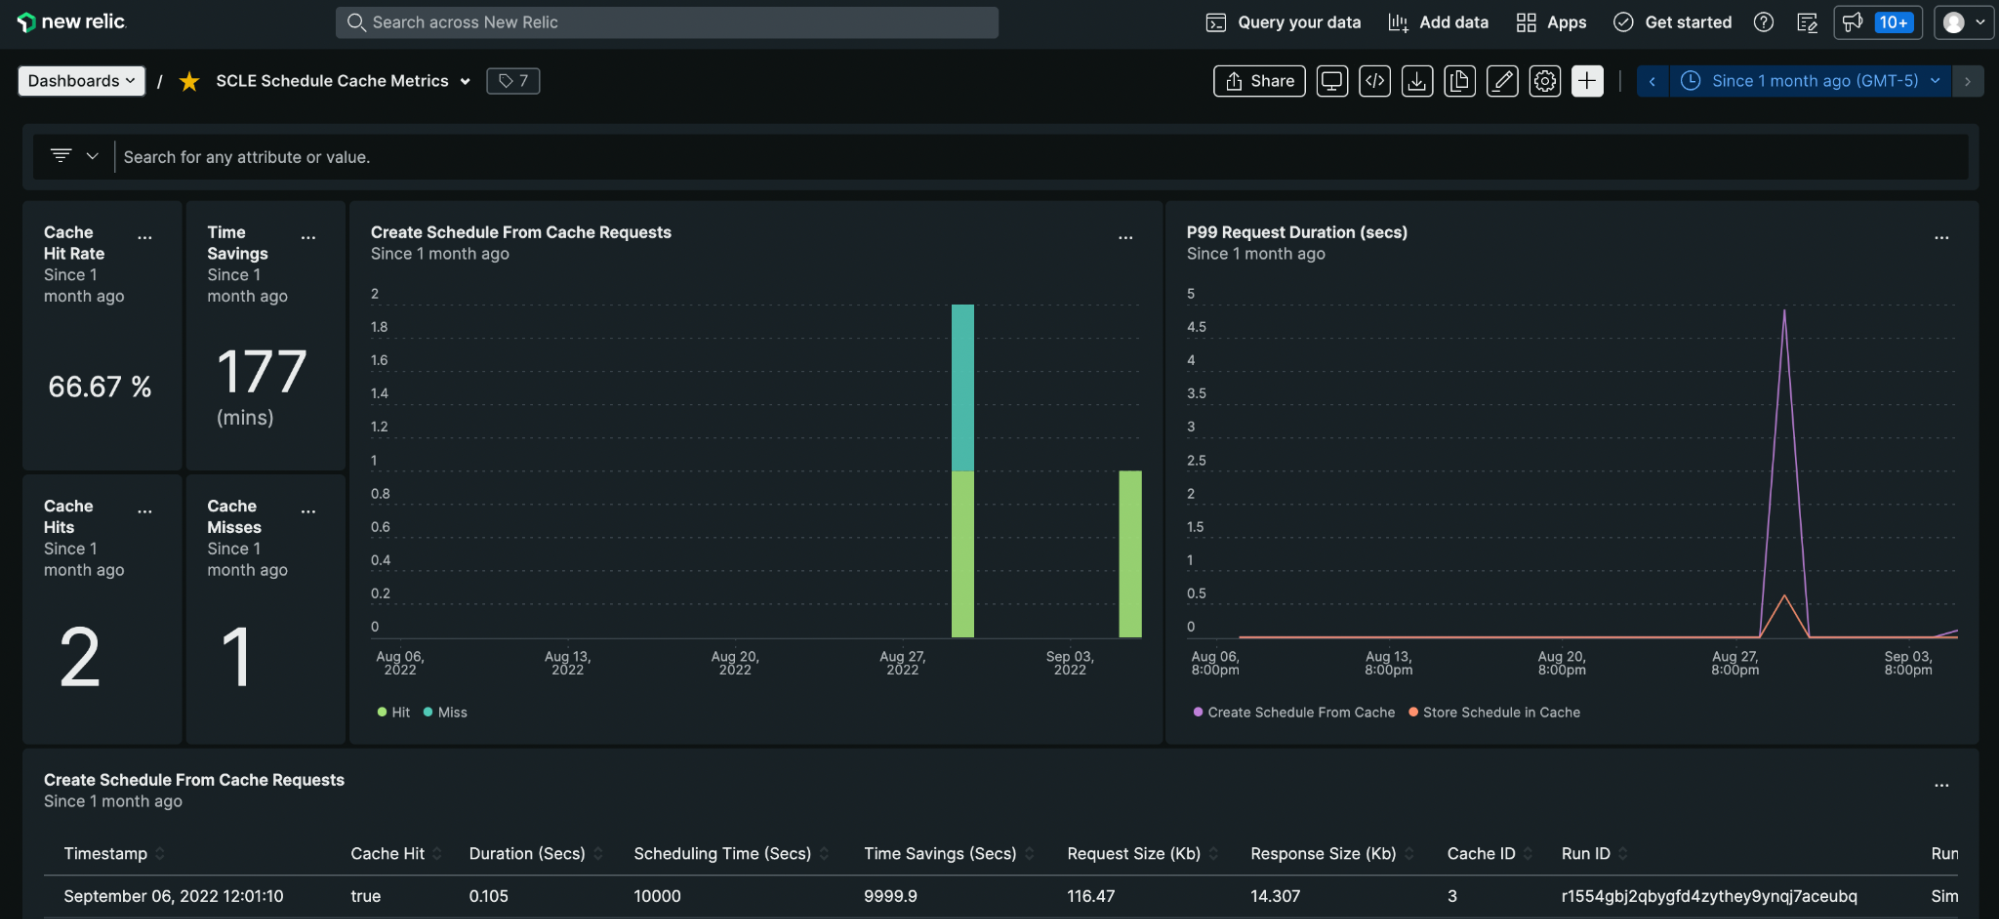
Metrics and errors are reported to New Relic. A custom dashboard allows us to view metrics like Cache Hit Rate and Total Time Saved.
My Ginkgo Experience
This summer marked my first time on the East Coast, as well as my first introduction to biotech. Ginkgo was a great place to experience both of these things! I especially valued the experience of going into the office and being able to see firsthand the work being done in the labs. It was also a great opportunity to meet new people and talk to people who worked in all sorts of roles. Being able to actually talk face to face with the people you work with was such a stark contrast to the remote internships and remote learning from the past 2+ years. Ginkgo also allowed me the flexibility to work from home, which was a nice perk.
Some highlights from my summer include meeting the founders, weekly intern lunches, intern events like Canobie Lake Park and kayaking in the Charles River, and exploring the Boston area on my own.
Conclusion
As this summer wraps up, we want to thank our Digital Tech Team interns for their contributions. What they accomplished has been impressive. Thank you, and we wish you great success in what you all will be doing next!
Once again, the Digital Technology Team welcomed a number of interns this summer. This is the first of a two-part series where our interns tell you about their summer in their own words. We will begin with Ariel, Yasmine, and Evan!
Ariel Fuchs, Software Engineering
Introduction
Hello! I am Ariel and I am pursuing a Bachelor’s Degree in Computer Science and Brain and Cognitive Science at MIT. This past summer I have been working on the Impressionists team as a full stack software engineer intern. Before I dive into my summer project, I want to give a BIG shoutout to Ben Hyman and Taylor Penberthy for being amazing mentors and enabling me to grow significantly from when I first started at Ginkgo!
Project
The overarching goal of my project was to create a personalized settings page for Ginkgo services. On this page, users can tailor services so when they are working with different tools, all of their preferences will be pre-selected. Since this project will keep expanding after my internship, my specific summer project was to create the foundation and build out the necessary components for Servicely Users. Servicely is a unified applications portal for Ginkgo’s Foundry services, and is designed with two different personas in mind: requesters and operators. Requesters are users who make requests to Foundry services. Operators are users who carry out Foundry service runs in the lab. I worked on the front end in React, and implemented the backend portion using a Django framework.
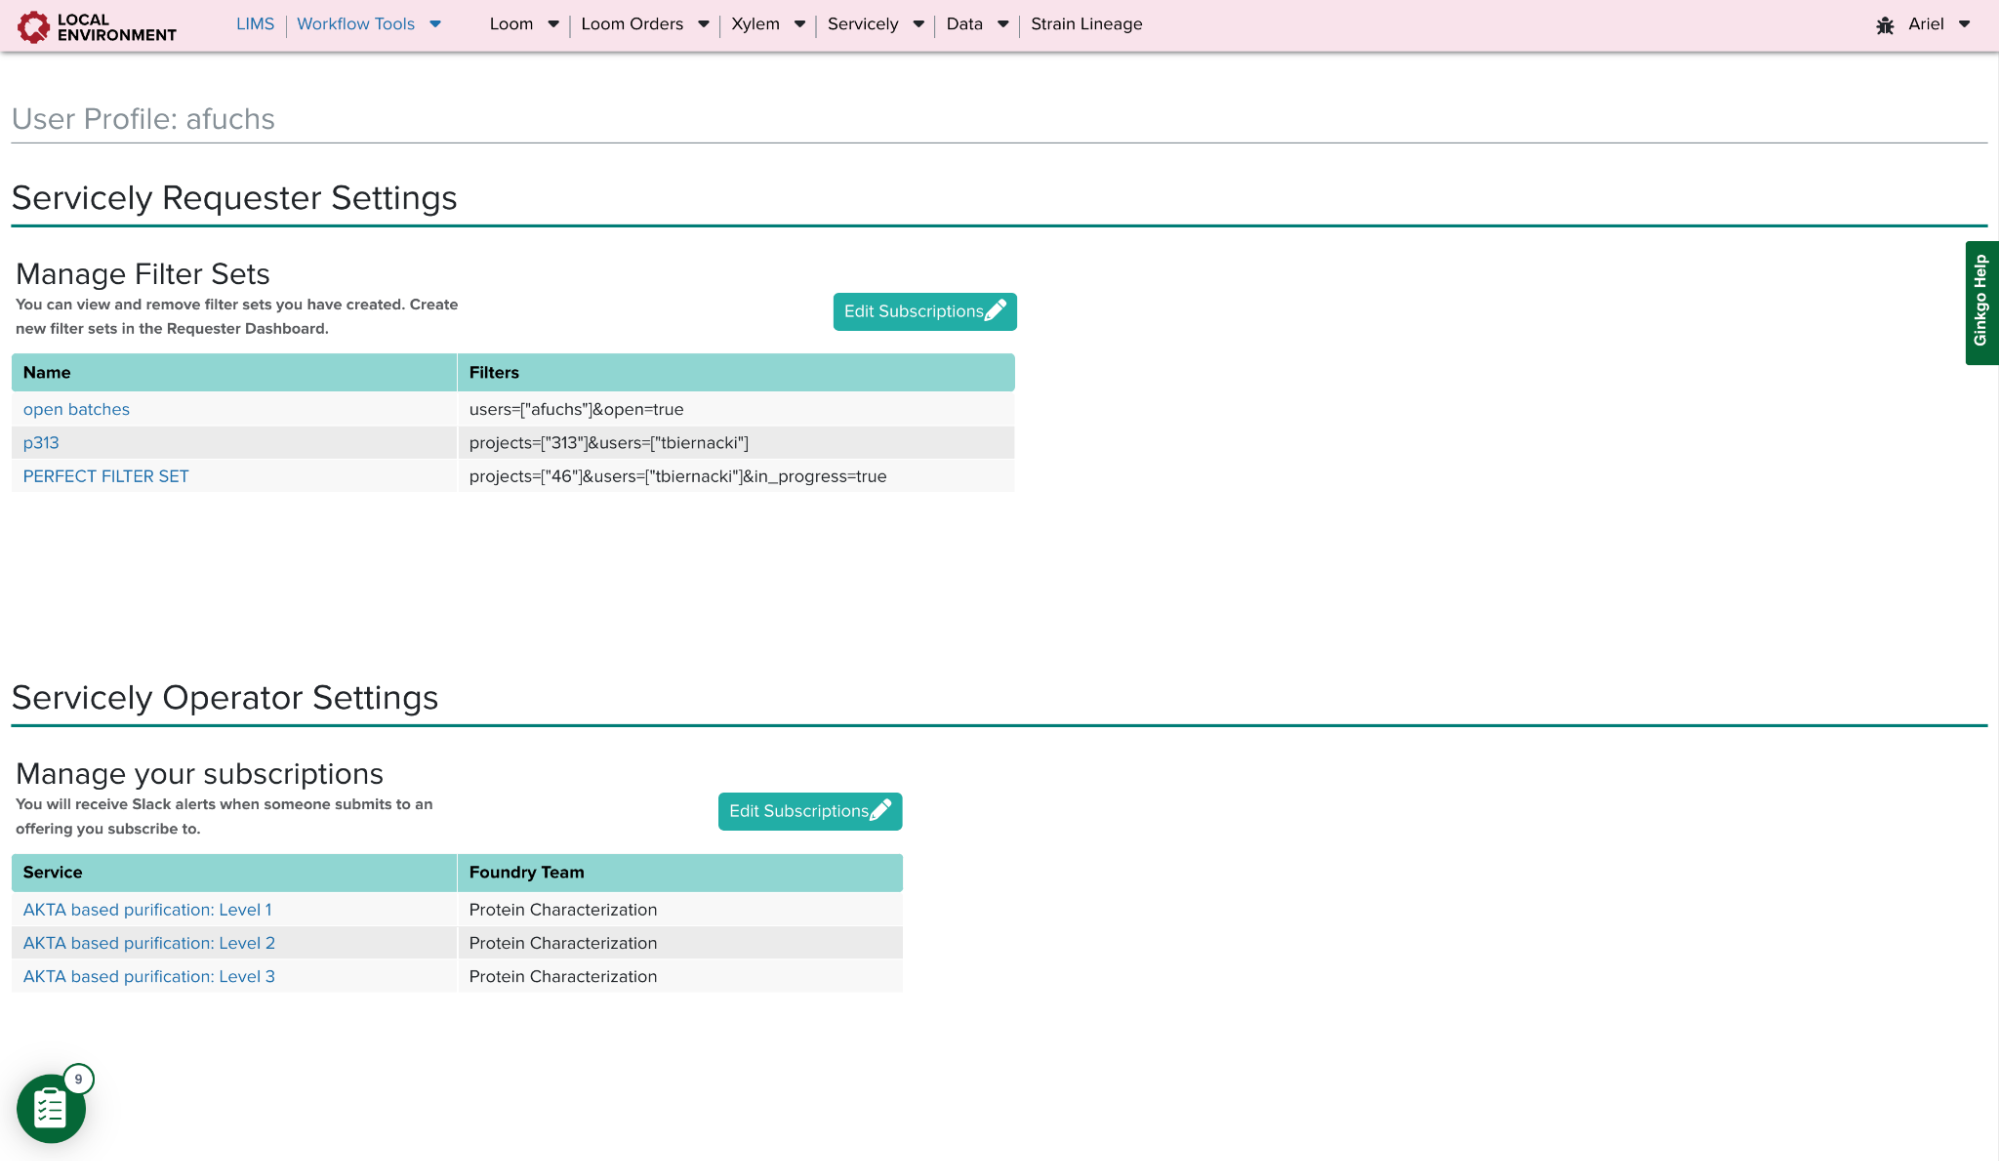
This is a screenshot of the settings page with a view of the Requester Component and Operator Component that I created.
Operator Settings Page Component
On Servicely’s Operator Dashboard, there is a list of all services and a list of all users who subscribe to each one. Being subscribed to a service allows for necessary slack notifications when requesters submit offerings. However, this page is not designed to specifically show services relevant to a user. Therefore, in the settings page, I created a table where users could manage all of their subscriptions. Operators can now see all services they are subscribed to, and they can easily add or remove themselves from multiple services at a time.
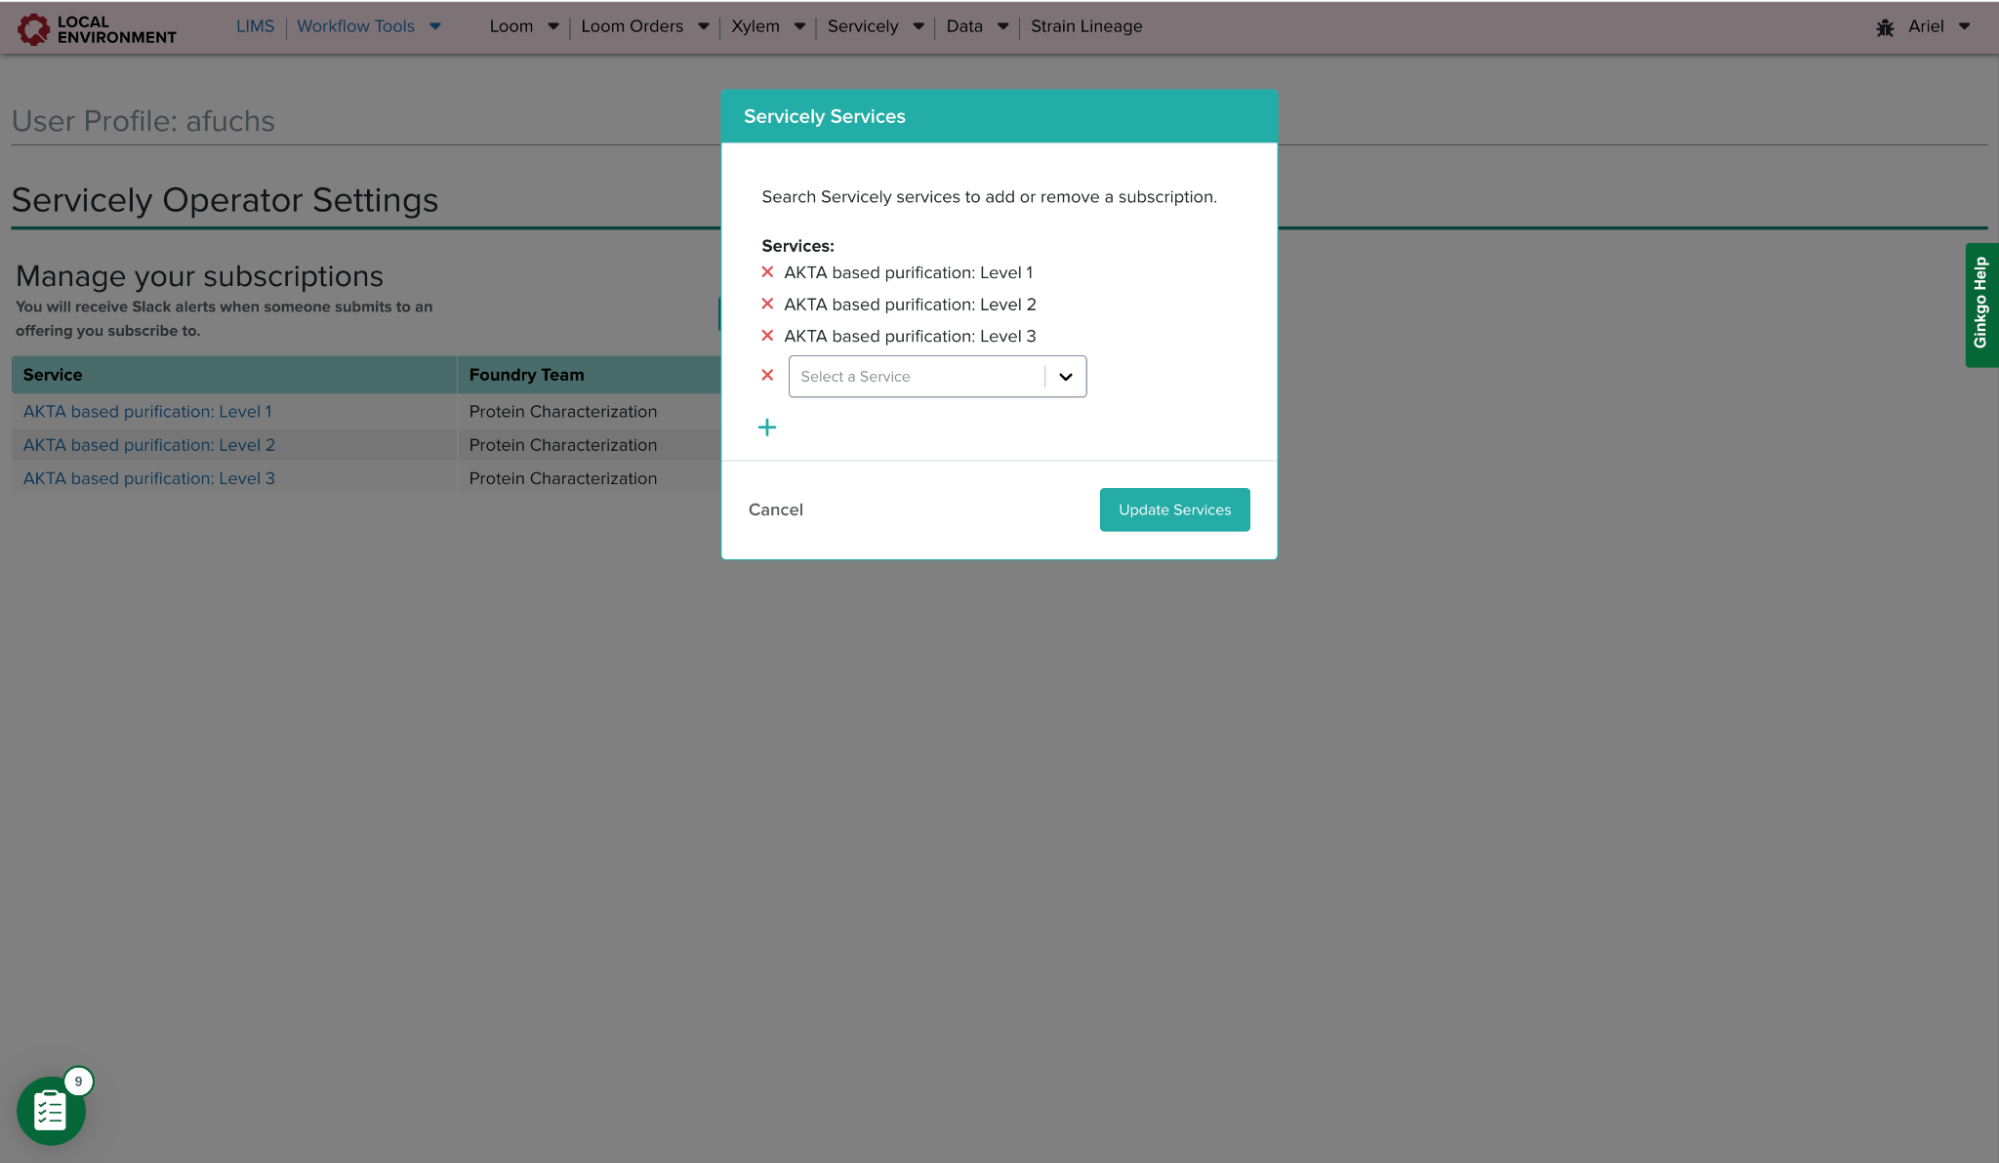
This modal allows users to add or remove as many services as necessary. Once the user hits the ‘Update Services’ button, the table will immediately reflect the current subscriptions. Operators can also navigate to a service from this table.
Requester Settings Page Component
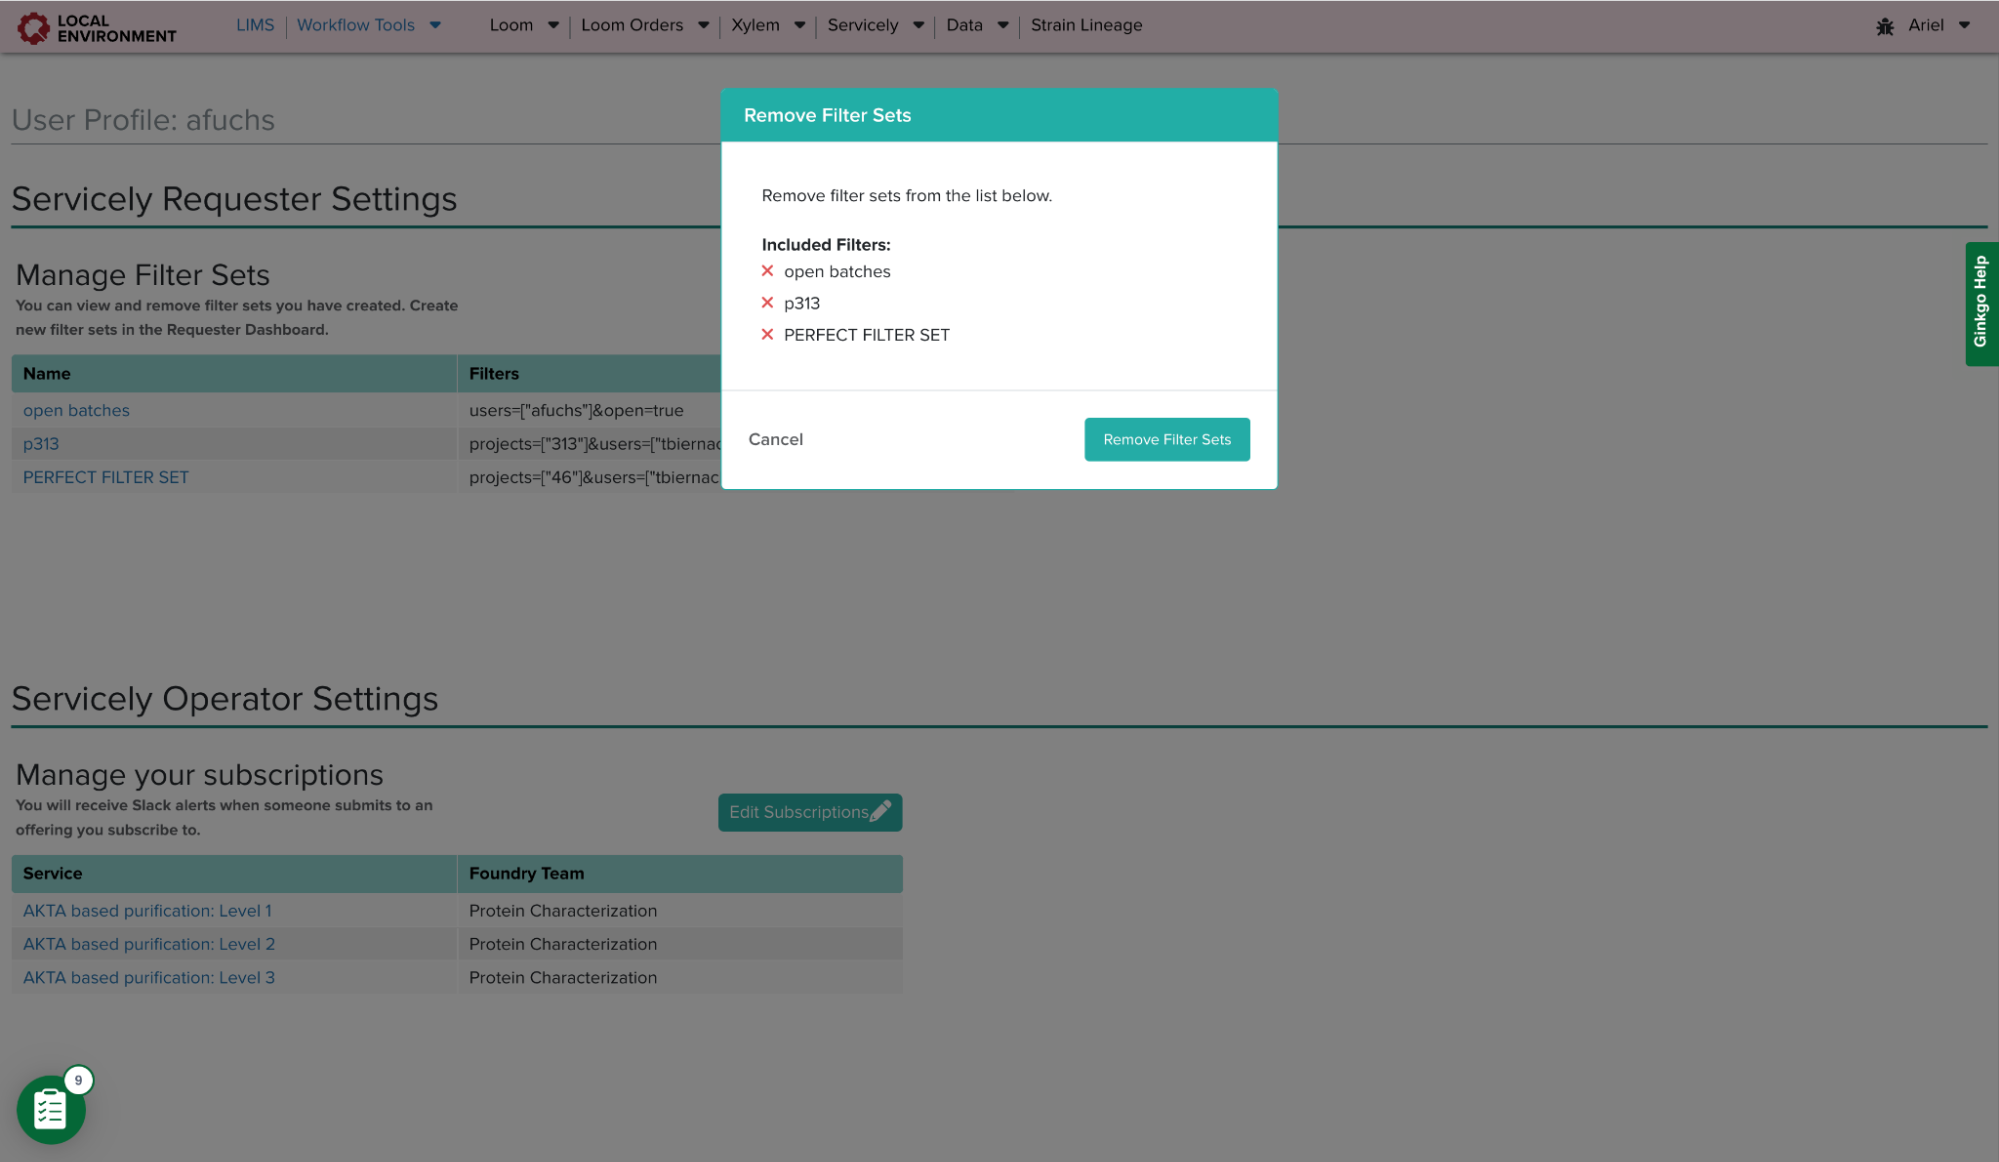
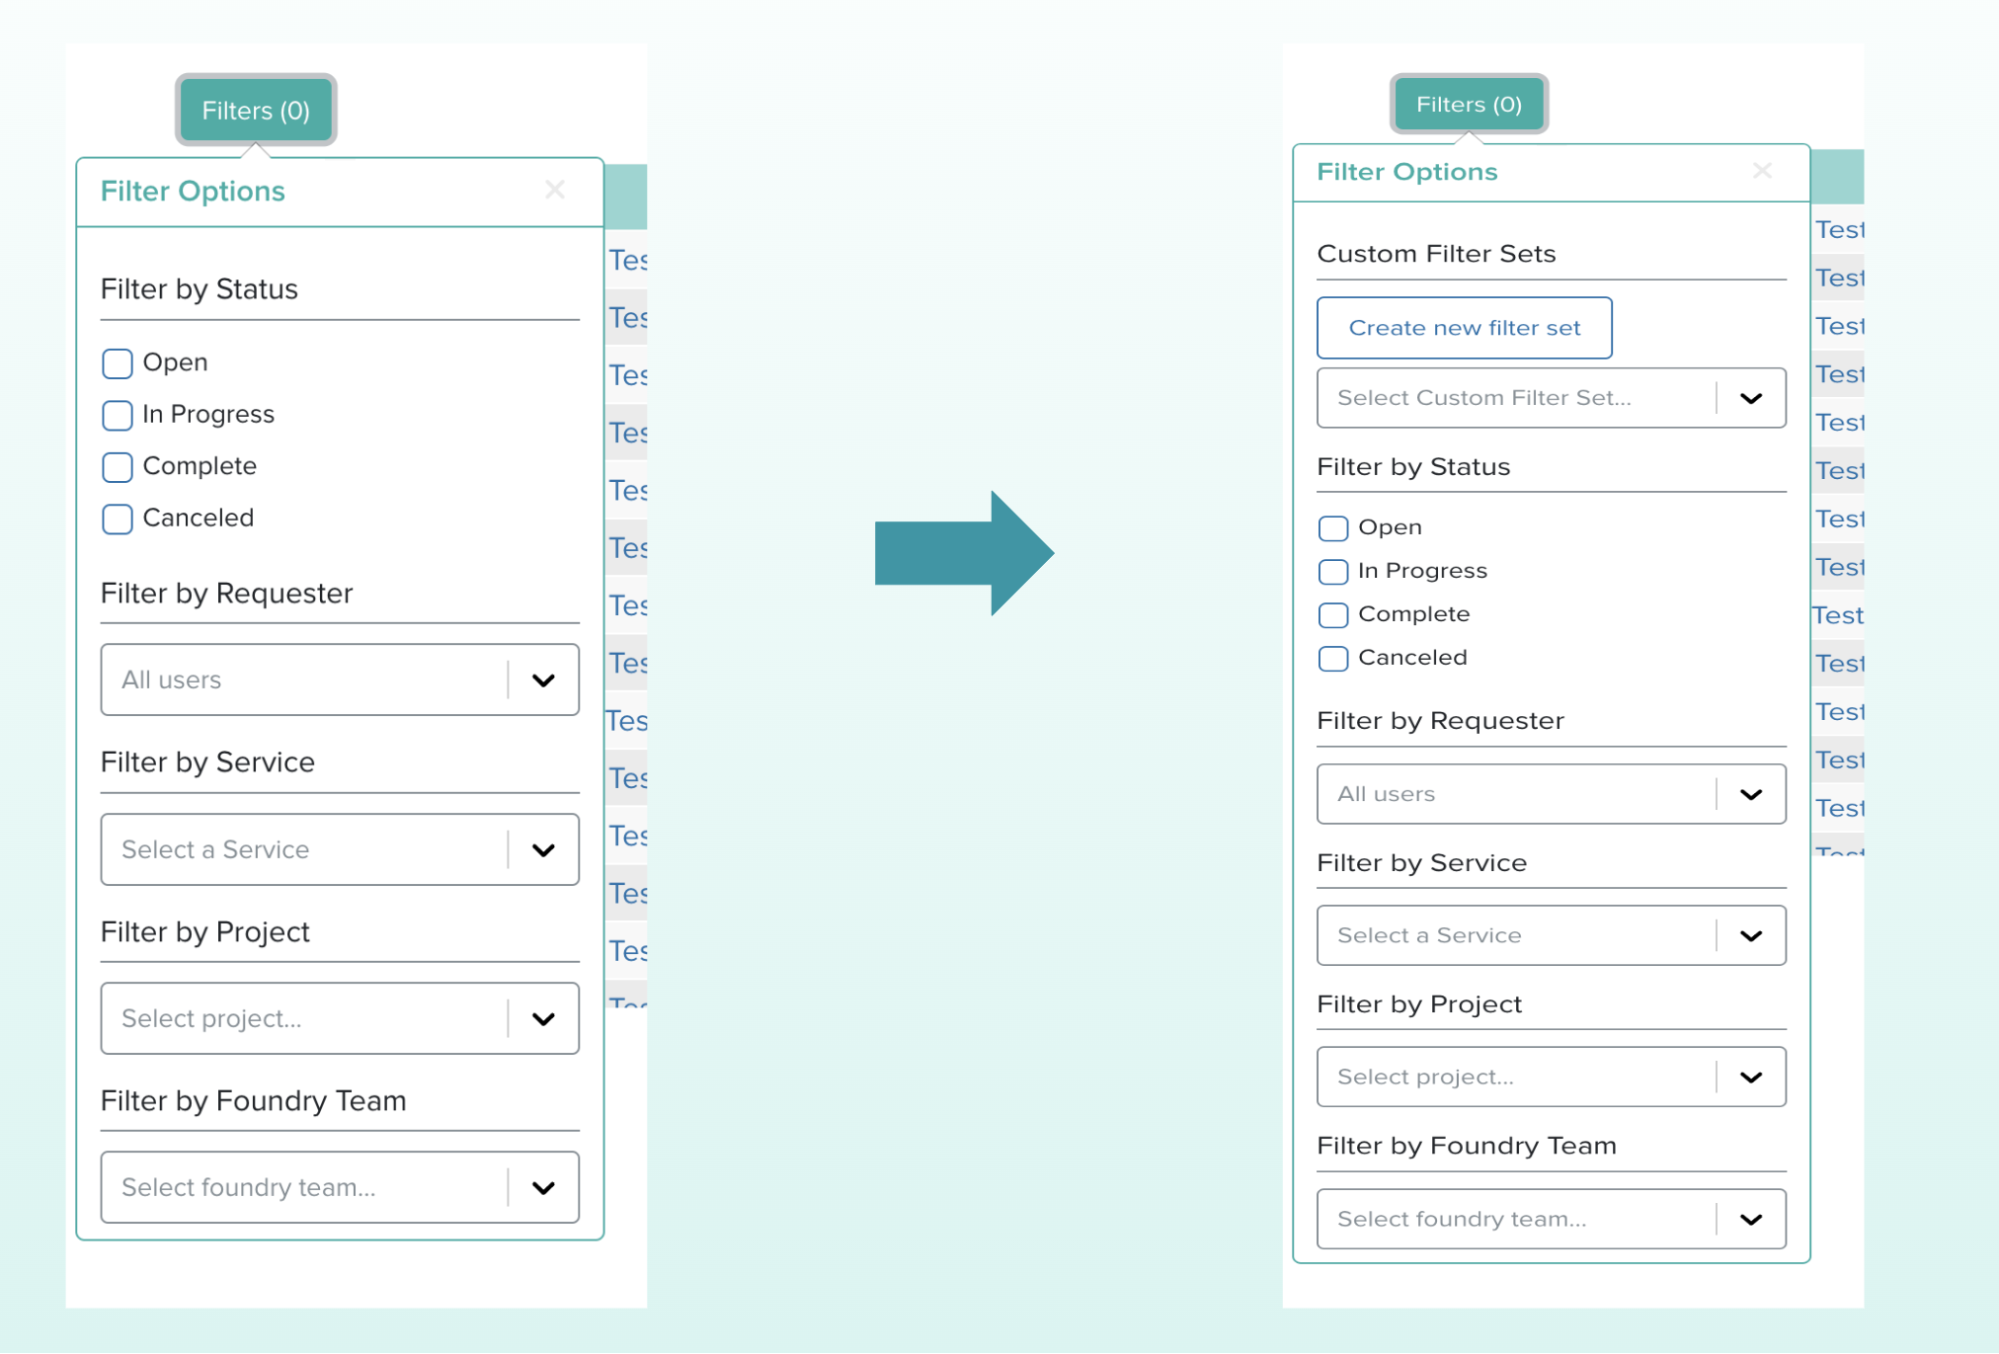
On Servicely’s Requester Dashboard, there is a display of all batches created. This table displays the status of each batch, the project and service it is associated with, and the Foundry team and users involved with the request. Similar to the Operator Dashboard, this page is not designed to show which batches are relevant to a user unless multiple filters are applied. Therefore, to make the Servicely requester experience more efficient, I introduced the notion of custom filter sets. These filter sets are a collection of filters that are commonly applied together by the requester. Users can create unlimited filter sets and apply them easily in the existing filter panel. Requesters can manage these filter sets in the settings page by setting their default filter set or removing any filter sets they have created.
This modal allows users to remove as many filter sets as needed. Once the user hits the ‘Remove Filter Sets’ button, the table will immediately reflect the current filter sets a user has. Requesters can then navigate from this table to the requester dashboard with the filter set of their choice applied.Once any filters are applied, users can create a filter set. This filter set will then appear in the dropdown in order for requesters to filter the batch table more easily.
Ginkgo Experience
Besides working on my summer project and taking on additional software tickets, I was able to meet with many senior leaders at Ginkgo and expand my technical background. It was extremely exciting to meet the founders and learn about their experiences first hand. In addition, everyone I worked with was very knowledgeable and I learned more with every interaction I had with them. It was amazing to work on a project that would have high visibility and be used by many users across Ginkgo’s platform. My last highlight of the summer was the intern cohort. I enjoyed getting close to them through amusement parks, movies, and many ~Ginkgo sponsored~ meals:) Overall this was a very impactful summer and I am very grateful to everyone who helped me succeed!
Yasmine Karni, Software Engineering
Introduction
Hello! My name is Yasmine, and I just graduated with my Bachelor’s in Computer Science and Biology from Northeastern University, where I will also be completing my Master’s in Bioinformatics. This summer I had the pleasure of being the Software Engineering Intern with Ginkgo’s Decepticons team, which has a main focus of building and maintaining LIMS and OrganiCK services. LIMS is the Laboratory Information Management System, which tracks information on all of the samples in the Ginkgo Foundry. OrganiCK, aka the Organism Construction Kit, is a sister-service to LIMS meant to help users plan their experiments, note progress, and interact with samples in LIMS while running a wet lab workflow.
Main Project: Cre Lox Content Update Step
My project’s focus was to build a new content update step on OrganiCK. Content update steps in OrganiCK allow users to track the physical steps that occur on their benchtop as part of a workflow, and they also get LIMS to modify the relevant sample information accordingly, so that the LIMS samples stay up to date with the physical state of the biological samples.
The new content update step that I implemented was a Cre-Lox Recombination step. Previously, this step was being handled semi-manually by a Python package written by a Ginkgo Organism Engineer, and did not integrate with the OrganiCK and LIMS workflows. The existing solution was not easy to use and required biologists to run Python code themselves, while not being able to maintain and calculate sequence annotations or integrate into our strain lineage tracking system. By integrating the cre lox content update step into LIMS and OrganiCK, this crucial annotation and strain lineage tracking functionality is added, and the process for tracking these recombination events is streamlined. Before I dive into the specifics of my project, let me describe what a cre-lox recombination consists of.
Cre-Lox Recombination System
The cre-lox system is a site-specific recombinase system. A set of cre recombinase enzymes recognize, cut, and recombine a pair of target lox sites, resulting in a targeted insertion, deletion, or inversion of the molecule. The lox sites adjacent to the affected flanked DNA are recombined during this process. See the diagrams below for an example of each:
Inversion
When the targeted DNA region is located between two lox sites with inverted spacers facing opposite direction, in the presence of cre recombinase, the targeted DNA will be inverted.
Deletion
When the targeted DNA region is located between two lox sites with congruent spacers facing the same direction, in the presence of cre recombinase, the targeted DNA will be removed along with a lox site into a circular plasmid.
Insertion
Finally, when one linear DNA molecule or genome and a circular plasmid each have a lox site, in the presence of cre recombinase, the plasmid DNA will be integrated into the linear lox site. An insertion is just the opposite of a deletion!
Building the Content Update Step
As you can see, a cre-lox recombination is a complex biological process, requiring an equally complicated bioinformatic computation to track the reorganization of sequences. This is where Strand comes in. Strand is a bioinformatics microservice that helps LIMS calculate the sequences that would result from genetic editing operations, like for instance: the annealing of DNA (joining complementary strands), digesting DNA (cutting DNA by way of restriction enzymes), or PCR (polymerase chain reaction).
So, the first step to building a new content update step was to first build a new Strand endpoint to handle the bioinformatic process of a cre-lox recombination. This involved creating a new AWS lambda function for cre-lox, and surfacing an endpoint which could be used to spin up lambdas on command to perform the calculation in a scalable way. Of course I also had to add the cre-lox operation to the core bioinformatic library which powers Strand. Unit and integration testing allowed me to ensure that the entire concert of the AWS infrastructure from the beginning of a Strand request through receiving a response from the endpoint worked together reliably.
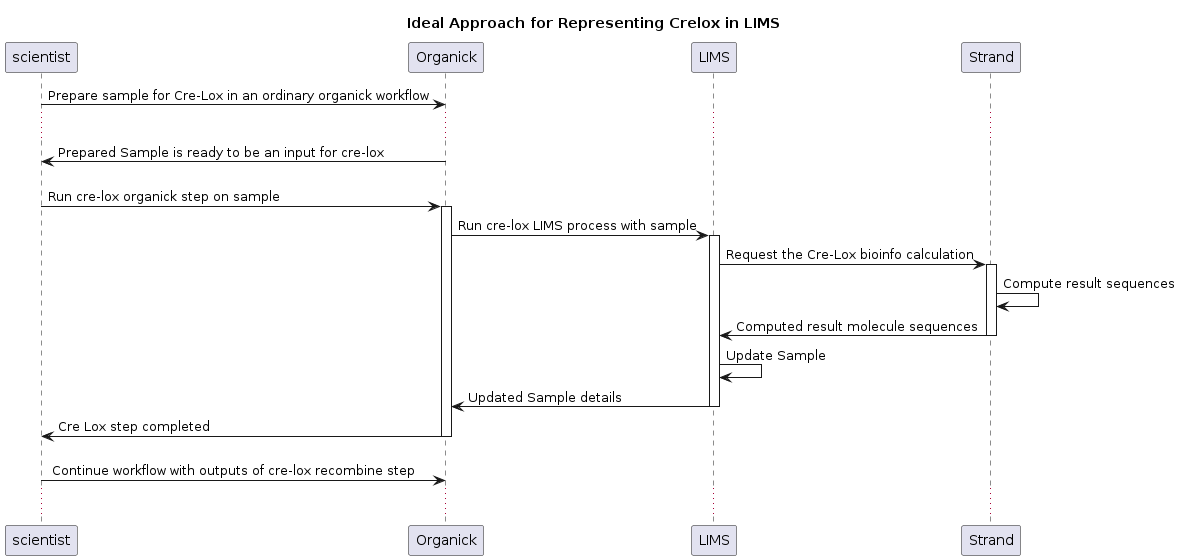
Now that the new Strand endpoint was implemented, the next step in creating the content update step was to define the behavior we want on OrganiCK and LIMS. If you look at the diagram below, you can see the dataflow of a sample in the lab undergoing a cre lox recombination, and how that content update step is being propagated through the various levels of infrastructure. I needed to create a new OrganiCK step which would call into LIMS to update the samples; in order for LIMS to update the samples, it needed to call into the new cre lox endpoint on Strand to calculate the new sequences.
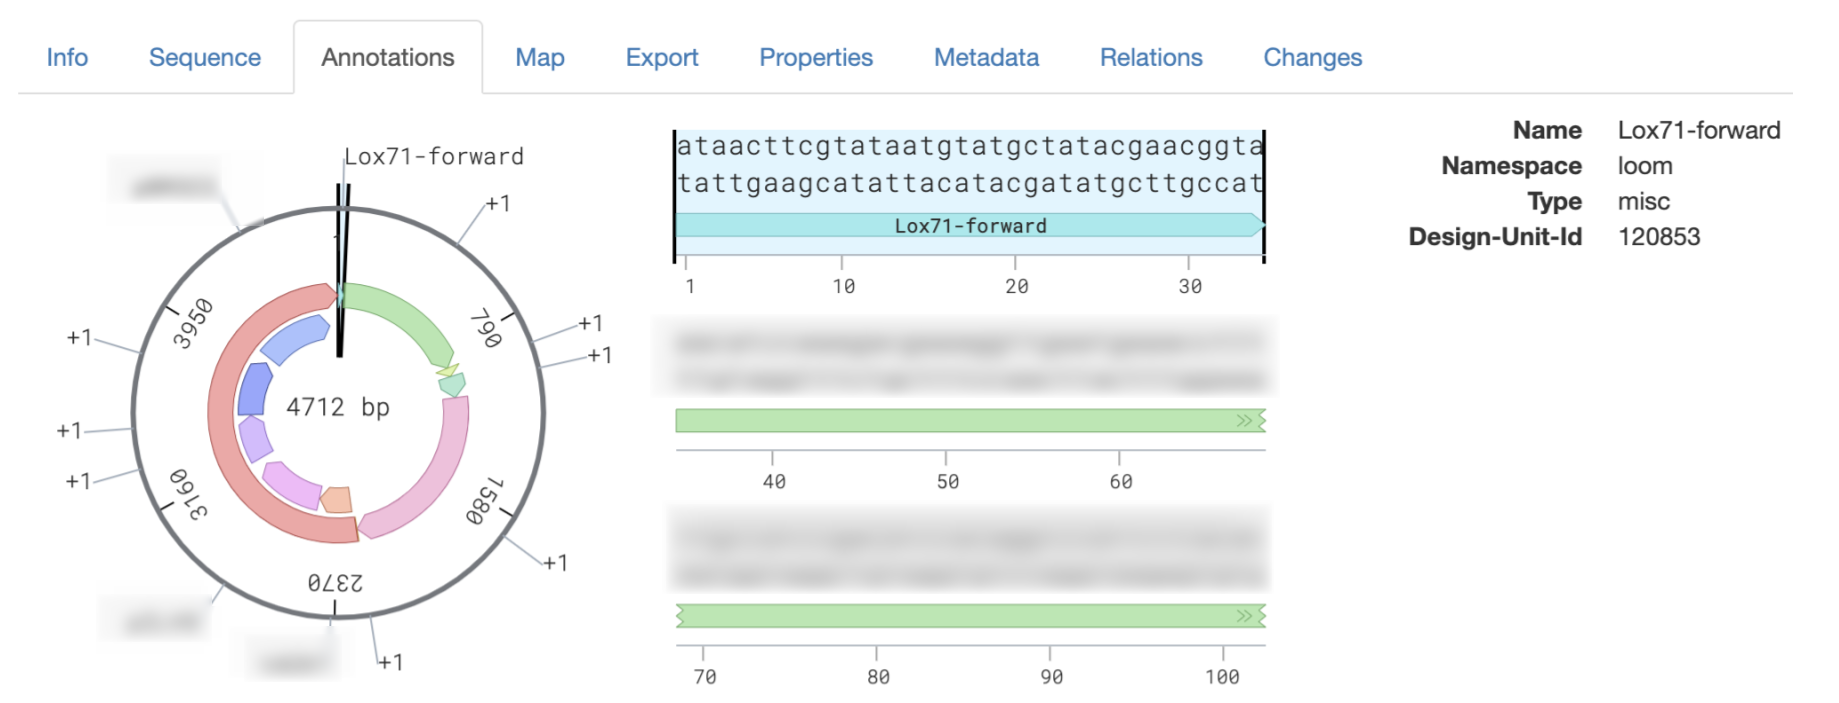
Adding Annotations
Once the first draft of the cre lox content update step was completed and live on OrganiCK, the final step to fully integrating the product molecules with Ginkgo’s LIMS was to make sure they maintain annotations once they undergo a cre-lox operation. Annotations provide context to molecules, such as where a start codon or a promoter is located – or in the case of cre-lox, where a lox site might be! Propagating annotations for the cre lox operation through Strand and finally onto LIMS was the final step to completing my project. See below for an example of annotations on LIMS:
End Result
The aim of my project was to increase the efficiency and efficacy of the cre-lox workflow for biologists at Ginkgo. I produced a new content update step to keep track not only of the changes to molecules in LIMS undergoing a cre-lox recombination, but also of their positional annotations and strain lineages. Now, when a cre-lox operation is performed, scientists no longer have to run a Python package themselves and can rely on OrganiCK to perform the cre-lox calculations and update LIMS for them.
My Ginkgo Experience
Throughout my Ginkgo experience, I was able to develop and foster not only my technical skills, but also my people and whimsy skills. I feel so grateful to have had the opportunity to learn about my team and work on my own project, as well as to have explored all different sides of the company, from product management to scientists in the lab.
I had a great time getting to know the other interns and going to all the fun intern events: from kayaking on the Charles to lunch with the founders of Ginkgo, to going to a Red Sox game at Fenway park! A major shoutout to David Zhou and Hanna Tseng for organizing our events, and a huge thank you to Abe Miller, my Decepticons mentor, for always being there, answering my questions, and cheering me on.
I truly could not have asked for a better internship experience, and have learned an incredible amount this summer. Thank you Ginkgo!
Evan Kenyon, Software Engineering
Introduction
Hi, my name is Evan and I’m currently a rising senior at Duke University, studying Electrical and Computer Engineering as well as Computer Science. This summer, I interned on a scrum team called the “Terminators” working on a project in Loom, Ginkgo’s platform for designing and ordering DNA libraries that is widely used by biologists throughout the company. My work this summer was full-stack, fairly evenly distributed between backend and frontend. My project would not have been as successful as it was without the guidance of my mentor on the Terminators, Travis Beach; contributions from the Product Design team, and feedback from our users.
Main project: Sub-Combinatorial Designs in Loom
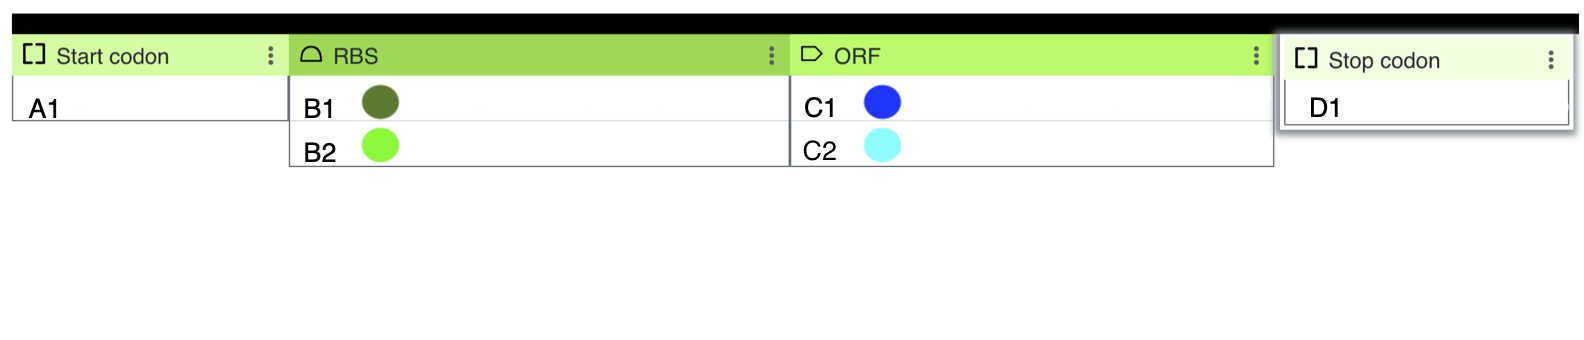
In Loom, users design constructs, which are segments of DNA that can eventually be put into an organism for some desired effect. A design in Loom is made up of multiple buckets, and each bucket has one or more design units (reusable DNA parts). Every bucket represents a different type of DNA, so one bucket could be for Ribosome Binding Sites (RBS), another for Open Reading Frames (ORF), etc. Before my project, users in Loom could only create fully combinatorial designs, which means that a construct is created for each possible combination of design units across each bucket.
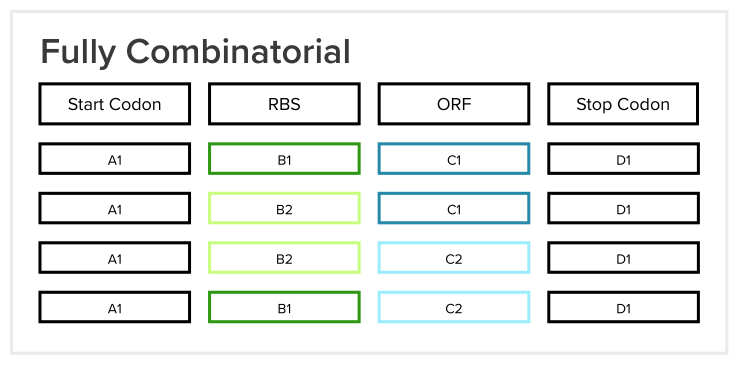
In the example shown above, 1 * 2 * 2 * 1 = 4 constructs would be created when the user clicks a “Create Constructs” button. The table below shows the constructs that would be created:
Users were only able to create “sub-combinatorial” designs (designs that included fewer than every possible combination) via our team’s Python library before my project. Since the users are biologists, most of them have little coding experience and have to spend a nontrivial amount of time learning Python in order to access such features rather than simply clicking a button like in Loom.
To make this possible, my project allows the user to upload CSV files defining relationships between design units in different buckets. For example, in the above design, they could decide they only want B1 in the RBS bucket to be used with C1 in the ORF bucket, and for B2 to only be used with C2. Thus, the total number of constructs would now be 2, shown in detail in the table below:
My Ginkgo Experience
Throughout my internship, I had really valuable experiences with fellow interns, my teammates, and other teams alike.
This summer, due to the improved pandemic situation, I was thankfully able to come into the office quite often. This allowed me to meet other people who I would not have otherwise had the chance to meet, and it was great to learn about the many different types of workers at Ginkgo this way. Also, it helped me bond with the other interns since we usually had lunch together at least once a week.
Aside from those in-person office experiences, David Zhou and Hanna Tseng led an intern program this summer that was filled with great social events. This included a luncheon with the founders of Ginkgo, which was my favorite day of the summer. These events also further helped increase the bond among the interns.
Finally, as part of my project, I had the chance to get feedback for my project from the Product Design team during their office hours, and I gained valuable insight into the product design process. I also regularly interacted with my teammates in various meetings and learned about how my team is helping Ginkgo grow.
This summer at Ginkgo has been great, and I have gone through professional and personal growth because of my experience as an intern here.
Stay tuned! In our next blog post, we will be hearing about more cool things that our interns have been doing this summer!
If your organization uses Docker, the expression “works on my machine” might feel out-of-date to you. But if your organization is also considering moving to newer Macs (circa November 2020), you might find that expression making an unexpected comeback.
We ran into just this situation at Ginkgo Bioworks. We use Docker extensively for developing and running our applications, and normally everything works seamlessly. That is, until we started outfitting our developers with newer MacBook Pros.
We learned that Docker containers can behave differently on different machines–sometimes in complex and confusing ways–and those differences can be significant. In this article, I’d like to share some of what we learned so that others can have a head start working through the issues and sources of confusion they might encounter along the way.
Why Is This Complicated?
Docker images, despite their renowned portability, are sensitive to the chip architecture they are built and run on (Docker calls this the “platform”). This sensitivity isn’t a big deal in a world where everyone uses the same class of chips. Docker images would only need to support a single architecture to make most people happy.
But a couple of years ago, Apple (an admittedly popular company) started rolling out computers with what is colloquially called “Apple Silicon”: M1 or M2 chips that use an ARM architecture instead of the traditional x86 architecture used on Intel chips.
Luckily, Docker images can be crafted to support multiple architectures, and many of the most popular base images are! Ideally, this removes the entire cognitive burden of dealing with different architectures for the average Docker user. For example, if you are working on a machine that uses Apple Silicon, Docker automatically knows to pull and run an image version compatible with that machine.
What if you are on Apple Silicon and the only version of the image available targets x86? Theoretically, Docker Desktop for Mac has you covered. It will automatically emulate an x86 environment if you are trying to use an x86 image on a machine with Apple Silicon.
Protip: You can see the architecture your image is built for with the command docker run <IMAGE> uname -m. If it echos back “aarch64”, you’ve got an image happily built targeting Apple Silicon. If you see “x86_64” instead, your image targets Intel chips and will run under emulation.
So What’s the Problem?
There are two issues. First, not all base images support all architectures. Second, Docker Desktop emulation isn’t perfect. To quote Docker, “running Intel-based containers on Arm-based machines should be regarded as ‘best effort’ only.” Not only will you get a pesky warning, but you can get bugs too.
Example: “WARNING: The requested image’s platform (linux/amd64) does not match the detected host platform (linux/arm64/v8) and no specific platform was requested”
…And that is exactly what we discovered at Ginkgo. Developers who had been issued newer Macs and were working on a Ruby application found that common Ruby commands like bundle install and rake would hang forever, making the Docker build and container runtime unusable.
Ultimately, the issue was that the base image we use does not support Apple Silicon. So when a developer pulls this image on a newer Mac, it runs under x86 emulation, which, as we already mentioned, isn’t perfect. In our specific case, we found that an alternative version of malloc we use to reduce ruby’s memory consumption did not agree with its emulated environment. If we removed the library or switched to a base image that supports Apple Silicon, everything would start to work.
Wait, Doesn’t Docker have a “–platform” Flag?
Yup! It sure does. docker run and docker build both have a flag that lets you explicitly set the architecture, but they don’t work as one might expect.
For example, running:
docker run --platform=linux/arm64 ...
on Apple Silicon won’t magically make the container work if an image supporting ARM architecture doesn’t exist. Instead, this command tries to create a container from an image already built for ARM architecture. If such an image does not exist locally, Docker will try to pull it. If such an image does not exist remotely either, Docker will fail.
The “build” case is regretfully more confusing. If possible, running:
docker build --platform=linux/arm64 ...
on Apple Silicon will indeed build an image that supports ARM architecture; however, if your base image only supports x86 (as ours does), then Docker will silently build the image against linux/amd64 (aka x86 Intel chips)! This behavior was particularly misleading for us because it made it look like our images should support Apple Silicon and thus run without the Docker Desktop emulator; however, that is the exact opposite of what our images were doing. Remember that pro-tip from before about checking the architecture of your container? It was crucial here to discern the true nature of how our images were being built.
Takeaways
If your organization also relies heavily on Docker and plans a similar move to machines that use ARM chips, hopefully some of the lessons I’ve shared here will be useful. In the end, simply being aware of the common pitfalls and knowing where to look first can save you significant time and make the transition smoother.
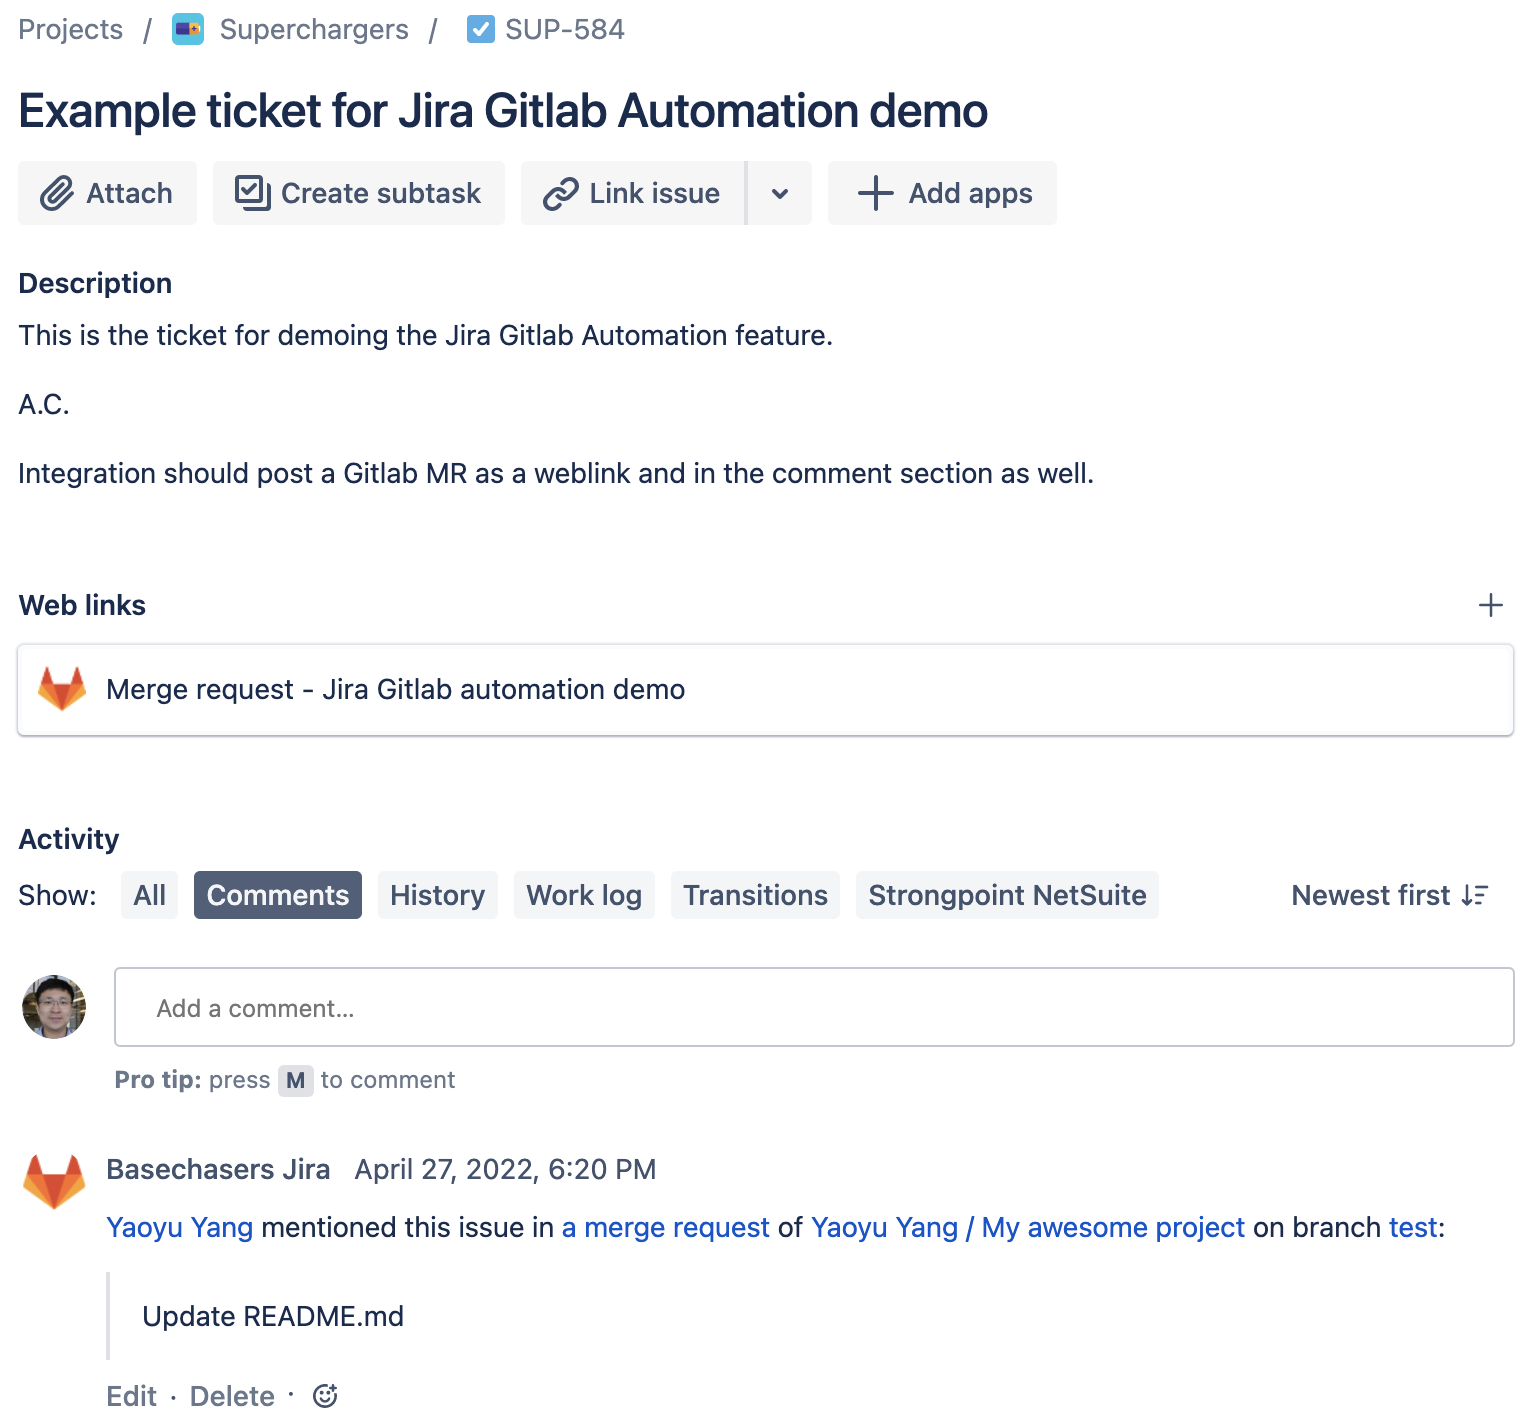
At Ginkgo, we use Jira to do ticket/issue tracking to facilitate agile software development and Gitlab as our version control system to manage our extensive software codebase. As software engineers, you usually create tickets on Jira and then create branches and open merge requests (MRs) on Gitlab to work on these tickets. We use the integration that Gitlab and Jira offers to track the association between the tickets in Jira and the merge requests in Gitlab. Gitlab has extensive documentation and videos about how to set up this integration. I’m not going to repeat their instructions here; instead, I’m going to highlight how we are using it at Ginkgo and what benefits we get from using it.
The Flow
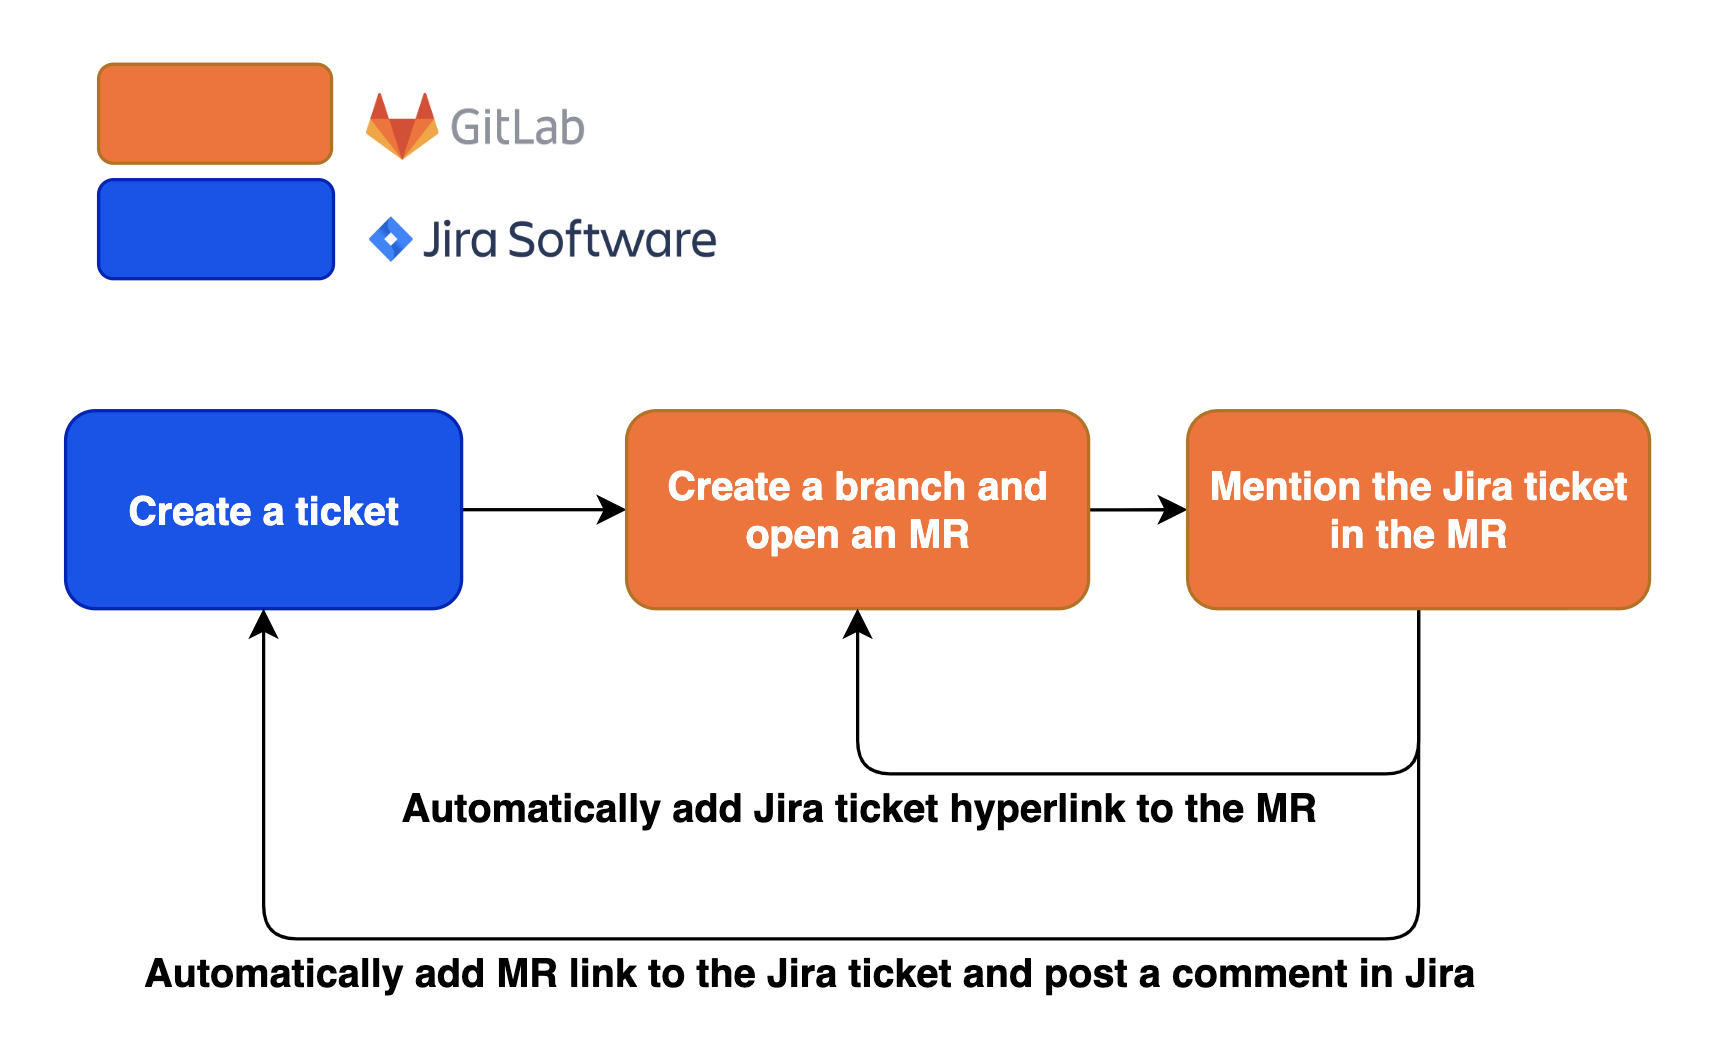
This diagram gives a quick overview of the user flow for this automation feature.
Product manager or software engineer creates a ticket on Jira to track the work
Software engineer creates a branch and open an MR on Gitlab
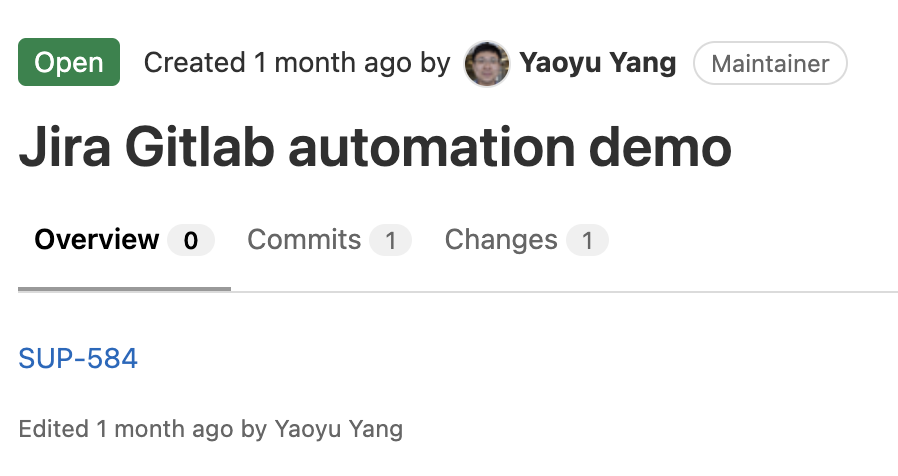
Software engineer mentions the Jira ticket in the MR by the Jira ticket shorthand, e.g. SUP-584, where the SUP is the shorthand for the Jira project name and 584 is the ticket number, in the MR description or the branch name.
Gitlab Jira integration automatically converts the shorthand ticket number in the MR as a hyperlink to the Jira ticket, adds a link of the MR in the Jira ticket and posts a comment in the Jira ticket about the MR.
As software engineers work on the MR, it posts updates to the Jira ticket whenever there is an update on the MR. For example, new code commits on the MR will result in a new comment on the Jira ticket.
Benefits
We’ve been using this Jira/Gitlab automation feature for more than 2 years at Ginkgo and it provides some strong benefits for product managers, software engineers, and engineering managers. Before the integration, we had to manually add the Jira link in the Gitlab MR and manually add the MR link in the Jira ticket and it was quite time consuming and not everyone followed the steps. Since the integration was implemented, way more engineers used this feature because it is super easy to just write a ticket number in the MR and let the automation handle the rest. As a result, it has been:
easier to figure out the context of an MR by easily going to the Jira ticket.
easier to figure out the coding work done on a Jira ticket.
For example, a product manager or engineering manager who wants to figure out what the coding work done on the Jira ticket was can go directly from the Jira ticket to Gitlab without needing to ask the software engineers who did the work. Software engineers who review the MR can easily get to the Jira ticket to understand the context about the ticket, who created it, which epic it is under, how urgent it is, etc. Even software engineers who created the ticket and coded the solution can also look at a ticket or an MR years later and quickly get up to speed with the historical context around it. I cannot stress enough how important this is as I often look at the code I wrote years ago and wonder why I did it. There were more than several times that the Jira/Gitlab automation helped me recover my memory.
Summary
We highly recommend this Jira/Gitlab automation if we use Jira and Gitlab in your organization as well! It saves time and provides context by connecting two pieces of software coherently. If you have any questions on this or if you have similar automation practices in your organization, feel free to tweet us @ginkgobits and we love to discuss with you!
Git is a powerful and essential tool for anyone that writes code. It can also cause you great despair if you run the wrong command at the wrong time, so many of us keep our heads down and try not to get too fancy with Git. I actually find Git to be quite a joyful tool to use — it makes source control fun. Perhaps you feel a bit more neutral about it. At the very least, though, here are two git commands that will save you both time and heartache.
git reflog
We’ve all done it. Whether it was an ill-advised git reset --hard, git commit --amend with later regret, or a git rebase gone awry, at some point or another we’ve all run some destructive Git command that we later wished we hadn’t. Fortunately, the reflog is here to the rescue!
Git tracks changes made to branch tips and other references in the “reflog”. Lets see it in action. Create a Git repository and run these commands in a bash shell:
Maybe that last command was a mistake — you didn’t mean to amend. Check the commit log for master:
git log
The output should look like this:
commit 5f35ac5ddedfdd432bb6f66b13907ddd1ff58423 (HEAD -> master)
Author: Raymond Lam <[email protected]>
Date:   Sun May 22 23:31:34 2022 -0400

    fourth commit

commit 102175066a4df49ca9a29d17b0053d6f9bb61734
Author: Raymond Lam <[email protected]>
Date:   Sun May 22 23:31:34 2022 -0400

    second commit

commit 4d2a2d880f69726ca3f61c68a5f9ec33ec63340d
Author: Raymond Lam <[email protected]>
Date:   Sun May 22 23:31:34 2022 -0400

    first commit
It seems like that “third commit” is gone, along with hours of work! Never fear, though — run this command:
git reflog show master
The output from the last command should look like this:
5f35ac5 (HEAD -> master) master@{0}: commit (amend): fourth commit
0e1655b master@{1}: commit: third commit
1021750 master@{2}: commit: second commit
4d2a2d8 master@{3}: commit (initial): first commit
This is a log of every update to the master branch tip. (Your actual commit hashes may be different.) You can see when master was updated to “second commit”, and then updated to “third commit”, which you thought you lost, and then updated to “fourth commit” (and notice the indication that “fourth commit” is commit amendment). That “third commit” is the one you want back, so to put master back on that commit, go ahead and run:
From here, you can integrate recovered-branch back into master however you wish.
Interestingly, the reflog tracks other references besides branch tips, including HEAD. Run:
git reflog
which is shorthand for:
git reflog show HEAD
The output should look like this:
0e1655b (HEAD -> recovered-branch) HEAD@{0}: checkout: moving from 0e1655be8fe3cbaab32dc25f96c242927ba6677f to recovered-branch
0e1655b (HEAD -> recovered-branch) HEAD@{1}: checkout: moving from master to 0e1655b
5f35ac5 (master) HEAD@{2}: commit (amend): fourth commit
0e1655b (HEAD -> recovered-branch) HEAD@{3}: commit: third commit
1021750 HEAD@{4}: commit: second commit
4d2a2d8 HEAD@{5}: commit (initial): first commit
As you can see, every update to HEAD is tracked, including not only commits but branch checkouts. This is a pretty comprehensive log of Git activity in a repository and could come in handy.
git bisect
A customer calls customer support to report a bug that is blocking a critical workflow. Minutes later, another customer calls reporting that same bug. And then another, and another, and soon the support team finds itself inundated with calls from unhappy customers who suddenly cannot use the app that your team maintains. You are on call, and you get paged.
The pressure is on — you have to find and fix the bug before your service’s uptime SLA is breached. Debugging and fixing forward might take too long, and for whatever reason rolling back to yesterday’s deployment is impractical. The best thing to do would be to find the commit that broke the app and revert, but there have been a lot of commits between yesterday’s and today’s deployments. You start to panic a little…
We’ve all been there. The task is daunting, and the pressure is high. Fortunately Computer Science saves us. Don’t go through every commit — use a binary search to find the bad commit and save the day in logarithmic time! Take a known good commit, a known bad commit, checkout the commit in the middle, and test. If the bug is there, then that’s the new bad commit; otherwise, that’s the new good commit. Find the commit in the middle, test, and repeat, until you zero in on the bad commit.
This still sounds like a lot of work. Fortunately, git bisect will do a lot of it for you! Let’s give it a try. Initialize a Git repository and run these commands in bash to set up our scenario:
The v1 and v2 tags represent the last good deployment and a bad deployment, respectively. The exception is obviously the bug. To get started, run:
git bisect start
Next, we must give Git a good commit and a bad commit. Run:
git bisect good v1
git bisect bad v2
You can indicate any kind of reference (tags, branches, commit hashes, HEAD, etc.) as the good and bad commits. The output should look like this:
Bisecting: 2 revisions left to test after this (roughly 1 step)
[5082142d6835ac7af2186d717c3c9da29049bd55] Commit 4
This means that “Commit 4” is currently checked out. Test this commit (which is to say, run useful_program.py). If the bug manifests, run:
git bisect bad
If the bug is not present, run:
git bisect good
Each time, Git will checkout another commit for you to test. (It will also tell you roughly how many commits are left to test.) Repeat this process until the output looks like:
commit edaf593d26877117dcee190fd3f554ebe28f23d2
Author: Raymond Lam <[email protected]>
Date:   Sun May 22 22:26:17 2022 -0400

    Commit 5

:100644 100644 f01bb32ee5cd9e62a8572f9977f60f2c8d9a1acb 2007f74b3a0017f04780284afc0190445346e99b M	useful_program.py
Lo and behold, “Commit 5” is the commit where we introduced the exception! Although there were 6 commits since the last good deploy, we only had to test 3 of them. Revert the bad commit, deploy, and celebrate the elegance with which you brought an end to a crisis.
Other Resources
There are plenty of good resources out there to help you use, understand, and get the most out of Git.
The Atlassian Git Tutorials are quite good. My favorite of these is the Git Reset tutorial — git reset is one of those commands that is really powerful and dangerous (though not that dangerous thanks to git reflog!), and everyone uses it, and almost nobody really understands it. This tutorial does a great job of dispelling the mystery of this command.
Finally, there is a popular cheatsheet for getting yourself out of a jam when you run the wrong Git command. Dangit, Git!?! is the PG version of it.
I meant it when I said that Git makes source control fun, and I hope that after reading this you come closer to agreeing with me.
Passwords are a nightmare! Username and password combinations have been the dominant form of authentication since the inception of the internet, but they have many issues, both technically and procedurally. According to the 2021 Verizon data breach investigations report, password-based attacks were responsible for over 80% of data breaches in 2020. Users have to remember dozens of passwords; which often leads users to create less secure passwords, jot them down in insecure locations (like sticky notes) or reuse the same password across multiple accounts. In many cases they can be cracked quite easily, and sometimes if a malicious attacker can obtain a password hash (a password’s cryptographic representation) they may not even need to crack it to gain unauthorized access to a user’s account. Perhaps worst of all, the security community has spent the better part of the last couple of decades giving users bad advice – as it turns out, substituting letters for special characters, numbers, and mixed cases has only resulted in passwords that are difficult for users to keep track of and still not secure against modern attacks. Aside from the obvious security issues, this also demands a lot of overhead with support teams having to do constant password resets and account unlocks. Gartner found that between 20%-50% of all helpdesk calls are for password resets. In reality, the internet and computing in general were not built with security in mind.
Steps Forward
The security community has spent years trying to rectify mistakes of their own as well as those of computer scientists and engineers from days of old. We’ve made a lot of great strides in that time, but there are many hurdles to jump through still. Re-educating users to create more secure passwords is a logical choice. We now know that length is the most important factor for security in a password and are shifting more towards the term “passphrase” rather than “password.” A short 4-word phrase with spaces that means something to the user, but may otherwise sound nonsensical, is both easy for a user to remember and extremely difficult to be guessed by a computer as demonstrated by this popular XKCD comic.
While this is a seemingly good solution, as the saying goes, “old habits die hard.” Undoing the damage we’ve done via poor education is challenging at best, and technical enforcement of a password policy that supports this is somewhere between extremely difficult and impossible.
Password managers such as LastPass help somewhat in this regard. With a password manager, a user only needs to know one password to access their password manager’s “vault” which then generates secure passwords, stores them, and auto-fills them across websites. The problem here is somewhat the same as the latter – it’s a habit change. Encouraging users to use a password manager is somewhat easier since it provides some convenience to them as well, but it is still a small learning curve and some people just don’t like change. Even if users do adopt a password manager, there is little to stop them from storing the same insecure passwords within it.
Another significant improvement has been the increased use of single sign-on (SSO.) Like a password manager SSO allows the user to only have to remember a single password, but rather than auto-filling, an SSO service serves as the identity provider (IDP) and authenticates to the application without using an individual password for each specific application.
Perhaps the most significant improvement that we’ve made is the increased enforcement of multifactor authentication (MFA.) That is taking adding an additional authentication factor on top of the first factor, typically being a password. Common factors include something you know (passwords, security questions, etc.), something you have (an authenticator app on your phone, a hardware token, SMS-based code, etc.), and something you are (biometrics.) The benefit here is that even if a user’s password is compromised they can not use it without access to the second factor. MFA should always be enforced in conjunction with secure passwords, password managers, and SSO. Still, even with MFA enabled an attacker can often deduce whether they have obtained or guessed the correct password. Since many tend to reuse passwords between multiple accounts, an attacker could use this information to gain access to another service where MFA isn’t enabled or supported.
What’s Next
The information security community has brought password security a long way, but despite our best efforts we have failed to stop poor password practices and passwords are still, by a large margin, the number one vector exploited by attackers. So the next logical step? We stop using them. Yes, you read that correctly. One of the most modern approaches to this problem is the passwordless authentication model.
You may be wondering how this works. In the traditional model of MFA discussed above, passwords are typically the first authentication factor, but they don’t have to be. In a passwordless model we opt for a different factor – the device you are logging in from. A passwordless authentication service cryptographically ties a user and their trusted device together. When the user goes to login from their device, they will no longer be prompted for a password. Instead the user is redirected to an agent installed on the device; which automatically checks that the user and device match up with who they say they are, and then signs them into the app.
So does this mean all of our prior efforts go to waste? Not at all; in fact, for this model to actually be more secure, it needs to be paired with additional security measures. MFA is especially important. In addition to being on a trusted device, a user must be able to authenticate themselves another way, ideally with something convenient such as a fingerprint or a push notification on their phone. Passwordless authentication also works best in conjunction with SSO either by being built into the SSO solution, as is the case with Okta device trust, or with an additional 3rd party IDP such as Beyond Identity.
This offers us a lot of additional security benefits. Most importantly the issue mentioned above, that passwords are the number one attack vector, goes away. With no passwords, we can significantly reduce our attack surface and in doing so, when implemented properly apps and services can be accessed only by that user on their known and trusted devices. This also gives us the ability to run checks to make sure devices are secured, by measures such as antivirus and encryption, before allowing them to be trusted to authenticate a user at all.
Is all of this practical? It is — in fact, we’re doing it here at Ginkgo today! While we haven’t shifted entirely to passwordless, our employees can opt-in to this model at any time. Users who have gone passwordless are happy with the added convenience, security is happy with the reduced attack surface, and our help desk is happy to have fewer password resets and account unlocks to do. Passwordless authentication is still quite new. “Passwordless” doesn’t exactly equate to “password-free”, the device you trust for example will still need to be authenticated in some way, for most desktop operating systems that means a password. For the most part, passwordless authentication only extends to enterprise applications as consumer products generally don’t let you change your authentication method. This is where password managers still come in handy. But, overall the reduction in the use of passwords significantly mitigates many of the most common cyber attacks.
A couple months ago I came across this post on why young people seem to prefer working in ad tech than biotech. Given that I spent 10 years at a couple ad tech companies, and the past 5 years at a synthetic biology company, I have some opinions on the subject, and wanted to share them. Consider this my attempt at addressing two of the points raised in the post: Educating people about the opportunities in synthetic biology, and giving my own example of an outsider who has found some success in this field.
In this post, I have two audiences in mind. The first is people in synthetic biology who want to understand how we can bring over people in ad tech. The second is people currently working in, or destined for, ad tech, who might be interested in synthetic biology instead.
My Story
In 2004, I was three years into a computer science grad program and decided to drop out, so I started looking for a job. At that time, biotech was not on my radar, and to be honest, I don’t think someone like me was on biotech’s radar. I applied to some of the companies you might expect, and was lucky enough to land a job at Google. I don’t know how most people think of Google, but it is primarily funded by advertising, so I would definitely count it as ad tech. I worked there for four years, and learned a lot about how the company works internally.
I then worked at a startup ad tech company called Fiksu for six years. The company brokered ads to encourage people to download customers’ apps. I was an early employee and watched as the company grew like crazy, but near the end of my time there it started to shrink like crazy. The short version is Facebook ate our lunch. I learned a lot about Ruby on Rails and Postgres while I was there, which helped me to land my current job at Ginkgo.
At this point, you’re probably wondering why I started looking for a job in biotech. One reason is that when you live in the Boston area, you can’t avoid running into biotech. In 2009 I moved to Cambridge, Massachusetts, and noticed a company in my neighborhood called Codon Devices, an early DNA synthesis company. This was my first hint that people were trying to engineer biology. Many employees at Codon Devices would go on to found another company called Gen9, which eventually became the DNA synthesis team at Ginkgo.
Another reason is that I read a book by Eric Drexler called Radical Abundance, which described how nanotechnology could be used to manufacture pretty much anything. I think eventually Drexler’s vision could be achieved, but I agree more with Tom Knight when he says “Biology is nanotechnology that actually works,” meaning it’s probably easier to adapt something that is already working at nanoscale instead of building something from scratch. But Radical Abundance opened my eyes to how things can be engineered at the molecular level, something that Ginkgo is very much interested in.
The final reason is that, to me, synthetic biology can be the basis for a lot of fundamental change. Ad tech companies are concerned with pushing electrons around, often at great scale. In biology you’re pushing molecules around, something a million times more massive than electrons. Molecules are the building blocks for things that people use every day, like food, clothes, and buildings. If we can grow more of these things instead of making them from synthetic materials, I think the world will be in a much better place.
Anyway, I joined Ginkgo in 2016, and I’ve been here ever since. So I’ve had a few years to compare what it’s like to work as a software engineer here with working in ad tech. There are a few differences I’d like to highlight, and there are tradeoffs, so if you are currently working at an ad tech company, synthetic biology might not be your thing. But there are a lot of people working in ad tech, and I suspect synthetic biology might be interesting to some of them.
Synthetic Biology Compared With Ad Tech
With synthetic biology, there are far worse outcomes than a user misclicking an ad, which is one reason why Ginkgo and Concentric have worked to build up a Covid testing network across the U.S. which has the potential to be used for testing for other diseases. More importantly, there are some really amazing outcomes of synthetic biology too, and I feel Ginkgo is playing a major role in delivering them. I sometimes worry that my friends find me insufferable for talking about how Ginkgo is working on ways to help with climate change and disease. But, in terms of helping humanity, I’d much rather be working on synthetic biology than advertising.
One tradeoff for software engineers is that in ad tech, you are basically at the top of the heap. Sure, there are deep learning researchers and certain other skilled people who probably make more in ad tech, but software engineering there is pretty central. Software provides the product that customers are paying for. In synthetic biology, software engineering helps to support many of the other teams, which are the ones actually involved in producing the end product. If Ginkgo’s mission is to make biology easier to engineer, I think of my role as making it easier to make biology easier to engineer. It’s a somewhat humbling experience to join such a company, but I like being surrounded by people who have diverse knowledge and expertise.
As for the nature of the work, it’s quite different. In ad tech, there’s a need for scale in terms of pure information. I’ve worked on systems that processed thousands of events per second. At Ginkgo, we process tens of thousands of samples a day, so in pure information terms, it’s not nearly as much. (I would add that this number is growing exponentially, so I expect it to get quite large fairly soon, but it’s starting from a low base.) But synbio is much more complex in terms of domain knowledge. Ad tech is a relatively young field, and typically people there want to store, aggregate and filter the data using relatively simple operations at great scale. Biology is an older discipline than computer science. In the lab, there are many different patterns of sample transfers that users want to do. There are bioinformatic operations on DNA sequences we compute, like PCR and homologous recombination. And sometimes we do need to help scale our systems and even implement better algorithms, like when we optimize database queries for circDNA lookup. I feel as intellectually challenged at Ginkgo as I was at ad tech companies, but the nature of the challenge is different, and it helps a lot to be genuinely curious about molecular biology. Not everyone on the outside is, but I think a lot of outsiders to synthetic biology aren’t aware of the interesting challenges of writing software in this domain.
The Migration to Synthetic Biology
So if synthetic biology is exciting and intellectually challenging (and to me, it definitely is), why aren’t more people moving to it from ad tech? It’s been over ten years since one Silicon Valley engineer noted that “The best minds of my generation are thinking about how to make people click ads.” But I don’t think all that much has changed yet. From the perspective of someone starting in ad tech today, Google, Facebook, and Amazon (yes, they do ads too) are big companies that are well known both to pay well and to be continually hiring for people with CS degrees. Generally, biotech companies aren’t yet well known in this regard.
Also, if you’ve been at a big tech company for a while, maybe you have a family, or you look at a field like biology and realize there’s a lot to learn, and it’s hard to picture changing jobs. And I can confirm that there is a lot to learn, and it takes time to get the big picture as well as lots of specific details about how things work in the lab. That said, I’ve found it to be very rewarding as a learning experience. There are a lot of software engineers at Ginkgo who don’t have a formal background in biology, so we are continually working on ways to share biological knowledge with people on the Software team.
Additionally, I’m aware of both software veterans and people just starting their careers who are interested in synthetic biology, so based on my own sample set of people, it’s not clear to me that ad tech people will automatically be uninterested in synbio or believe it’s not something they’re capable of learning.
Finally, I think it’s still early days. In the 1960s and 1970s people knew about computers, but most didn’t have direct experience with them. Tech companies existed, but they weren’t nearly as big in the economy as they are today, and working as a computer programmer wasn’t a conventional career path. I think working in cell programming is in a similar place today. It isn’t a standard career path right now, and it will take time for it to become one. I think if Ginkgo and other synthetic biology companies build on their successes, synthetic biology will be on the radar of more people. Give it time.
All that said, if synthetic biology is interesting to you and you’d like to be a part of a future where we program cells in addition to computers, Ginkgo is hiring!
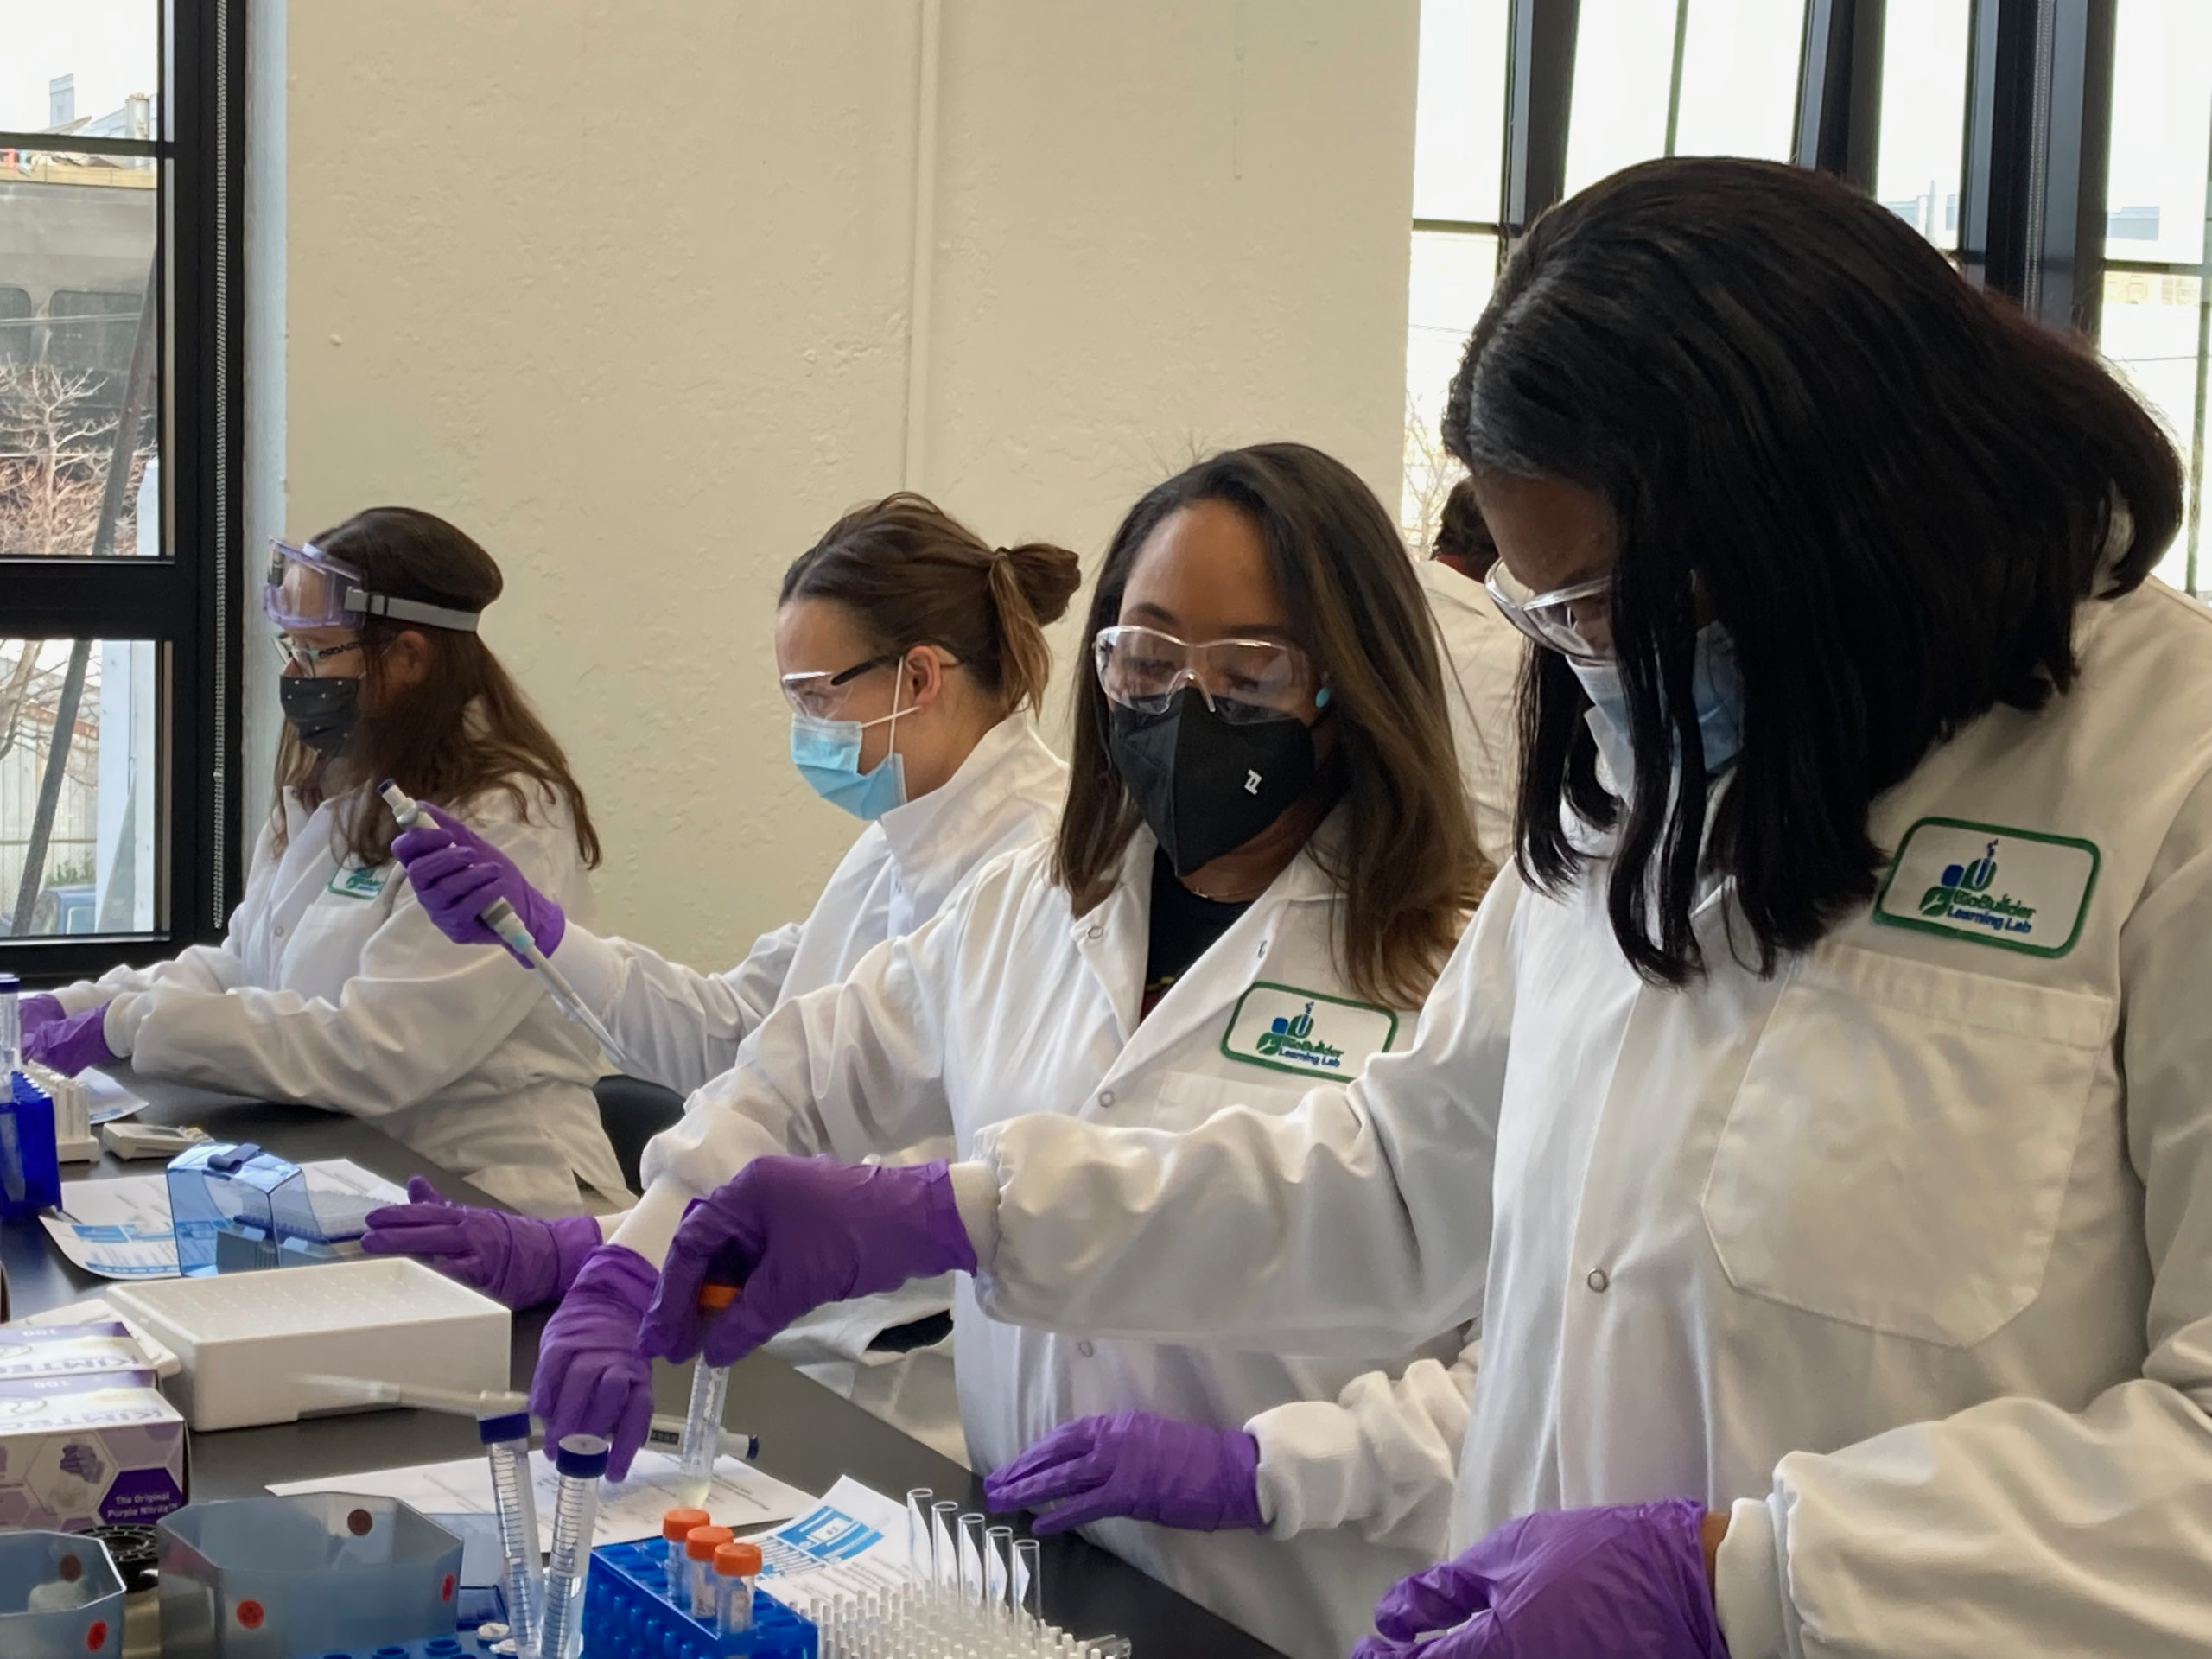
A few months ago, a number of us on the Digital Tech team had the opportunity to participate in a pilot of an introductory course in molecular and synthetic biology. Developed and taught by Natalie Kuldell and BioBuilder specifically for the “non-biologists” working at Ginkgo Bioworks, this week-long class was roughly divided evenly between classroom instruction and hands-on lab time.
In the classroom, we learned the foundations of molecular biology, from the structure of DNA and RNA, to codons, promoters, ribosomal binding sites, and primers, to protein synthesis,transcription, translation, DNA replication, and PCR. “[P]erhaps the most astonishing feature of biology is that it runs on digital code in the form of DNA, which makes it possible for us to imagine building such living machines. The code is made up of A’s, T’s ,C’s, and G’s, and we can read and write it to program cells like we program computers.” As a software engineer, this idea has always intrigued me, but until taking this course I had never fully appreciated the depth of this statement. When engineering an organism, you can componentize the A’s, T’s, C’s, and G’s into building blocks of different levels of abstraction, much like you can abstract the 1’s and 0’s of a computer program into higher level statements, functions, services, and systems.
Personally, perhaps my favorite part of the course was actually engineering an organism in the laboratory. We transformed different plasmids into samples of bacteria — which is to say, we actually inserted DNA into living organisms and “programmed” them to do things for us! (In our case, we caused the bacteria to produce different colored pigments.) We later sent the samples upstairs to one of our Bioworks (BioBuilder and Ginkgo Bioworks are both located in the same building) to have them sequenced.
I very much enjoyed this course and now I more fully appreciate the work that my colleagues in the lab do each day that I help to support. Two of my colleagues from DevOps, who took the course with me, will now share their thoughts.
Dannerys Duran
I started my career at Ginkgo 4 years ago and my current role is as a DevOps Manager. I joined intending to help make biology easier to engineer. But at some point, I thought, “how do I contribute without a biology background”? Many other great contributors aren’t scientists either, and they do it, so I decided to just dive in and do my best. As the company grew, so did the non-scientific employees’ interest in learning about what happens in the lab. That’s how small sessions of BIO101 were born. Tom Knight initially hosted these sessions at Ginkgo, but they were never formalized as an official offering. However, the interest from individual contributors in Digital Tech is to learn more about what goes on in the labs and how we could bring technology closer to science. That’s how a BIO101 class of 4 half-days came about.
Having the opportunity to go to BIO101 was an eye-opener for me on how engineering biology works and how the magic happens in the lab. We learned how DNA is structured, the different types of DNA, retrieving reagents, growing overnight cultures, verifying DNA, testing it, how to analyze it, and much more. We also learned about some essential tools in the workbench and how to use them. Some of the tools included pipettes, glass tubes, cuvettes, vortex, incubators, reading the absorbance using the spectrophotometer, and of course, a lab coat, glasses, and gloves — because safety first!
The instructor was passionate about everything biology offers and was excellent at transmitting that passion through her class. She made learning about promoters, inverters, the system, and different growth phases (LOG, LAG, and stationary) easy.
Going into the lab and creating experiments on what we learned after each session, understanding the how and why of all the different components or compounds can yield a variety of results, and how to interpret them. The experience was exciting and enlightening because it better explained what the scientists we support actually do every day.
One of the class highlights was sequencing our samples using our homegrown tools, as it was very close to what the process is like for the scientists. After the experience, I decided to stick to computers! However, it provided a much more clear understanding of all the commonly used terms and practices around synthetic biology. I am able to now engage in conversations where I wouldn’t have understood the biological side of things before.
By any means, I wouldn’t say I am a biology expert, but I now have a better understanding of the practice on how to make Biology easier to engineer.
Jim Waldrop
I graduated from a top-tier university with a bachelor’s and master’s degree in Electrical Engineering and Computer Science. However, the last time I touched biology was in high school, and I’d never touched modern bioinformatics or synthetic biology at all. Despite having personal connections who did quite a bit of synthetic biology, I could never quite grasp some of the fundamentals. This class changed that.
I learned about DNA transcription and protein synthesis, binding sites, and our current understanding of how ribosomes work. I learned what metabolomics and proteomics are, as concepts, and why you can’t just code a bunch of “logic gates” into a strand of DNA without taking into account all of the other metabolic pathways in a cell or organism. We got to see how genes are encoded, and how you can have a single base pair be part of up to 6 genes at a time, theoretically, so it really drove home to me how careful you need to be when rewriting or inserting DNA into a cell to make sure that you’re not altering other genes when you do it. I learned enough to understand why we don’t just have ‘compilers for cells’ – imagine having to recompile every bit of software on your computer, including the operating system, every time you wrote a small program! That’s the problem you’d need to solve if you wanted to “just make a compiler, but for DNA”!
These are concepts that I’d been struggling to grasp for years, but just being able to sit down and have someone talk through them in a short course was what I needed.
My team maintains quite a large amount of computational resources for our Foundry scientists to use to “do bioinformatics”. Previously, we were stuck just handwaving away the specifics of what our users were doing, and just provisioning our systems for the use case of “They’re doing bioinformatics! It’s science! They need compute resources!” Now I can use the knowledge I got from this class to extrapolate what our users in the Ginkgo Foundry are using these computational resources for. I already have a background in classical computer science; I understand algorithmic run times, and I’m familiar with maintaining enterprise-scale computing systems. But to properly maintain such a system, you really do want to understand what it’s being used for. This insight will help us across our entire computing infrastructure, and that will allow our scientific users in the Foundry to get their jobs done better and faster.
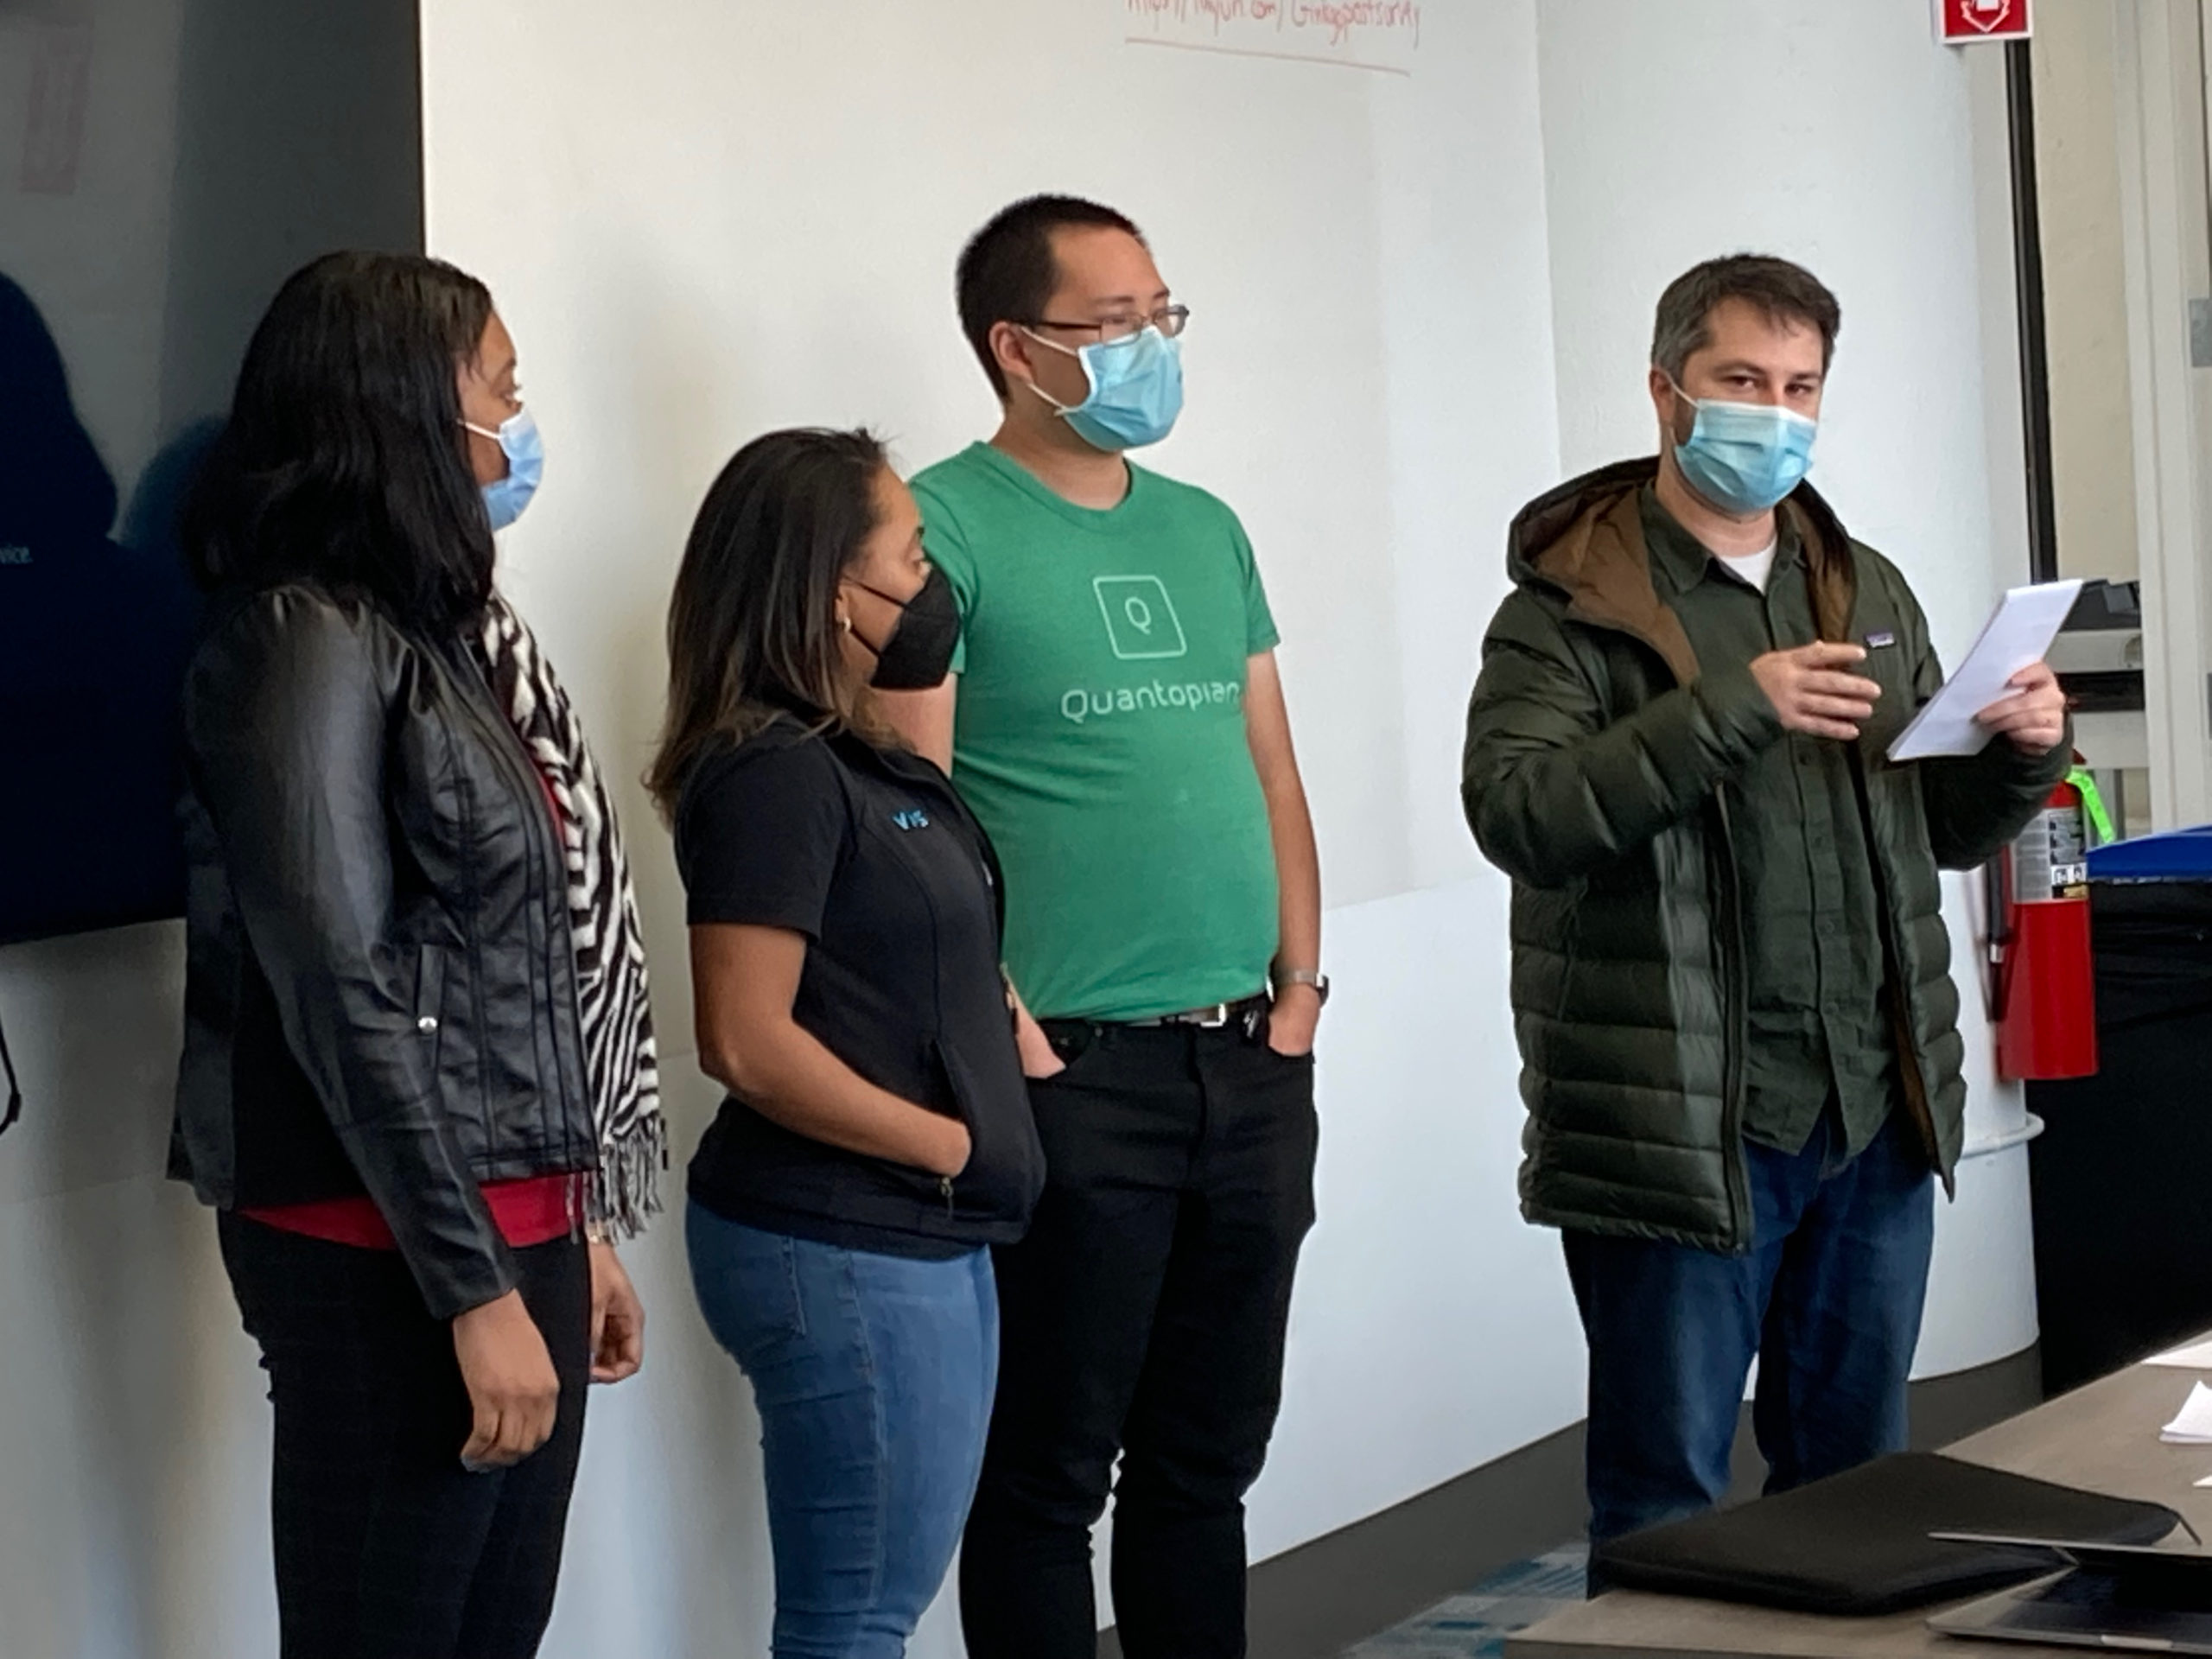
Transforming plasmids into a couple of strains of E. coli. Photo by Natalie Kuldell.Colonies of bacteria that we engineered to make a purple pigment. Photo by Natalie Kuldell.At the end of the couse, we presented our ideas on how we could engineer organisms to make the world better. Photos by Natalie Kuldell.
(Feature photo of a lapel pin representing a promoter, ribosomal binding site, and coding region by Natalie Kuldell)